


How I did my own composite bonding
The original kit I got has been removed but this one looks identical:

U also need a dental light cure:
A dental file:
Or you can use an electric nail file like this one bcus it’s cheaper it will just be harder to make the teeth look good I assume)
You need Dental shaping tools just look on Amazon or eBay
U also need a cheek retractor, disposable gloves and whitening strips.
So firstly I whitened my teeth using purple whitening strips.(you should be whitening ur teeth for a while weeks before doing ur teeth so they are white as possible when u do the bonding,bcus u can’t whiten them afterwards.)
Then I flossed and used mouth wash.Then I brushed my teeth and dried them off with cotton pads.its important ur teeth stay as dry as possible when doing this so try to limit ur saliva.
I put layers of tissue up inside gums to protect them and then I used a cheek retractor-(The thing dentists used to stretch ur mouth to see ur teeth)
Use disposable gloves when doing all of this:
Step 1: Etching
Put a thin layer of etch (phosphoric acid 37%) to the enamel where you are going to do the bonding.
Wait 30 seconds then wipe it off immediately with a dry cotton pad.Dont leave it on longer cus this can damage the teeth
Ur enamel should look chalky.
Step 2: Bonding
Put a thin layer of the bonding agent over the etched area and spread it evenly to cover all surfaces where the resin will touch.
Light cure using a 420–460 nm, 1500 mW/cm² curing light (or stronger if you can find that) for 30 seconds.CLOSE UR EYES WHEN CURING BCUS THE LIGHT ISNT SUITABLE FOR EYES.just keep the light shining on the area and close ur eyes.
It should be very slightly sticky.
This is the glue layer
Step 3: Composite Resin
The kit comes with multiple shades of resin.Pick the one closest to ur natural teeth.A1 is the lightest and it goes down from there.I used shade A1
Squeeze a small amount of composite resin onto the teeth u already prepared.u can also squeeze it into ur fingertips first to make sure u got the right amount and mould it that way.
Once on ur teeth shape it with a dental tool,u can also use ur fingers to help mould it
If the gap or area is thick, work in thin layers
(Also if ur doing this to fix a gap between teeth-make sure u add a line in the middle of the composite between those 2 teeth so it looks natural and not like u just stuck something in the middle)
Step 4: Light Curing
Position the curing light directly over the resin without touching it.
Cure each layer for 40-60 seconds.CLOSE UR EYES WHEN CURING.
Add more layers if needed and cure each separately.
It should be hard and feel stable after this if don’t correctly.
Step 5: Shaping and Polishing
It will probably look and feel bulky so use an electric dental file to file it down and make it flat and smooth like real teeth.U can also use an electric nail file,that’s cheaper.make sure you don’t accidentally file ur real teeth tho.
Also make sure you Check your bite. close teeth to remove excess resin interfering with normal biting and make sure you can still talk and close ur mouth normally
Polish the surface with a soft brush or polishing strip for a natural shine.make sure the teeth don’t look like a horse or bulky or anything like that.
Step 6: afterwards
Avoid hard, sticky, or staining foods for the first 2-3 days so u don’t damage it or stain it
If the resin chips or discolours, it can be polished or reapplied.
Also only drink coffee sodas etc etc through a straw from then on,or else it can stain the teeth overtime.
So yeah I’ve had this for 8 months and had no problems so far.
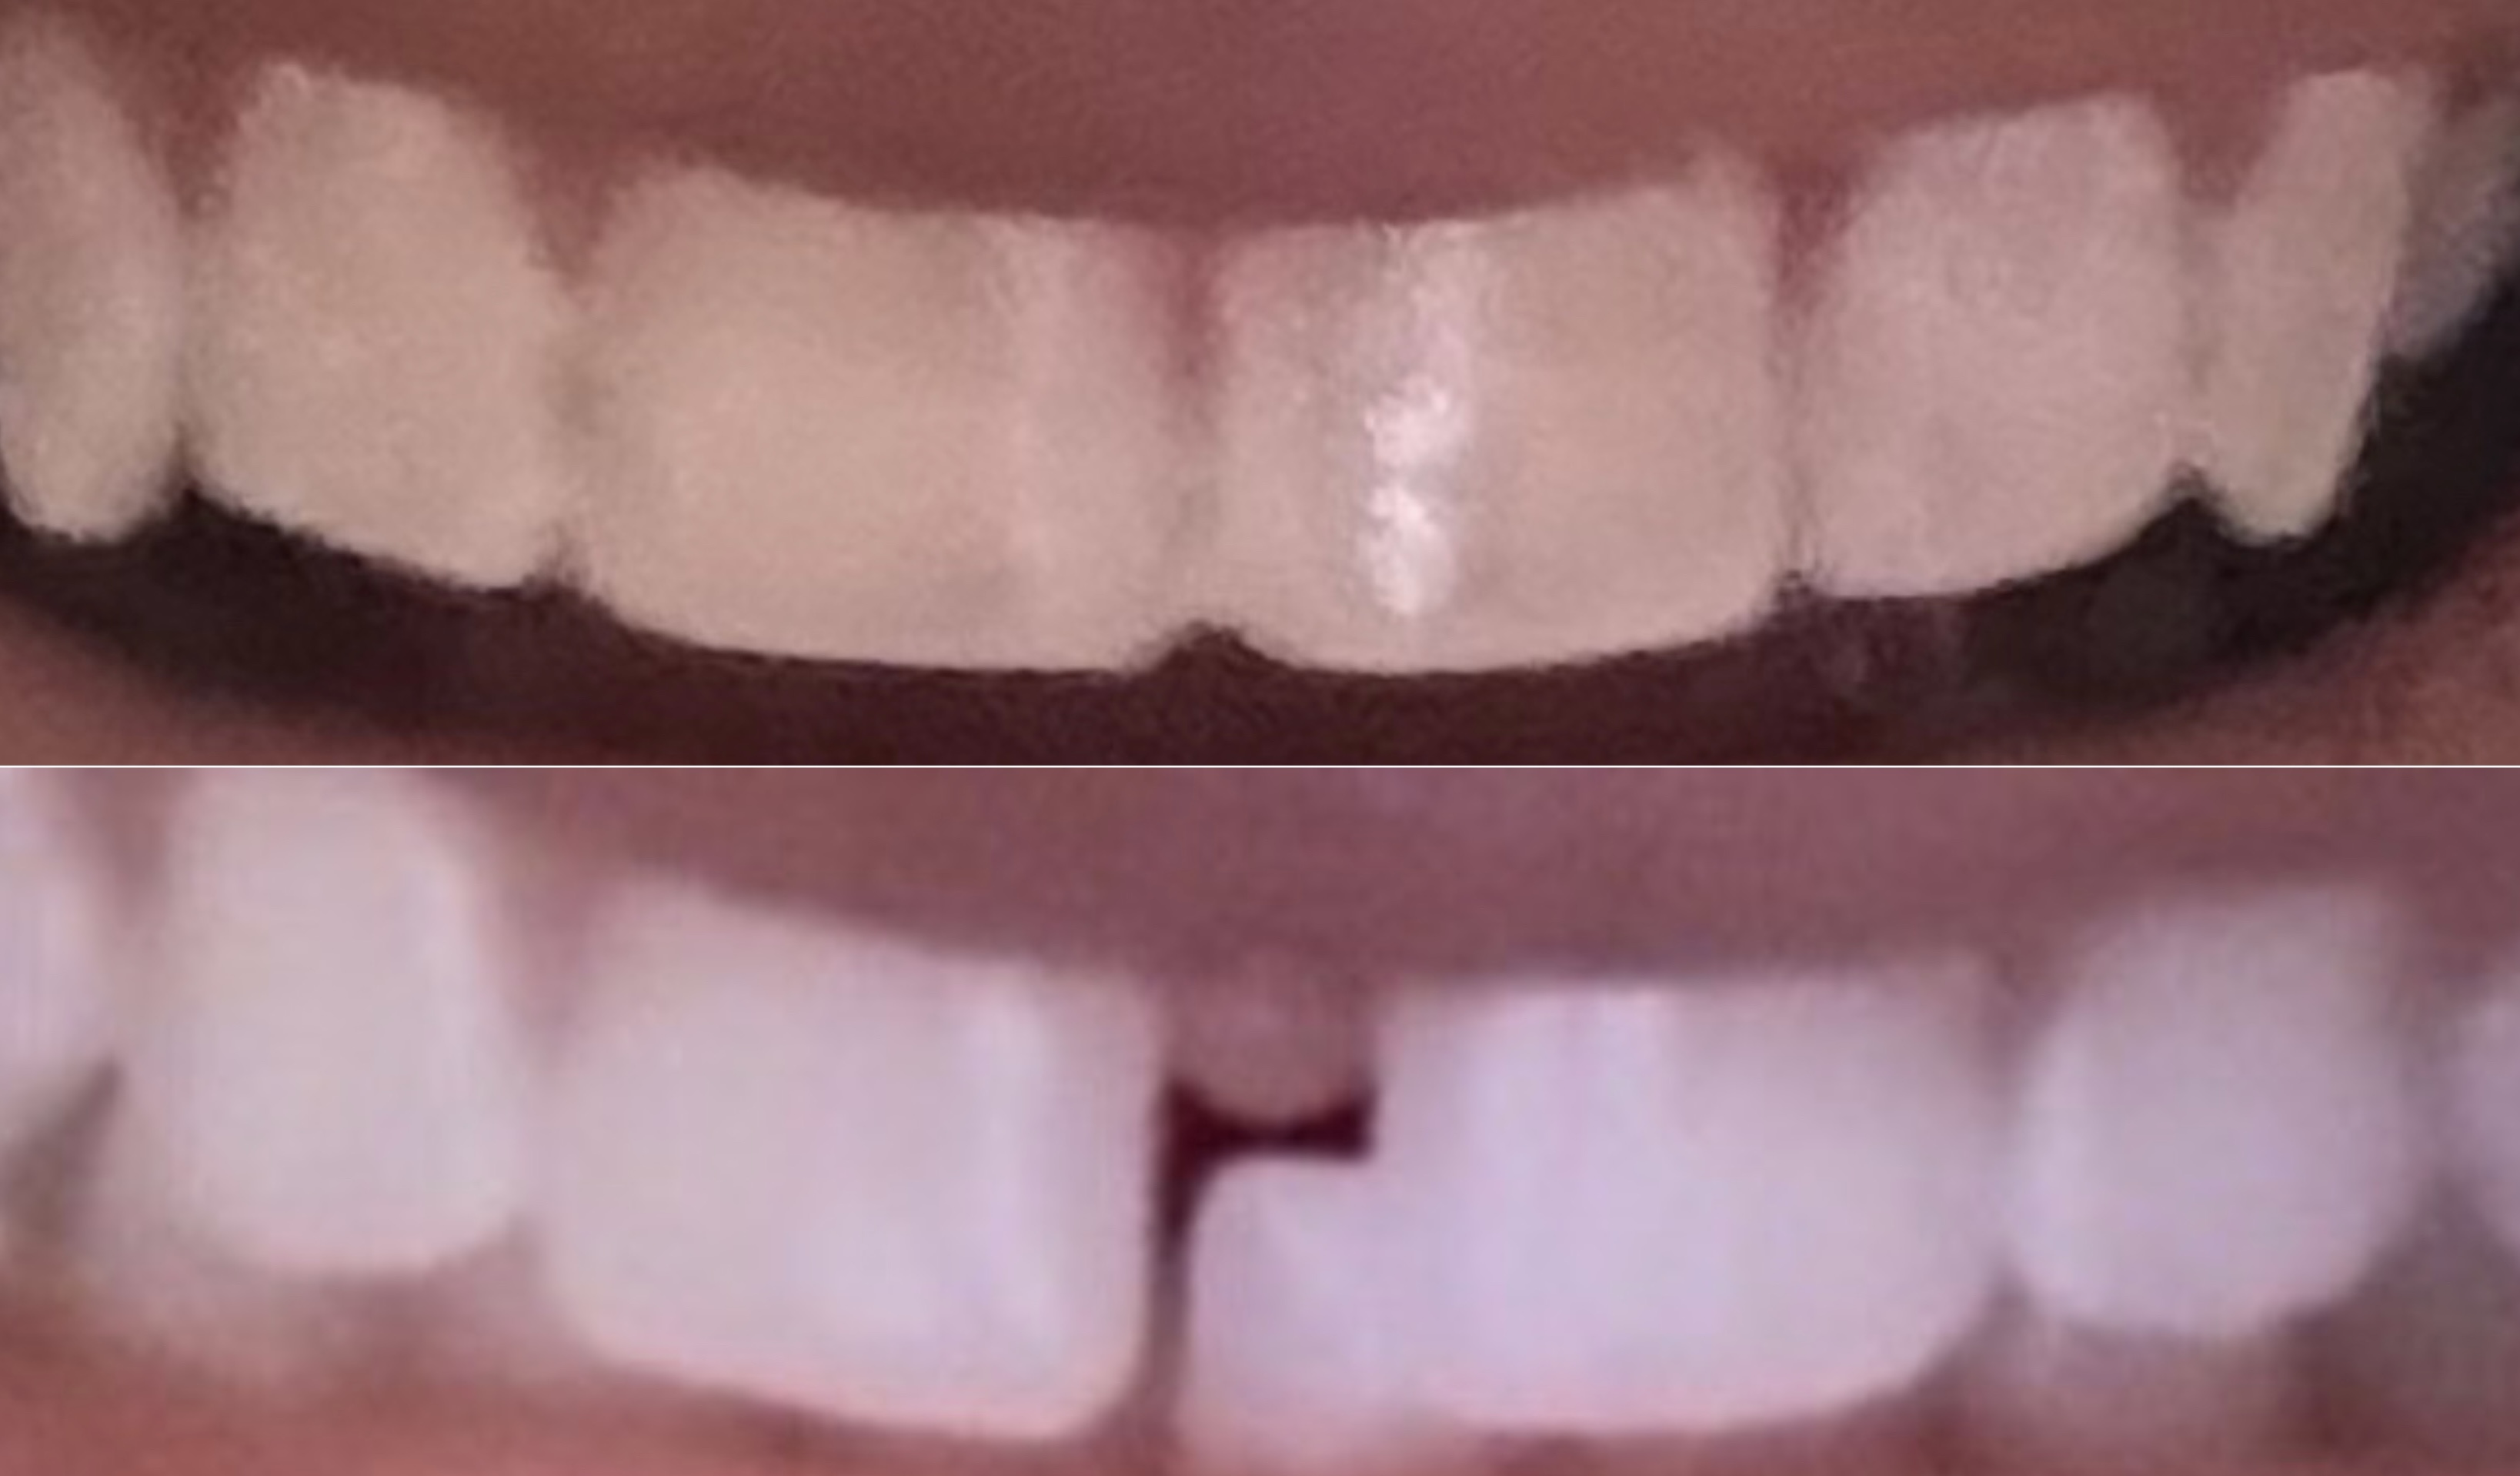
My before is below and after on top-lowkey my teeth look yellow in the after it’s just lighting.
The original kit I got has been removed but this one looks identical:
PRIMEDENT Visible Light Cure Resin Based 7 Composite Bonding Dental Restorative | eBay UK
Strong Bonding : Superior bonding agents enhance adhesion, reducing the risk of sensitivity and failure. 7 Composite, Bonding & Etch Kit. 1 x Brush Holder. Durability : Formulated for long-lasting restorations, minimizing wear and tear.
ebay.us
U also need a dental light cure:
A dental file:
Or you can use an electric nail file like this one bcus it’s cheaper
it will just be harder to make the teeth look good I assume)You need Dental shaping tools just look on Amazon or eBay
U also need a cheek retractor, disposable gloves and whitening strips.
So firstly I whitened my teeth using purple whitening strips.(you should be whitening ur teeth for a while weeks before doing ur teeth so they are white as possible when u do the bonding,bcus u can’t whiten them afterwards.)
Then I flossed and used mouth wash.Then I brushed my teeth and dried them off with cotton pads.its important ur teeth stay as dry as possible when doing this so try to limit ur saliva.
I put layers of tissue up inside gums to protect them and then I used a cheek retractor-(The thing dentists used to stretch ur mouth to see ur teeth)
Use disposable gloves when doing all of this:
Step 1: Etching
Put a thin layer of etch (phosphoric acid 37%) to the enamel where you are going to do the bonding.
Wait 30 seconds then wipe it off immediately with a dry cotton pad.Dont leave it on longer cus this can damage the teeth
Ur enamel should look chalky.
Step 2: Bonding
Put a thin layer of the bonding agent over the etched area and spread it evenly to cover all surfaces where the resin will touch.
Light cure using a 420–460 nm, 1500 mW/cm² curing light (or stronger if you can find that) for 30 seconds.CLOSE UR EYES WHEN CURING BCUS THE LIGHT ISNT SUITABLE FOR EYES.just keep the light shining on the area and close ur eyes.
It should be very slightly sticky.
This is the glue layer
Step 3: Composite Resin
The kit comes with multiple shades of resin.Pick the one closest to ur natural teeth.A1 is the lightest and it goes down from there.I used shade A1
Squeeze a small amount of composite resin onto the teeth u already prepared.u can also squeeze it into ur fingertips first to make sure u got the right amount and mould it that way.
Once on ur teeth shape it with a dental tool,u can also use ur fingers to help mould it
If the gap or area is thick, work in thin layers
(Also if ur doing this to fix a gap between teeth-make sure u add a line in the middle of the composite between those 2 teeth so it looks natural and not like u just stuck something in the middle)
Step 4: Light Curing
Position the curing light directly over the resin without touching it.
Cure each layer for 40-60 seconds.CLOSE UR EYES WHEN CURING.
Add more layers if needed and cure each separately.
It should be hard and feel stable after this if don’t correctly.
Step 5: Shaping and Polishing
It will probably look and feel bulky so use an electric dental file to file it down and make it flat and smooth like real teeth.U can also use an electric nail file,that’s cheaper.make sure you don’t accidentally file ur real teeth tho.
Also make sure you Check your bite. close teeth to remove excess resin interfering with normal biting and make sure you can still talk and close ur mouth normally
Polish the surface with a soft brush or polishing strip for a natural shine.make sure the teeth don’t look like a horse or bulky or anything like that.
Step 6: afterwards
Avoid hard, sticky, or staining foods for the first 2-3 days so u don’t damage it or stain it
If the resin chips or discolours, it can be polished or reapplied.
Also only drink coffee sodas etc etc through a straw from then on,or else it can stain the teeth overtime.
So yeah I’ve had this for 8 months and had no problems so far.
My before is below and after on top-lowkey my teeth look yellow in the after it’s just lighting.
Attachments
Last edited: