Fundamental GIMP Morphing Guide (Photoshop Alternative)

How to use GIMP to perform detailed photo editing/morphing.
i. Introduction & Installation
GIMP (GNU Image Manipulation Program) is a free, open-source alternative to Photoshop. It's powerful enough for professionals, but if you can understand the basics, its superior to basic browser/mobile editors as these alternatives lack the precision to produce good morphs. For our use case, I believe it's the most accurate software to perform morphs whether its for surgery simulation, frauding, or wasting time. It's also completely free.
Installation
___________​
For both Windows and MacOS, navigate to gimp.org and download. Run the installation and launch the app. If you're too retarded to do this, you might as well stop here.
(Optional) For a cleaner user interface, you can navigate to​
and follow the installation instructions.
From here, launch the application.
ii. Initial Configuation and Interface Overview
a) Upon first launch, GIMP presents a multi-panel interface consisting of three primary components:​
  • Toolbox Panel (left): Contains selection, painting, transformation, and color tools
  • Image Canvas (center): The primary workspace for image display and manipulation
  • Dockable Dialogs (right): Provides access to layers, channels, paths, brushes, patterns, and gradients
For improved workflow efficiency, navigate to Windows > Single-Window Mode to consolidate all interface elements into a unified workspace.​
b) Opening and Importing Images

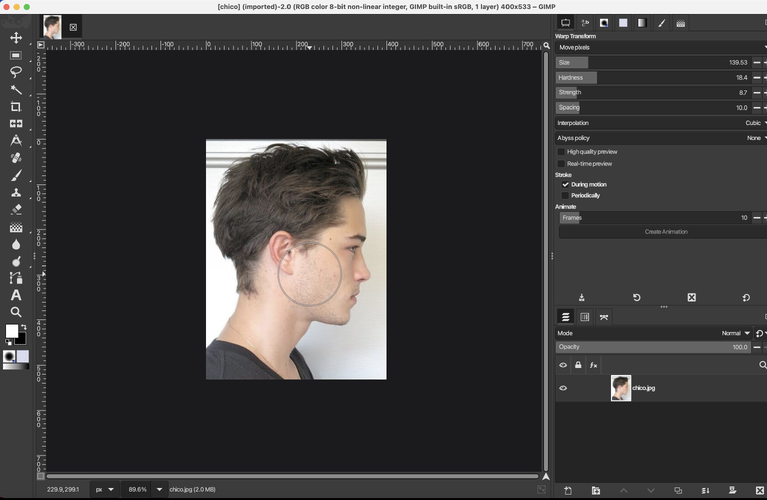
Access File > Open to load existing images, or utilize drag-and-drop functionality to import files directly onto the canvas. Should look like the figure below.


Screenshot 2025 10 23 at 22309PM
Figure 1. Opening an image post installation


iii. Fundamental Image Adjustments
A. Selection
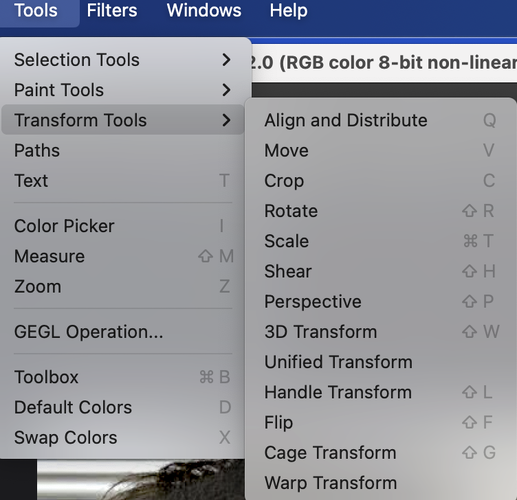
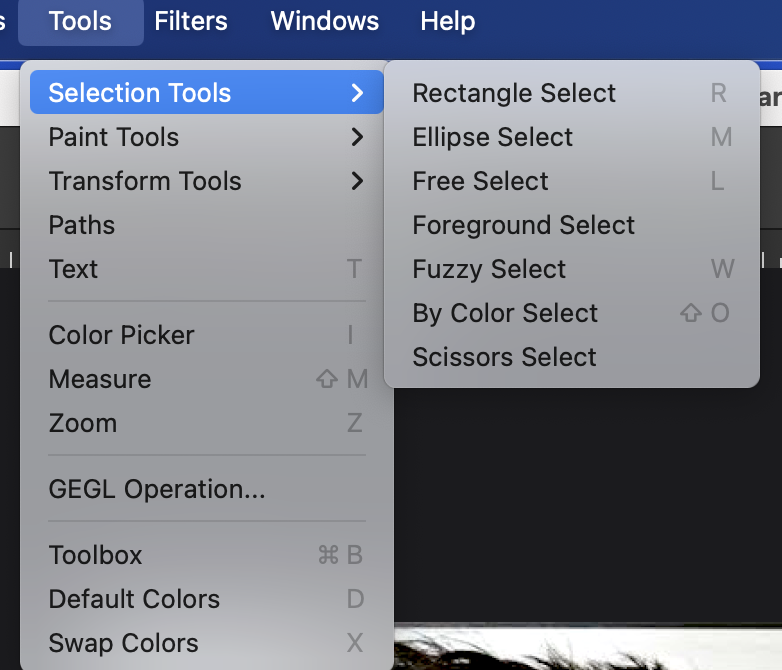
  • For many of these edits, going to Tools > Selection Tools > Free Select or Fuzzy Select will enable you to localize changes, instead of the entire image. Can also be actived with shortcuts. (Shortcuts may vary, viewing the menu should tell you what they are).
  • Free Select is useful for isolating eyes, lips, nose, or facial contours.
  • Fuzzy Select is effective for applying global skin adjustments while excluding hair, eyes, and background
Screenshot 2025 10 23 at 25531PM

Figure 2. Selection Tool Menu, MacOS

B. Selection Feathering for Natural Transitions​

  • Navigate to Select > Feather
  • Apply 3-10 pixel feather radius for facial feature adjustments
  • Larger feather values (10-20 pixels) for skin tone modifications affecting larger areas
  • Creates gradual, undetectable transitions between adjusted and unadjusted regions
  • Good for maintaining natural appearance in portrait retouching

C. Brightness and Contrast​

  • Navigate to Colors > Brightness-Contrast
  • Adjust sliders to achieve optimal tonal balance
  • This method provides rapid correction for underexposed or low-contrast imagery

D. Levels Adjustment​

  • Access Colors > Levels
  • Manipulate the three control points beneath the histogram:
    • Left slider: Defines the black point (darkest values)
    • Right slider: Defines the white point (brightest values)
    • Center slider: Adjusts midtone values
  • This technique offers superior precision compared to basic brightness/contrast adjustments

E. Curves Adjustment​

  • Select Colors > Curves
  • Click and drag along the curve to adjust specific tonal ranges
  • Create an S-curve configuration for enhanced contrast
  • This represents the professional standard for tonal and color correction

F. Color Temperature Correction​

  • Navigate to Colors > Color Temperature
  • Adjust slider toward blue values for cooler tones, or toward red/orange for warmer tones
  • Effective for correcting artificial lighting conditions or enhancing atmospheric effect
G. Hue-Saturation for Selective Skin Enhancement
  • Access Colors > Hue-Saturation
  • Select Reds or Yellows channel to target skin tones specifically
  • Reduce saturation slightly (5-15 points) for a more refined appearance
  • Adjust hue minimally to correct color casts without creating unnatural results
  • Increase lightness subtly to brighten skin tones selectively


iv. Morphing & Measurements (Bread & Butter)

Screenshot 2025 10 23 at 30048PM
Figure 3. Transform Tools Menu, MacOS


A. Warp Transform Tool for Precise Facial Adjustments

  • Select the Warp Transform tool from the toolbox
  • Adjust size, hardness, strength, etc. as desired.
  • Click and drag directly on facial features to reshape
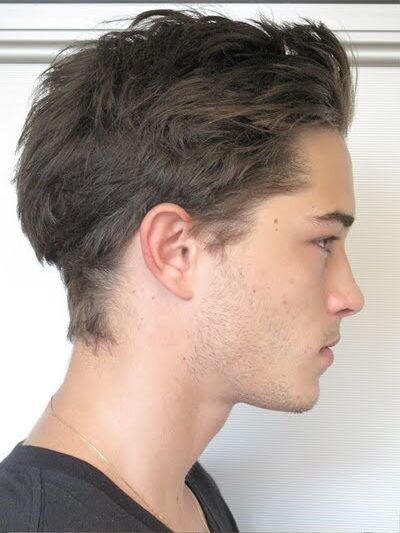
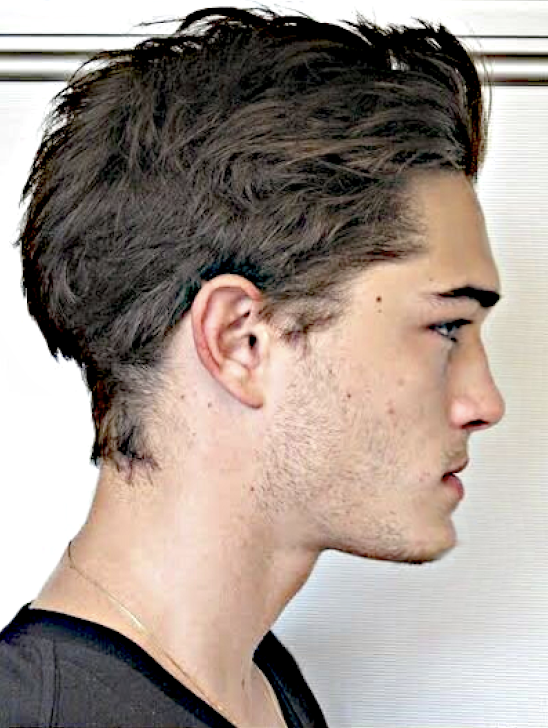
  • Optimal for adjusting facial asymmetry, side profile surgery simulation, subtle facial structure adjustments
Chico
Screenshot 2025 10 23 at 32213PM

Figure 4. Before & After of Chico Lachowski's side profile using warp transform & sharpen tool. Adjusted chin projection and masculinzed nasofrontal angle.
B. Measure (This tool is necessary to calculate angles, ratios, etc.)
_________________
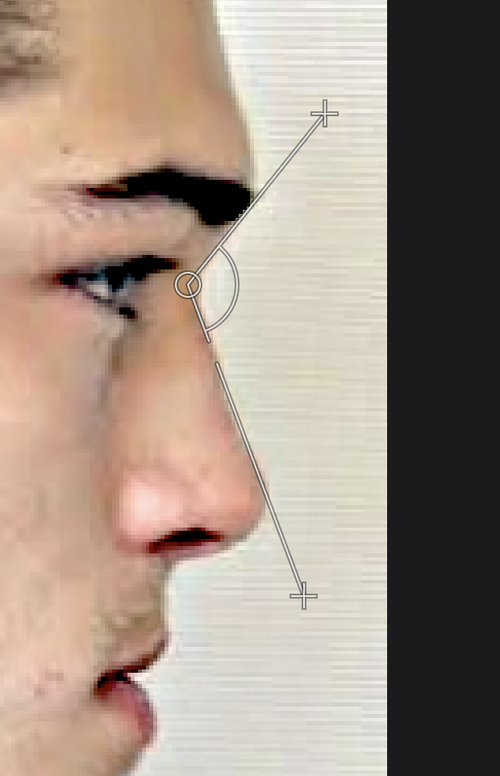
  • Navigate to the tools menu, then select the Measure tab. From here, your cursor will measure distances in pixels when you click, hold, and move the cursor. Pixel lengths should appear on the bottom of the interface.
  • Holding Shift while taking measurements will toggle angle measurements. Ensure the second vector of the angle begins at a vertice of the former measurement.​
Screenshot 2025 10 23 at 33715PM Screenshot 2025 10 23 at 33734PM
  • Unfortunately, I don't believe there is a way to automatically calculate two measurements and their ratios. I write down the pixel lengths then manually calculate.

C. Symmetry Analysis Using Guides and Measurement​

Creating Reference Lines:
  1. Image > Guides > New Guide (by Percent)
  2. Create vertical guide at 50% (facial midline)
  3. Create horizontal guides at key landmarks:
    • Eyes (typically 40-45% from top)
    • Nose base (typically 62-65% from top)
    • Mouth center (typically 75-80% from top)
Measuring Symmetry Deviations:
1. Measure distance from midline guide to left eye outer corner​
2. Measure distance from midline guide to right eye outer corner​
3. Compare measurements to identify asymmetry​
4. Repeat for other bilateral features (eyebrows, cheeks, jaw angles)​
5. Use morphing tools to correct significant asymmetries​

v. Layers & Masks
Honestly, this feature isn't very useful for our use case on this forum, as we're focusing on geometric warping to change shape.
  • Layers: Act as transparent sheets stacked vertically, with each sheet can hold part of an image, whether its text, effects, or components.
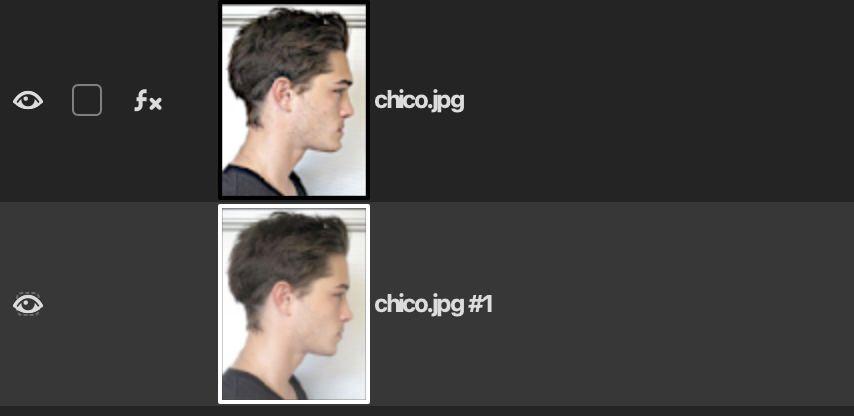
  • I would only use this by having two layers - one layer being the original image, and another being my "after" morph. By keeping the original, I can efficiently toggle between before and after images by selecting visibility


Screenshot 2025 10 23 at 35855PM
Figure 5. Bottom right of the interface, layer menu. By inputting two copies of the image you wish to morph, you can easily toggle between the before and after by selecting the eye icon of the layer you're viewing.

  • There are more advanced techinques with layers, but unecessary for us.
  • Masks: A layer mask controls visibility of areas within a layer. Black hides, white reveals, and grey partially reveals. This allows for precise and reversible blending between layers. It's usually used for
    • Merging two images seamlessly (e.g., sky replacement, exposure blending)
    • Selective adjustments (only brightening a face, darkening background)
    • Gradual transitions or soft edges
    • Complex composites and visual effects

vi. Quick Reference
1. Move Tool
Repositions image layers for alignment. Used to line up facial features between source and target images.​
2. Scale Tool
Resizes one face to match proportions of the other. Maintains alignment of eyes, nose, and mouth.​
3. Rotate Tool
Adjusts angle of a layer for correct facial orientation and symmetry.​
4. Warp Transform Tool
Deforms and nudges specific facial regions like eyes, mouth, jawline into alignment. Key for shaping one face to match the structure of another.​
5. Layer Masks
Non-destructive blending between two faces. Enables selective visibility and smooth edge transitions.​
6. Brush Tool
Used on layer masks to paint black/white and control which areas of each face are visible. Soft brush = smooth blending.​
7. Clone Tool
Copies texture or skin detail from one area to another. Used to patch mismatched regions after blending.​
8. Healing Tool
Blends color and texture seamlessly. Used to smooth transition zones (e.g., cheeks, forehead).​
9. Measure
Used to calculate ratios, angles.​
9. Color Adjustment Tools
  • Colors > Hue-Saturation — adjusts skin tone match.
  • Colors > Levels / Curves — balances brightness and contrast.
  • Colors > Color Balance — fine-tunes temperature and tint consistency.
10. Gaussian Blur (Filters > Blur > Gaussian Blur)
Softens harsh mask edges or texture inconsistencies between layers.​
11. Eraser Tool
Alternative to masks for permanent pixel removal (used sparingly; destructive).​
12. Layer Opacity Slider
Adjusts transparency of top layer to preview or fine-tune blend intensity.​
13. Guides and Alignment Tools
  • Image > Guides > New Guide (by Percent): helps align eyes, mouth symmetrically.
  • Snap to Guides: maintains geometric alignment during warping/scaling.
14. Help Tab
Going on the help tab will let you search up whatever tool you want. Super useful.​
TL;DR: Free & superior software to perform precise morphs/edits on your face. Only really need measure and warp. Great for mental masturbation to see what you'd look like if you stopped LDAR and got some money for surgery. Extreme surgeries like jaw advancement may be more difficult to morph.
 
  • +1
  • Love it
Reactions: rotation, mvpisafaggot420 and HighIQ ubermensch
also: dnr faggot
 
  • Ugh..
Reactions: HighIQ ubermensch
How to use GIMP to perform detailed photo editing/morphing.
i. Introduction & Installation
GIMP (GNU Image Manipulation Program) is a free, open-source alternative to Photoshop. It's powerful enough for professionals, but if you can understand the basics, its superior to basic browser/mobile editors as these alternatives lack the precision to produce good morphs. For our use case, I believe it's the most accurate software to perform morphs whether its for surgery simulation, frauding, or wasting time. It's also completely free.
Installation
___________​
For both Windows and MacOS, navigate to gimp.org and download. Run the installation and launch the app. If you're too retarded to do this, you might as well stop here.
(Optional) For a cleaner user interface, you can navigate to​
and follow the installation instructions.
From here, launch the application.
ii. Initial Configuation and Interface Overview
a) Upon first launch, GIMP presents a multi-panel interface consisting of three primary components:​
  • Toolbox Panel (left): Contains selection, painting, transformation, and color tools
  • Image Canvas (center): The primary workspace for image display and manipulation
  • Dockable Dialogs (right): Provides access to layers, channels, paths, brushes, patterns, and gradients
For improved workflow efficiency, navigate to Windows > Single-Window Mode to consolidate all interface elements into a unified workspace.​
b) Opening and Importing Images

Access File > Open to load existing images, or utilize drag-and-drop functionality to import files directly onto the canvas. Should look like the figure below.

Figure 1. Opening an image post installation


iii. Fundamental Image Adjustments
A. Selection
  • For many of these edits, going to Tools > Selection Tools > Free Select or Fuzzy Select will enable you to localize changes, instead of the entire image. Can also be actived with shortcuts. (Shortcuts may vary, viewing the menu should tell you what they are).
  • Free Select is useful for isolating eyes, lips, nose, or facial contours.
  • Fuzzy Select is effective for applying global skin adjustments while excluding hair, eyes, and background
View attachment 4238224
Figure 2. Selection Tool Menu, MacOS

B. Selection Feathering for Natural Transitions​

  • Navigate to Select > Feather
  • Apply 3-10 pixel feather radius for facial feature adjustments
  • Larger feather values (10-20 pixels) for skin tone modifications affecting larger areas
  • Creates gradual, undetectable transitions between adjusted and unadjusted regions
  • Good for maintaining natural appearance in portrait retouching

C. Brightness and Contrast​

  • Navigate to Colors > Brightness-Contrast
  • Adjust sliders to achieve optimal tonal balance
  • This method provides rapid correction for underexposed or low-contrast imagery

D. Levels Adjustment​

  • Access Colors > Levels
  • Manipulate the three control points beneath the histogram:
    • Left slider: Defines the black point (darkest values)
    • Right slider: Defines the white point (brightest values)
    • Center slider: Adjusts midtone values
  • This technique offers superior precision compared to basic brightness/contrast adjustments

E. Curves Adjustment​

  • Select Colors > Curves
  • Click and drag along the curve to adjust specific tonal ranges
  • Create an S-curve configuration for enhanced contrast
  • This represents the professional standard for tonal and color correction

F. Color Temperature Correction​

  • Navigate to Colors > Color Temperature
  • Adjust slider toward blue values for cooler tones, or toward red/orange for warmer tones
  • Effective for correcting artificial lighting conditions or enhancing atmospheric effect
G. Hue-Saturation for Selective Skin Enhancement
  • Access Colors > Hue-Saturation
  • Select Reds or Yellows channel to target skin tones specifically
  • Reduce saturation slightly (5-15 points) for a more refined appearance
  • Adjust hue minimally to correct color casts without creating unnatural results
  • Increase lightness subtly to brighten skin tones selectively


iv. Morphing & Measurements (Bread & Butter)
Figure 3. Transform Tools Menu, MacOS


A. Warp Transform Tool for Precise Facial Adjustments

  • Select the Warp Transform tool from the toolbox
  • Adjust size, hardness, strength, etc. as desired.
  • Click and drag directly on facial features to reshape
  • Optimal for adjusting facial asymmetry, side profile surgery simulation, subtle facial structure adjustments
View attachment 4238356View attachment 4238379
Figure 4. Before & After of Chico Lachowski's side profile using warp transform & sharpen tool. Adjusted chin projection and masculinzed nasofrontal angle.
B. Measure (This tool is necessary to calculate angles, ratios, etc.)
_________________
  • Navigate to the tools menu, then select the Measure tab. From here, your cursor will measure distances in pixels when you click, hold, and move the cursor. Pixel lengths should appear on the bottom of the interface.
  • Holding Shift while taking measurements will toggle angle measurements. Ensure the second vector of the angle begins at a vertice of the former measurement.​
  • Unfortunately, I don't believe there is a way to automatically calculate two measurements and their ratios. I write down the pixel lengths then manually calculate.

C. Symmetry Analysis Using Guides and Measurement​

Creating Reference Lines:
  1. Image > Guides > New Guide (by Percent)
  2. Create vertical guide at 50% (facial midline)
  3. Create horizontal guides at key landmarks:
    • Eyes (typically 40-45% from top)
    • Nose base (typically 62-65% from top)
    • Mouth center (typically 75-80% from top)
Measuring Symmetry Deviations:
1. Measure distance from midline guide to left eye outer corner​
2. Measure distance from midline guide to right eye outer corner​
3. Compare measurements to identify asymmetry​
4. Repeat for other bilateral features (eyebrows, cheeks, jaw angles)​
5. Use morphing tools to correct significant asymmetries​

v. Layers & Masks
Honestly, this feature isn't very useful for our use case on this forum, as we're focusing on geometric warping to change shape.
  • Layers: Act as transparent sheets stacked vertically, with each sheet can hold part of an image, whether its text, effects, or components.
  • I would only use this by having two layers - one layer being the original image, and another being my "after" morph. By keeping the original, I can efficiently toggle between before and after images by selecting visibility

View attachment 4238503
Figure 5. Bottom right of the interface, layer menu. By inputting two copies of the image you wish to morph, you can easily toggle between the before and after by selecting the eye icon of the layer you're viewing.

  • There are more advanced techinques with layers, but unecessary for us.
  • Masks: A layer mask controls visibility of areas within a layer. Black hides, white reveals, and grey partially reveals. This allows for precise and reversible blending between layers. It's usually used for
    • Merging two images seamlessly (e.g., sky replacement, exposure blending)
    • Selective adjustments (only brightening a face, darkening background)
    • Gradual transitions or soft edges
    • Complex composites and visual effects

vi. Quick Reference
1. Move Tool
Repositions image layers for alignment. Used to line up facial features between source and target images.​
2. Scale Tool
Resizes one face to match proportions of the other. Maintains alignment of eyes, nose, and mouth.​
3. Rotate Tool
Adjusts angle of a layer for correct facial orientation and symmetry.​
4. Warp Transform Tool
Deforms and nudges specific facial regions like eyes, mouth, jawline into alignment. Key for shaping one face to match the structure of another.​
5. Layer Masks
Non-destructive blending between two faces. Enables selective visibility and smooth edge transitions.​
6. Brush Tool
Used on layer masks to paint black/white and control which areas of each face are visible. Soft brush = smooth blending.​
7. Clone Tool
Copies texture or skin detail from one area to another. Used to patch mismatched regions after blending.​
8. Healing Tool
Blends color and texture seamlessly. Used to smooth transition zones (e.g., cheeks, forehead).​
9. Measure
Used to calculate ratios, angles.​
9. Color Adjustment Tools
  • Colors > Hue-Saturation — adjusts skin tone match.
  • Colors > Levels / Curves — balances brightness and contrast.
  • Colors > Color Balance — fine-tunes temperature and tint consistency.
10. Gaussian Blur (Filters > Blur > Gaussian Blur)
Softens harsh mask edges or texture inconsistencies between layers.​
11. Eraser Tool
Alternative to masks for permanent pixel removal (used sparingly; destructive).​
12. Layer Opacity Slider
Adjusts transparency of top layer to preview or fine-tune blend intensity.​
13. Guides and Alignment Tools
  • Image > Guides > New Guide (by Percent): helps align eyes, mouth symmetrically.
  • Snap to Guides: maintains geometric alignment during warping/scaling.
14. Help Tab
Going on the help tab will let you search up whatever tool you want. Super useful.​
TL;DR: Free & superior software to perform precise morphs/edits on your face. Only really need measure and warp. Great for mental masturbation to see what you'd look like if you stopped LDAR and got some money for surgery. Extreme surgeries like jaw advancement may be more difficult to morph.
amazing thread
 
  • +1
Reactions: almostAverage

Similar threads

T4deoIncel0s
Replies
53
Views
356
Glorious King
Glorious King
T4deoIncel0s
Replies
19
Views
337
T4deoIncel0s
T4deoIncel0s

Users who are viewing this thread

Back
Top