bddcoper
bloated gymcel summer
- Joined
- May 9, 2025
- Posts
- 4,138
- Reputation
- 4,670
Guide to DIY Subcision for Atrophic Acne Scars
Table of Contents
0. Test for Tethered Scars and Pre-Op
*Not using or discussing HA filler because it doesn’t really affect retethering.
Test for Tethered Scars and Pre-Op
Pick any acne scar that you have. Try pulling some skin around it. If the scar doesn’t disappear, it’s most likely tethered. If it’s not tethered, try more basic treatments like microneedling and CO2 laser first. If it isn’t tethered, you will get very little results from those treatments and you will end up ruining your elastin and collagen in the long run since that’s what happens the more you do stuff like microneedling.
For the pre-op, just avoid any skin treatments like peels, tret, skincare, for at least 1-2 weeks. Don’t be on accutane and also if you had laser or microneedling make sure it’s been at least 6 weeks.
Avoid things like fish oil, NSAIDs, aspirin, and anti-inflammatories for at least a week or two beforehand.
It may help to make your scars and entry points with a marker beforehand.
Materials (read my notes for very important risks)
For the subcision you need to get a standard needle for puncturing the skin and entering. Also a blunt cannula (DO NOT USE NOKOR OR TAYLOR LIBERATOR… even professionals have a high rate of tearing ligaments and causing facial sagging with these tools since it's so easy for the tool to go 1 or 2 mm too deep and tear a ligament).
Deciding Entry Points (And Avoiding Retaining Ligaments/Facial Sagging)

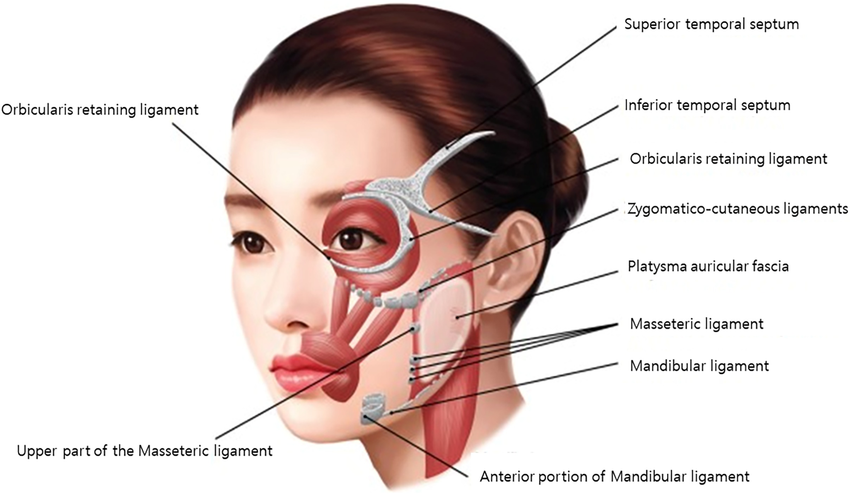
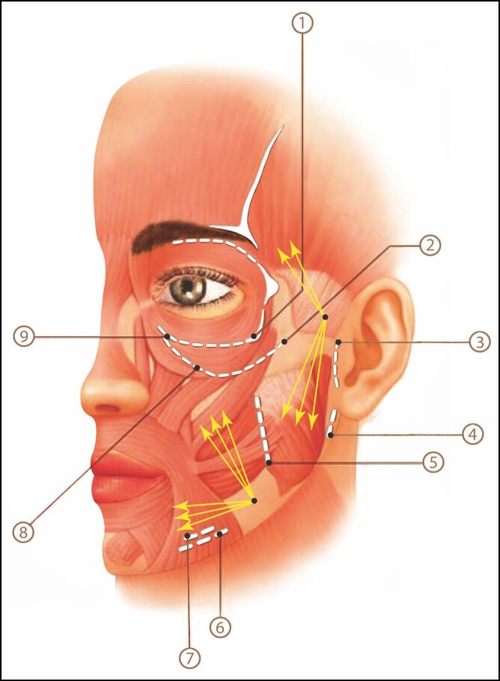
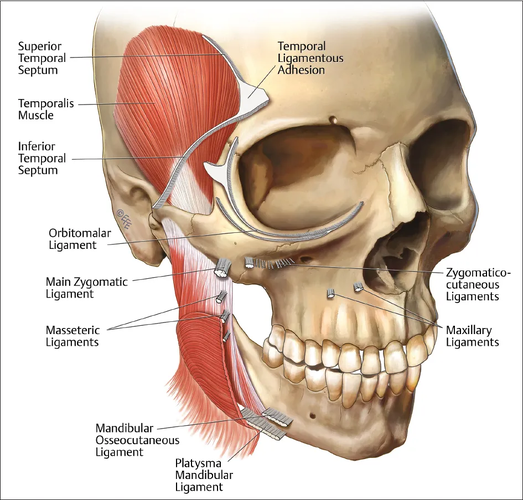
Locations of the retaining ligaments that you need to avoid at all costs.

The retaining ligaments of the face: 1, orbicularis retaining ligament (lateral part); 2, zygomatic ligament; 3, preauricular parotid cutaneous ligament; 4, auriculoplatysmal ligament; 5, masseteric cutaneous ligament; 6, platysma mandibular ligament; 7, mandibular osseocutaneous ligament; 8, zygomatic cutaneous ligament; 9, orbicularis retaining ligament (medial part). The white dashed lines show the extent of the ligament.
The dots with the yellow arrows coming out of them show the recommended entry points. Choosing an insertion point in front of the sideburns to approach the scars in all medial cheek and buccal areas may lead to facial sagging caused by damage to the zygomatic and masseteric cutaneous ligaments.
Therefore, an entry point in front of the masseteric cutaneous ligament to reach the buccal, infraorbital, and medial mandibular area is preferable to minimize injury to the aforementioned ligaments. On the other hand, choosing the point of entry in the front of the sideburns is suitable for approaching periauricular and mandibular ramus scars. Also, this point can be used simultaneously to approach temporal acne scars. (https://pmc.ncbi.nlm.nih.gov/articles/PMC8697340/)
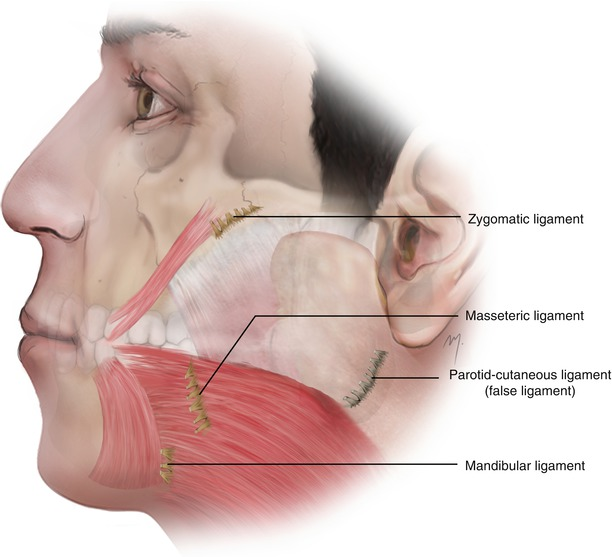
Most of you will be working on your cheeks so we can zoom in a bit and ignore all the other ligaments.


Now it doesn’t seem as bad. You only need to be cautious of a few. If you do hit any though, they will likely be the masseteric or zygomatic ligaments. Maybe the mandibular ligament if you are working near the jaw. Now how do you locate each of them on your own face?
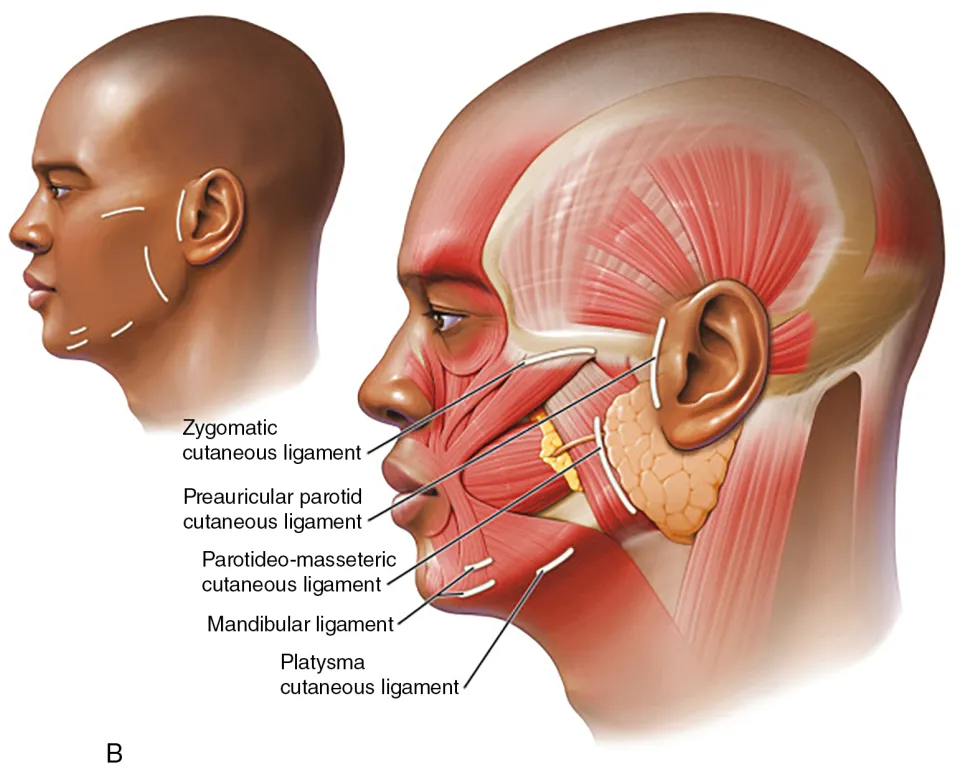
Zygomatic Ligament


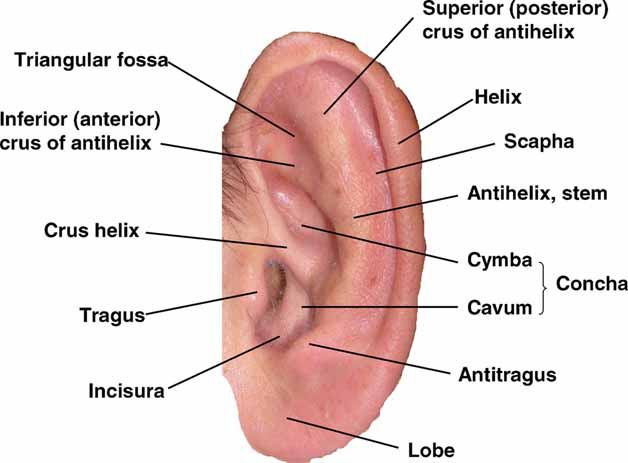
Locate your ear tragus and move 4 cm horizontally along your zygomatic arch. Mark that point. Now draw a circle with a radius of 1 cm. That’s just a rough approximation, but you should basically end up with a circle centered around your most prominent point (from feeling the bone) of your zygos with 1 cm radius.
And when you take two fingers and touch that point and move your fingers up and down, there should be a lot of resistance there compared to the rest of the horizontal line between the tragus and that point. When you move along that horizontal and suddenly feel the resistance go up, that’s also when you know you are there or closer.
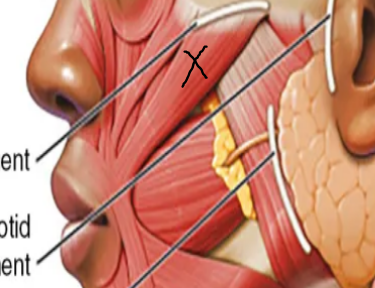
Alternatively, pucker your lips and try to feel for movement in the muscle below marked by an X.

Then trace upwards and circle that area. It’s best to do all the methods and average out your results to get the best approximation.
Masseteric Ligament
Start by clenching your teeth to locate your masseter muscle. Locate the frontmost edge of your masseter muscle by feeling around until you don’t feel the muscle anymore. The masseteric ligaments are just behind this edge. Draw a line from the rightmost point of your circle along the edge of your masseter muscle. Alternatively say “oh” and pause your face. Then open your mouth as wide as you can. If you are lean enough you should be able to clearly see and feel your masseters. Draw a line where your masseter ends. Always work ~3-5 mm in front of this line.
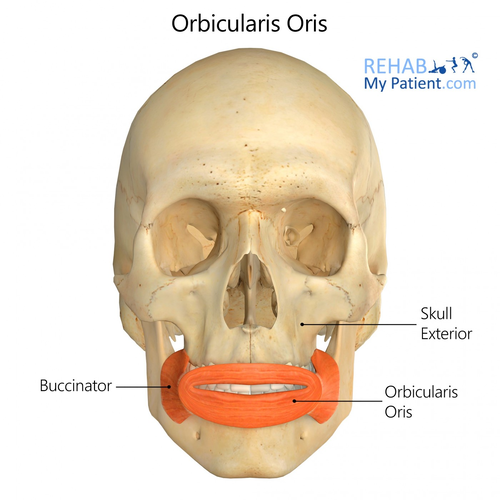
Mandibular Ligament
Pucker your lips with your fingers on the surrounding skin. Find the border of the orbicularis oris muscle. The mandibular ligament should be directly beneath the leftmost and rightmost edges of the muscle and closer to the mandible. Draw a point 1 cm above the mandible with a radius of 1 cm.

And using the previous diagram with the safe entry points labeled, approximate where the entry points would be on your face given the location of those 3 ligaments.
Since you have the diagram of all the ligaments you could choose some other entry points depending on your scar severity and distribution since you should now be pretty certain of where all the ligaments are on your face.
If you have seen subcision videos you might see them going over these ligaments. It’s fine as long as you are certain you are in the right layer and are working in a small area (aka not straying too far away from your initial entry points). I showed you 2 “ideal” entry points previously, but realistically you should hypothetically be able to enter anywhere where you won’t hit a ligament.
But I decided to research this a bit more for scars that are near/over the actual ligaments to figure out the best approach.
Enter near the scar, away from the ligament, in the correct plane (which will be discussed more later on) and approach scars near the ligament first; feel resistance under them. Then work around the ligament. Also don’t cross a ligament wall just work on either side. Tbh it might not be worth those areas given they aren’t really noticeable from a front view. You need to do a subcision at least 3 or 4 times to untether most of your scars, so personally my advice to you would be to wait until at least after the first time to get comfortable and actually see your results. It’ll be hard to tear the ligament with a blunt cannula regardless, but just in case.
Anesthesia and Safety Protocols
When doing the actual procedure, you need to make sure you don’t try to use one long needle to sweep across your entire cheek. This is the reason why facial sagging happens.
Imagine you enter your entry point at a 5-10 degree angle. The further away you go from your entry point, the deeper the tip of the needle will get into your skin, potentially getting into the wrong layer and severing a ligament if you are not careful. Stick to a small area and use multiple entry points if you are working with a bigger area.
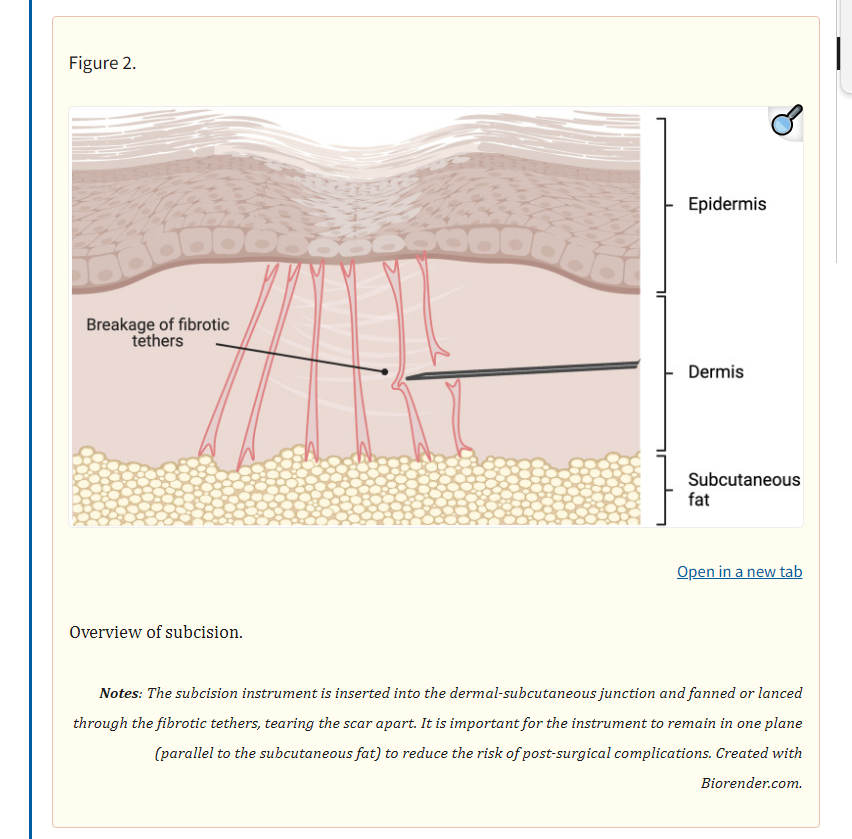
Getting to the Right Layer
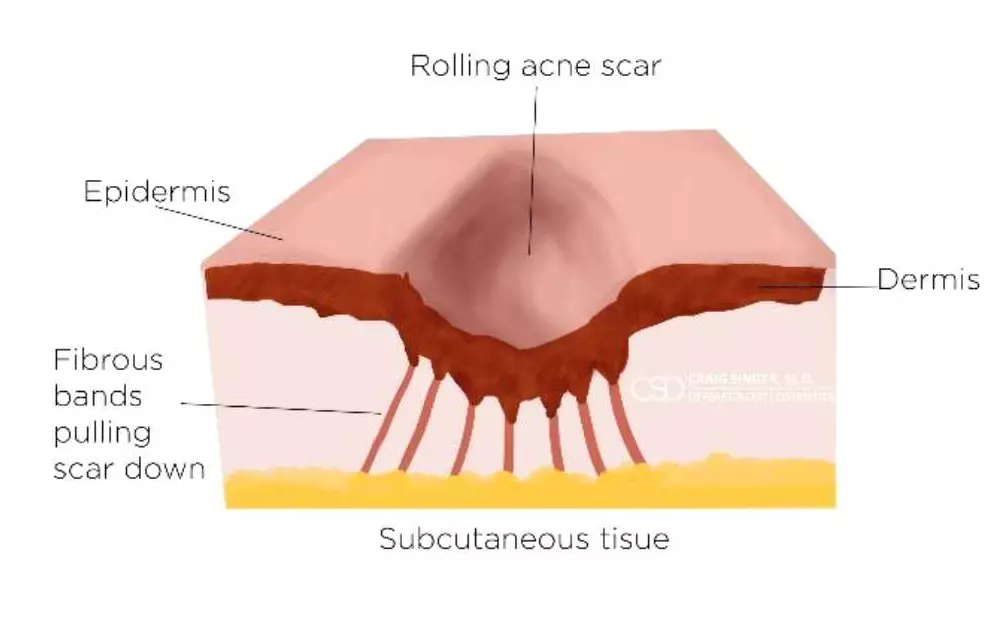
Anatomy of the scars


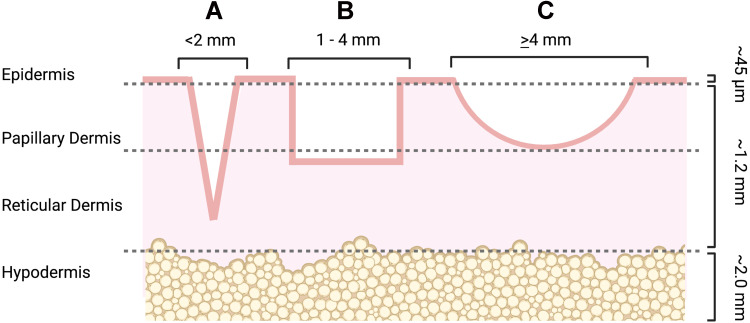
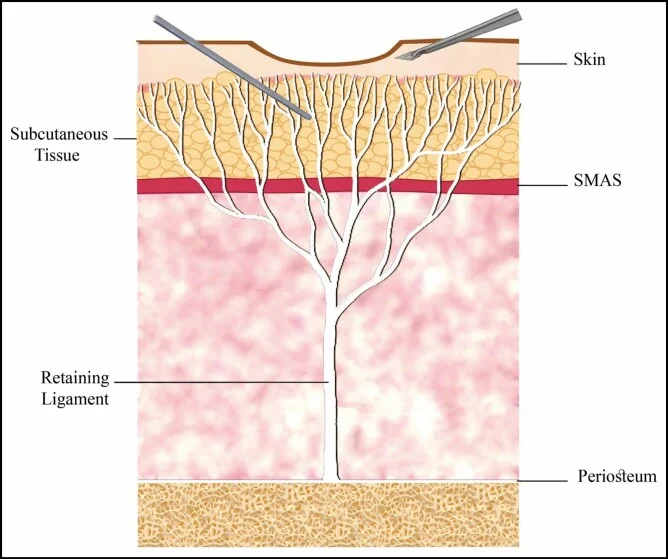
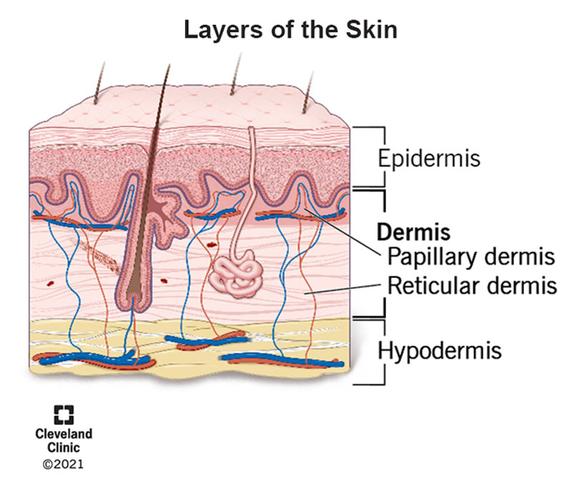
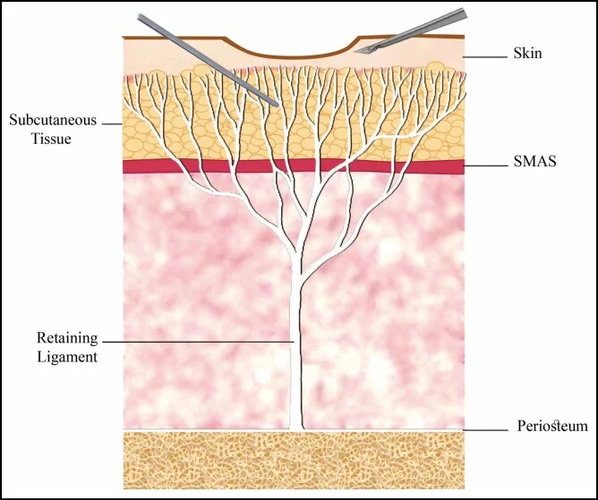
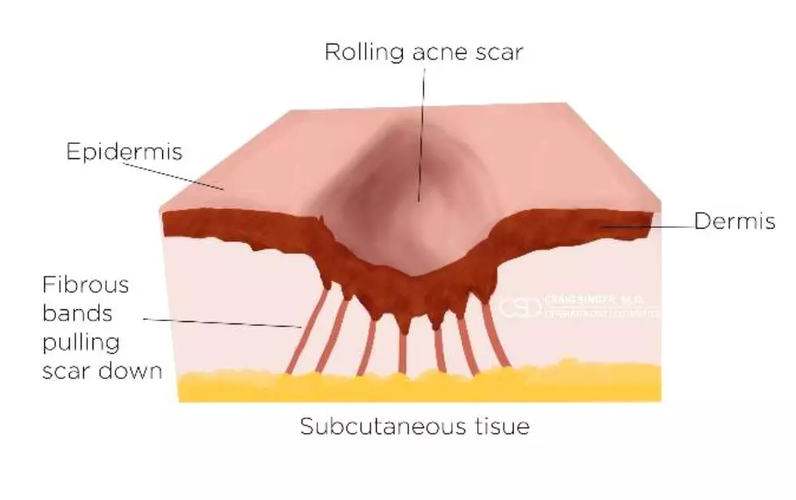
Here is a typical appearance of a tethered scar along with an image of the layers of skin.

Notice how the ends of the retaining ligament are in the subcutaneous tissue, which is right below the area we are going to be working with. You need to avoid entering the subcutaneous layer/hypodermis at all costs.

The tethers go from the end of the outlines to the hypodermis. It’s not worth treating ice pick scars with subcision since they are so narrow. They are also barely noticeable unless you have many (in which case this guide isn’t for you, but you can pretty easily diy a TCA cross or get it done for super cheaper compared to a subcision) compared to the other 2 types.

Studies show that we should be working in the dermal-subcutaneous plane. This is also known as the transitional zone going from the reticular dermis (deepest part of the dermis) and the subcutaneous tissue.
Inserting the Needle
The real question is how do we know we have entered the reticular dermis. The procedure shouldn’t be too bad or risky as long as we can be sure we are in the right layer. Too high and you won’t get proper results. Too low and you could tear a ligament.
You should ideally be working just above the layer of fat without actually touching/scraping the subcutaneous fat in the process.

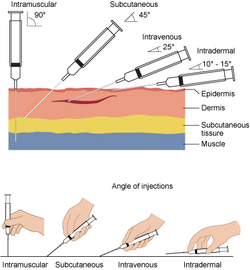
The steps to insertion
0. Familiarize yourself with how to perform a subcutaneous injection in general.

*The cannula itself should never be more than an inch into your skin. As in, you should not be treating scars greater than an inch away from your entry point. It’s best to stick to 0.5-0.75 inches in my opinion since many professionals choose to make a new entry for each scar. Every case that I have read about online where the person reported sagging had the person enter from the temple and go across the entire cheek. Also the cannula should be gliding under your skin (but it shouldn’t feel buttery) and only encountering resistance under a scar. This is another reason why you should never use a needle because it’ll just go right through everything.
Severing the Tethered Scar
Now we need to figure out how to tear the tethers. Ideally you don’t want to be too aggressive. There are a few approaches to tearing the scar, but the two most relevant that we need to get familiar with are
Start off with linear motions to make sure you are in the right layer, then switch over to fanning when attacking a scar/cluster. Don’t be too aggressive, but obviously you need some force to tear the scar fiber, so don’t be too soft.
*Once a tether is cut you should hear a snap. If you don’t you probably didn’t sever the tether. You should also see your scars slightly lifted, that’s how you know for sure you got the tether.
Obviously you shouldn’t be fanning your entire cheek. Yes, blunt cannulas are pretty low risk for cutting ligaments, but it doesn’t matter. If you fucking cut one its over you immediately lose any youthfulness you have and are stuck with a near impossible to fix flaw, so just make a few extra entry points and don’t use wide fanning motions unless the scars are clustered.
If a ligament does get cut, especially zygomatic or masseteric ones, it should be noticeable immediately after the subcision. As long as you look normal (maybe slightly puffy), don’t feel heaviness in your face, and heard the fibers snap, your subcision was probably a success.
After you finish, apply the sterile gauze to your face for 5 minutes until the bleeding stops.
Aftercare (And Things to Avoid)
Expect bruising that will last around 1 week. To minimize bruising, take Bromelain 500 mg twice a day and avoid aspirin, ibuprofen, fish oil, vitamin E, and herbal supplements. Tbh I would just avoid everything except moisturizer, hyaluronic acid, collagen supplements, and supplements that will help with collagen synthesis (glycine, vitamin C, etc. just look up some collagenmaxxing guide for everything) for at least a week. Also wear SPF.
You can do suction, it will give you better results, but I won't be discussing it there.
Future Procedures
You need to get another treatment like microneedling and or CO2 laser otherwise you are just wasting your time since subcision doesn’t stimulate that much collagen. You can do it either immediately after or do cup suctioning for 10-14 days, then do treatment after the bruising and swelling have faded.
I think it’s probably easier to do it immediately after and fairly effective (according to this study). You don’t want the scars to retether if you wait, but obviously you will be more swollen/red and need a greater downtime if you do both in the same day.
I recommend 1.5 - 2 mm if you have done microneedling before (which you probably have because subcision shouldn’t be your first treatment unless you know for sure your scars are tethered, which you will realize once you do microneedling a few times and see little improvement). If you did the tethering test and decided to do subcision without having done microneedling, I would say do 1 - 1.5 mm.
The post-op care discussed in the previous session also applies here. Not sure about whether it’s a good idea to ice your face. Some say to do so after microneedling, but others don’t. Obviously you want swelling after microneedling otherwise your healing process and results will get fucked. Basically don’t do anything to reduce the inflammation.
Overall, the procedure at home shouldn’t cost more than $20 for all of the needles, $10 for the lidocaine, and another $5-10 for the alcohol wipes and gauze. That’s like $40 for a $400 procedure. You probably need to do it 3 or 4 times to untether most of them, so you are easily saving at least $1200. Don’t do it if you are high inhib or retarded though.
Some (very important) notes from my own journey
If you do not read whatever is above, please read this or you will come crying in the comments that you messed some shit up. This was the guide I made for myself before I did subcision on myself, and I made a few mistakes, especially because I was extremely inexperienced with needles and my skin then, so below is what I learned during my attempts
First of all, the materials section recommend 18-21 gauge needles, and while these are best for tearing up the actual scar, they will hurt like hell to insert and there is a good chance something like 18 g will leave a mark. My first attempt was done using an 18 g needle to make an entry point, then a cannula to break up the scars. All those entry points left marks that only disappeared after 3 months and it's only because I had a very strict collagen protocol (peptides, GH, supplements, antioxidants, tazarotene... I was pretty much doing every single thing to maximize my collagen). My recommendation in all honesty is treating individual scars with many entry points, despite whatever the guide says, with a lower gauge needle (I've tried 30, 27, 25, and 23, and have found that 25 g works best, followed by 23 and 27). You can use a cannula, but the thing with a cannula is that it's gonna be a lot harder for you to untether scars and reenter the hole in the right layer, though it's not necessary unless all your scars are near your retaining ligaments.
When inserting the needle, if you are below an area of scarring and feel no tethers and just a smooth glide, it is very very very likely you are in the subcutaneous layer. You need to move the needle outwards and reinsert at a higher angle. If you fuck up and damage your fat layer too much, there is a chance you will get fibrosis and potentially worse scarring. Fortunately, subcutaneous fibrosis should go away with time, especially if you are on the glow stack, but why risk it? I would recommend inserting at a 20-30 degree angle and working from there. The bands could literally feel like bands. If you don't feel or hear the bands (they sort of sound like plucking a guitar cord) or at least feel some resistance and the skin resisting the needle under your scarring, you are too deep. Also if you are too shallow or dont angle the needle downward enough, there is a good chance you will accidentally exit the skin, creating another hole in the process. If you go slow, you will realize this as it will start to sting once you are exiting. That's why you need to work slow. Also when you do try to untether a band, hold the skin down at the surface so it doesn't move, and the band should snap easier.
also, have plenty of gauze lying around because there were multiple times were i would insert the needle, then once i removed it have blood spewing out of my cheek and dripping on the floor and on my desk. some scars might just not have any tethering so dont get too aggressive under your skin if you dont feel tethers. for me what really helped was doing DIY prf (just copied this guy ) under my scars and that helped reduce the pitting and redness. also don't list to the centrifuge settings in the video he says to do 5 or 6 minutes or some shit like that, but i found you 2-4 minutes @ 500 - 800 RPM is ideal, otherwise the shit will clot and you will be injecting unconcentrated crap. the very first time i did it i injected a bunch of yellow stuff, which turned out to be serum, and it stayed under my skin for weeks before it got absorbed. real prf gets absorbed within 1 week max. and for downtime in general, you will have bruising for a week after subcision (min), so make sure to drain any blood before finishing your session to not have the swelling last longer than it should.
as of now, just through subcision, prf, and the stack mentioned 2 paragraphs ago, i have managed to get my scarring down to a level i can easily cover with some CC cream, despite being told my shit was severe by some jew derm less than 3 months ago. and the best part is i havent even treated all my scarring with prf either, as i didnt have enough liquid, but the ones i did inject have healed pretty nicely, and i plan to inject more in 2 weeks followed by 1 last subcision. boxcars (untethered) will respond best to prf, but you can do on rolling scars too and given you untethered them they should improve a lot. and i think doing it while running bpc 157, tb 500, and ghk cu is ideal, as if you do mess up, you get some forgiveness plus you heal better because of the collagen and antifibrotic affects so end up needing less sessions as the scars never retether. maybe cialis is good too for skin healing (from studies) as it improves blood flow, but i believe it should be stopped 1 week before and 3 days after minimum, same with tazarotene, which is also good for acne scarring, but these are all cope unless you do subcision first, otherwise the results will be very minimal.
lastly, don't be a fucking retard and just depend on this guide. watch videos on subcision so you have a sense of how it's done because if you dont you will fuck up
thanks for reading
Table of Contents
0. Test for Tethered Scars and Pre-Op
- Materials
- Entry Points (And How to Avoid Retaining Ligaments/Facial Sagging)
- Anesthesia and Safety Protocols
- Getting to the Right Layer
- Severing the Tethered Scar
- Aftercare (And Things to Avoid)
- Future Procedures
*Not using or discussing HA filler because it doesn’t really affect retethering.
Test for Tethered Scars and Pre-Op
Pick any acne scar that you have. Try pulling some skin around it. If the scar doesn’t disappear, it’s most likely tethered. If it’s not tethered, try more basic treatments like microneedling and CO2 laser first. If it isn’t tethered, you will get very little results from those treatments and you will end up ruining your elastin and collagen in the long run since that’s what happens the more you do stuff like microneedling.
For the pre-op, just avoid any skin treatments like peels, tret, skincare, for at least 1-2 weeks. Don’t be on accutane and also if you had laser or microneedling make sure it’s been at least 6 weeks.
Avoid things like fish oil, NSAIDs, aspirin, and anti-inflammatories for at least a week or two beforehand.
It may help to make your scars and entry points with a marker beforehand.
Materials (read my notes for very important risks)
For the subcision you need to get a standard needle for puncturing the skin and entering. Also a blunt cannula (DO NOT USE NOKOR OR TAYLOR LIBERATOR… even professionals have a high rate of tearing ligaments and causing facial sagging with these tools since it's so easy for the tool to go 1 or 2 mm too deep and tear a ligament).
- 18 gauge standard needle
- 18 - 21 gauge blunt cannula
- Topical Lidocaine 5%
- Alcohol Wipes
- Sterile Gauze
- Bromelain 500 mg supplement (optional)
Deciding Entry Points (And Avoiding Retaining Ligaments/Facial Sagging)
Locations of the retaining ligaments that you need to avoid at all costs.
The retaining ligaments of the face: 1, orbicularis retaining ligament (lateral part); 2, zygomatic ligament; 3, preauricular parotid cutaneous ligament; 4, auriculoplatysmal ligament; 5, masseteric cutaneous ligament; 6, platysma mandibular ligament; 7, mandibular osseocutaneous ligament; 8, zygomatic cutaneous ligament; 9, orbicularis retaining ligament (medial part). The white dashed lines show the extent of the ligament.
The dots with the yellow arrows coming out of them show the recommended entry points. Choosing an insertion point in front of the sideburns to approach the scars in all medial cheek and buccal areas may lead to facial sagging caused by damage to the zygomatic and masseteric cutaneous ligaments.
Therefore, an entry point in front of the masseteric cutaneous ligament to reach the buccal, infraorbital, and medial mandibular area is preferable to minimize injury to the aforementioned ligaments. On the other hand, choosing the point of entry in the front of the sideburns is suitable for approaching periauricular and mandibular ramus scars. Also, this point can be used simultaneously to approach temporal acne scars. (https://pmc.ncbi.nlm.nih.gov/articles/PMC8697340/)
Most of you will be working on your cheeks so we can zoom in a bit and ignore all the other ligaments.
Now it doesn’t seem as bad. You only need to be cautious of a few. If you do hit any though, they will likely be the masseteric or zygomatic ligaments. Maybe the mandibular ligament if you are working near the jaw. Now how do you locate each of them on your own face?
Zygomatic Ligament
Locate your ear tragus and move 4 cm horizontally along your zygomatic arch. Mark that point. Now draw a circle with a radius of 1 cm. That’s just a rough approximation, but you should basically end up with a circle centered around your most prominent point (from feeling the bone) of your zygos with 1 cm radius.
And when you take two fingers and touch that point and move your fingers up and down, there should be a lot of resistance there compared to the rest of the horizontal line between the tragus and that point. When you move along that horizontal and suddenly feel the resistance go up, that’s also when you know you are there or closer.
Alternatively, pucker your lips and try to feel for movement in the muscle below marked by an X.
Then trace upwards and circle that area. It’s best to do all the methods and average out your results to get the best approximation.
Masseteric Ligament
Start by clenching your teeth to locate your masseter muscle. Locate the frontmost edge of your masseter muscle by feeling around until you don’t feel the muscle anymore. The masseteric ligaments are just behind this edge. Draw a line from the rightmost point of your circle along the edge of your masseter muscle. Alternatively say “oh” and pause your face. Then open your mouth as wide as you can. If you are lean enough you should be able to clearly see and feel your masseters. Draw a line where your masseter ends. Always work ~3-5 mm in front of this line.
Mandibular Ligament
Pucker your lips with your fingers on the surrounding skin. Find the border of the orbicularis oris muscle. The mandibular ligament should be directly beneath the leftmost and rightmost edges of the muscle and closer to the mandible. Draw a point 1 cm above the mandible with a radius of 1 cm.
And using the previous diagram with the safe entry points labeled, approximate where the entry points would be on your face given the location of those 3 ligaments.
Since you have the diagram of all the ligaments you could choose some other entry points depending on your scar severity and distribution since you should now be pretty certain of where all the ligaments are on your face.
If you have seen subcision videos you might see them going over these ligaments. It’s fine as long as you are certain you are in the right layer and are working in a small area (aka not straying too far away from your initial entry points). I showed you 2 “ideal” entry points previously, but realistically you should hypothetically be able to enter anywhere where you won’t hit a ligament.
But I decided to research this a bit more for scars that are near/over the actual ligaments to figure out the best approach.
Enter near the scar, away from the ligament, in the correct plane (which will be discussed more later on) and approach scars near the ligament first; feel resistance under them. Then work around the ligament. Also don’t cross a ligament wall just work on either side. Tbh it might not be worth those areas given they aren’t really noticeable from a front view. You need to do a subcision at least 3 or 4 times to untether most of your scars, so personally my advice to you would be to wait until at least after the first time to get comfortable and actually see your results. It’ll be hard to tear the ligament with a blunt cannula regardless, but just in case.
Anesthesia and Safety Protocols
- Wipe your entry points and treatment areas with an alcohol wipe.
- To apply the anesthesia, spread the lidocaine into a 1-2 mm thick layer over your acne scars. Leave it on for 30 - 60 minutes
- Wipe off any excess and use an alcohol wipe to sanitize the area and entry points.
When doing the actual procedure, you need to make sure you don’t try to use one long needle to sweep across your entire cheek. This is the reason why facial sagging happens.
Imagine you enter your entry point at a 5-10 degree angle. The further away you go from your entry point, the deeper the tip of the needle will get into your skin, potentially getting into the wrong layer and severing a ligament if you are not careful. Stick to a small area and use multiple entry points if you are working with a bigger area.
Getting to the Right Layer
Anatomy of the scars
Here is a typical appearance of a tethered scar along with an image of the layers of skin.
Notice how the ends of the retaining ligament are in the subcutaneous tissue, which is right below the area we are going to be working with. You need to avoid entering the subcutaneous layer/hypodermis at all costs.
- Ice pick scars, b) boxcar scars, c) rolling scars (https://pmc.ncbi.nlm.nih.gov/articles/PMC9868281)
The tethers go from the end of the outlines to the hypodermis. It’s not worth treating ice pick scars with subcision since they are so narrow. They are also barely noticeable unless you have many (in which case this guide isn’t for you, but you can pretty easily diy a TCA cross or get it done for super cheaper compared to a subcision) compared to the other 2 types.
Studies show that we should be working in the dermal-subcutaneous plane. This is also known as the transitional zone going from the reticular dermis (deepest part of the dermis) and the subcutaneous tissue.
Inserting the Needle
The real question is how do we know we have entered the reticular dermis. The procedure shouldn’t be too bad or risky as long as we can be sure we are in the right layer. Too high and you won’t get proper results. Too low and you could tear a ligament.
You should ideally be working just above the layer of fat without actually touching/scraping the subcutaneous fat in the process.
The steps to insertion
0. Familiarize yourself with how to perform a subcutaneous injection in general.
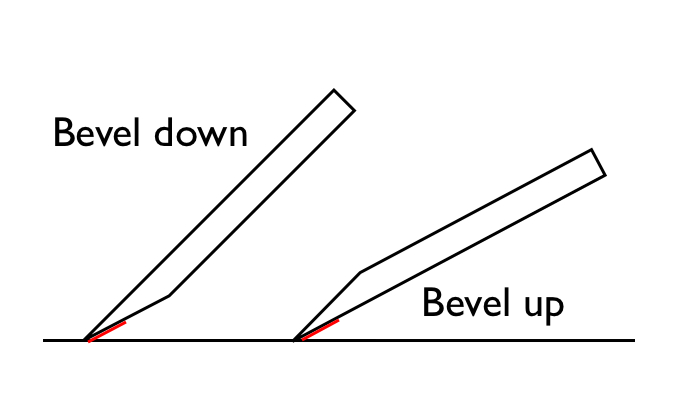
- Take your 18 gauge standard needle and hold it at a 45 degree angle bevel up.
- Insert and slowly keep going until you reach the hypodermis and stop there.
- Once you reach the reticular dermis you will feel resistance and once you get to the layer of fat/enter the hypodermis, the resistance will suddenly decrease. When this happens, immediately stop inserting your standard needle and switch over to your cannula.
- Take your blunt cannula and near parallel angle (<10 degrees) until you reach that layer (but don’t go too deep ideally you want to be working right before or around the loss of resistance). Once you reach the layer, stay as parallel as possible to avoid going into other planes.
*The cannula itself should never be more than an inch into your skin. As in, you should not be treating scars greater than an inch away from your entry point. It’s best to stick to 0.5-0.75 inches in my opinion since many professionals choose to make a new entry for each scar. Every case that I have read about online where the person reported sagging had the person enter from the temple and go across the entire cheek. Also the cannula should be gliding under your skin (but it shouldn’t feel buttery) and only encountering resistance under a scar. This is another reason why you should never use a needle because it’ll just go right through everything.
Severing the Tethered Scar
Now we need to figure out how to tear the tethers. Ideally you don’t want to be too aggressive. There are a few approaches to tearing the scar, but the two most relevant that we need to get familiar with are
- Linear strokes
- After you flatten the cannula (< 10°), push 5–10 mm forward, then pull the same distance back.
- The first 1–2 passes should confirm you’re in the right plane. You should be feeling a “rubbery drag” and a snap once you sever the cord.
- Good for confirming you are doing everything right.
- Tethers only the cord right in front of the cannula.
- Fanning
- Pivot the cannula at the entry hole and swing it in a 30–60° arc under the crater floor while doing linear strokes.
- Good for releasing the entire scar.
- Ensures you stay in a single horizontal plane.
- Risky for a super wide area if you aren’t careful (you should not be working in a super wide area in the first place though).
Start off with linear motions to make sure you are in the right layer, then switch over to fanning when attacking a scar/cluster. Don’t be too aggressive, but obviously you need some force to tear the scar fiber, so don’t be too soft.
*Once a tether is cut you should hear a snap. If you don’t you probably didn’t sever the tether. You should also see your scars slightly lifted, that’s how you know for sure you got the tether.
Obviously you shouldn’t be fanning your entire cheek. Yes, blunt cannulas are pretty low risk for cutting ligaments, but it doesn’t matter. If you fucking cut one its over you immediately lose any youthfulness you have and are stuck with a near impossible to fix flaw, so just make a few extra entry points and don’t use wide fanning motions unless the scars are clustered.
If a ligament does get cut, especially zygomatic or masseteric ones, it should be noticeable immediately after the subcision. As long as you look normal (maybe slightly puffy), don’t feel heaviness in your face, and heard the fibers snap, your subcision was probably a success.
After you finish, apply the sterile gauze to your face for 5 minutes until the bleeding stops.
Aftercare (And Things to Avoid)
Expect bruising that will last around 1 week. To minimize bruising, take Bromelain 500 mg twice a day and avoid aspirin, ibuprofen, fish oil, vitamin E, and herbal supplements. Tbh I would just avoid everything except moisturizer, hyaluronic acid, collagen supplements, and supplements that will help with collagen synthesis (glycine, vitamin C, etc. just look up some collagenmaxxing guide for everything) for at least a week. Also wear SPF.
You can do suction, it will give you better results, but I won't be discussing it there.
Future Procedures
You need to get another treatment like microneedling and or CO2 laser otherwise you are just wasting your time since subcision doesn’t stimulate that much collagen. You can do it either immediately after or do cup suctioning for 10-14 days, then do treatment after the bruising and swelling have faded.
I think it’s probably easier to do it immediately after and fairly effective (according to this study). You don’t want the scars to retether if you wait, but obviously you will be more swollen/red and need a greater downtime if you do both in the same day.
I recommend 1.5 - 2 mm if you have done microneedling before (which you probably have because subcision shouldn’t be your first treatment unless you know for sure your scars are tethered, which you will realize once you do microneedling a few times and see little improvement). If you did the tethering test and decided to do subcision without having done microneedling, I would say do 1 - 1.5 mm.
The post-op care discussed in the previous session also applies here. Not sure about whether it’s a good idea to ice your face. Some say to do so after microneedling, but others don’t. Obviously you want swelling after microneedling otherwise your healing process and results will get fucked. Basically don’t do anything to reduce the inflammation.
Overall, the procedure at home shouldn’t cost more than $20 for all of the needles, $10 for the lidocaine, and another $5-10 for the alcohol wipes and gauze. That’s like $40 for a $400 procedure. You probably need to do it 3 or 4 times to untether most of them, so you are easily saving at least $1200. Don’t do it if you are high inhib or retarded though.
Some (very important) notes from my own journey
If you do not read whatever is above, please read this or you will come crying in the comments that you messed some shit up. This was the guide I made for myself before I did subcision on myself, and I made a few mistakes, especially because I was extremely inexperienced with needles and my skin then, so below is what I learned during my attempts
First of all, the materials section recommend 18-21 gauge needles, and while these are best for tearing up the actual scar, they will hurt like hell to insert and there is a good chance something like 18 g will leave a mark. My first attempt was done using an 18 g needle to make an entry point, then a cannula to break up the scars. All those entry points left marks that only disappeared after 3 months and it's only because I had a very strict collagen protocol (peptides, GH, supplements, antioxidants, tazarotene... I was pretty much doing every single thing to maximize my collagen). My recommendation in all honesty is treating individual scars with many entry points, despite whatever the guide says, with a lower gauge needle (I've tried 30, 27, 25, and 23, and have found that 25 g works best, followed by 23 and 27). You can use a cannula, but the thing with a cannula is that it's gonna be a lot harder for you to untether scars and reenter the hole in the right layer, though it's not necessary unless all your scars are near your retaining ligaments.
When inserting the needle, if you are below an area of scarring and feel no tethers and just a smooth glide, it is very very very likely you are in the subcutaneous layer. You need to move the needle outwards and reinsert at a higher angle. If you fuck up and damage your fat layer too much, there is a chance you will get fibrosis and potentially worse scarring. Fortunately, subcutaneous fibrosis should go away with time, especially if you are on the glow stack, but why risk it? I would recommend inserting at a 20-30 degree angle and working from there. The bands could literally feel like bands. If you don't feel or hear the bands (they sort of sound like plucking a guitar cord) or at least feel some resistance and the skin resisting the needle under your scarring, you are too deep. Also if you are too shallow or dont angle the needle downward enough, there is a good chance you will accidentally exit the skin, creating another hole in the process. If you go slow, you will realize this as it will start to sting once you are exiting. That's why you need to work slow. Also when you do try to untether a band, hold the skin down at the surface so it doesn't move, and the band should snap easier.
also, have plenty of gauze lying around because there were multiple times were i would insert the needle, then once i removed it have blood spewing out of my cheek and dripping on the floor and on my desk. some scars might just not have any tethering so dont get too aggressive under your skin if you dont feel tethers. for me what really helped was doing DIY prf (just copied this guy ) under my scars and that helped reduce the pitting and redness. also don't list to the centrifuge settings in the video he says to do 5 or 6 minutes or some shit like that, but i found you 2-4 minutes @ 500 - 800 RPM is ideal, otherwise the shit will clot and you will be injecting unconcentrated crap. the very first time i did it i injected a bunch of yellow stuff, which turned out to be serum, and it stayed under my skin for weeks before it got absorbed. real prf gets absorbed within 1 week max. and for downtime in general, you will have bruising for a week after subcision (min), so make sure to drain any blood before finishing your session to not have the swelling last longer than it should.
as of now, just through subcision, prf, and the stack mentioned 2 paragraphs ago, i have managed to get my scarring down to a level i can easily cover with some CC cream, despite being told my shit was severe by some jew derm less than 3 months ago. and the best part is i havent even treated all my scarring with prf either, as i didnt have enough liquid, but the ones i did inject have healed pretty nicely, and i plan to inject more in 2 weeks followed by 1 last subcision. boxcars (untethered) will respond best to prf, but you can do on rolling scars too and given you untethered them they should improve a lot. and i think doing it while running bpc 157, tb 500, and ghk cu is ideal, as if you do mess up, you get some forgiveness plus you heal better because of the collagen and antifibrotic affects so end up needing less sessions as the scars never retether. maybe cialis is good too for skin healing (from studies) as it improves blood flow, but i believe it should be stopped 1 week before and 3 days after minimum, same with tazarotene, which is also good for acne scarring, but these are all cope unless you do subcision first, otherwise the results will be very minimal.
lastly, don't be a fucking retard and just depend on this guide. watch videos on subcision so you have a sense of how it's done because if you dont you will fuck up
thanks for reading
Attachments
-
 1764290198523.png42.2 KB · Views: 0
 -
 1764290198260.png243.9 KB · Views: 0
 -
 1764290198184.png569.4 KB · Views: 0
 -
 1764290198316.png216.6 KB · Views: 0
 -
 1764290198479.png204.9 KB · Views: 0
 -
 1764290198152.png395.8 KB · Views: 0
 -
 1764290198211.png377.5 KB · Views: 0
 -
 1764290198510.png54.7 KB · Views: 0
 -
 1764290198401.png1.3 MB · Views: 0
 -
 1764290198299.png973 KB · Views: 0
 -
 1764290198243.png799.1 KB · Views: 0
 -
 1764290198444.png550.5 KB · Views: 0
 -
 1764290198499.png453.1 KB · Views: 0
 -
 1764290198463.png417.7 KB · Views: 0
 -
 1764290198421.png304 KB · Views: 0
 -
 1764290200187.png42.2 KB · Views: 0