Veridic
Member of SLYR
- Joined
- Aug 14, 2024
- Posts
- 2,681
- Reputation
- 3,702
Guide on increasing dimorphism through angularity of contouring while retaining a natural appearance and avoiding getting called out.
Follow steps exactly to avoid any unwanted results
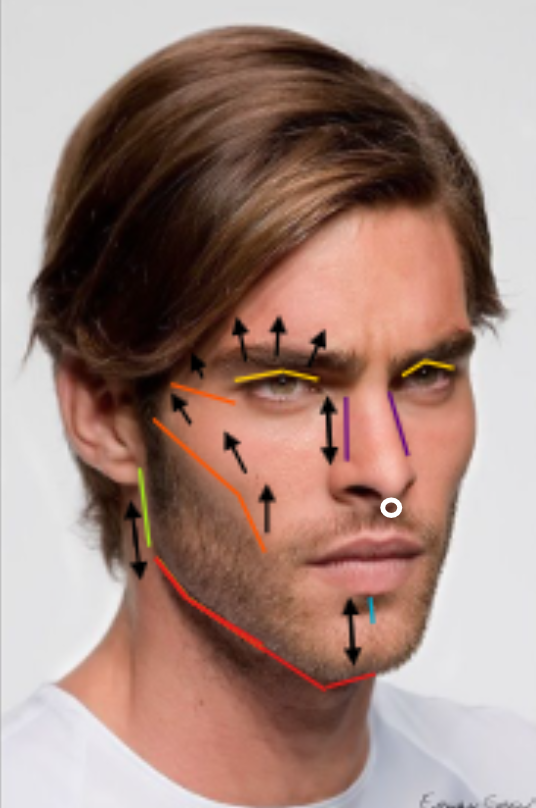
Color guide pertaining to the image I've marked with references displayed below:
Yellow - Orbital depth shadowing (Inside of the eye socket)
Adds dimorphism and perceived browridge projection to a deeper set orbital appearance, adding intensity especially to those lacking contrast or brow/supraorbital projection.
Application: Apply in tiny amounts towards the furthest corner within region in taps and tap/blend outwards towards brow until evened out, making sure to avoid getting any on the upper eyelid.
Orange - Lateral zygomatic plane + ogee curve contour
Hollow cheekbone + visually sharper zygomatic plane flow that gives the male models that "flowing line" look.
Application: Draw dotted line along the lower plane of your zygomas (you can apply it slightly on the bone itself around the lower half to contribute to a higher set appearance), smudge and blend up and away from your face, towards the upper ear without smearing too far, in small consistent tap-like movements.
Green - Ramus highlighting
Absolute must, no matter who you are or what you look like, contouring this region will increase side profile angularity in motion by creating a shadow of separation between the ramus and neck tissue while also visually widening your gonial flaring as a dimorphism boost.
Application: Very simple, draw a line using a contouring stick or eyeliner and blend back and forth until it resembles a "shadow".
Red - Neck to jaw shadowing
Adds separation between the neck to jaw (obviously) and may improve perceived hyoid height when it comes to how it affects your soft tissue transitions in the area.
Application: Finding the crease connecting your submental submental region between the lower jaw and upper neck, draw a thin line from one end of the ramus to the other. Blend parallel to what you drew back and forth, in the same manner you did with the ramus.
Purple - Nose slimming
If, required, and pretty self explanatory. Apply using the same technique mentioned in the previous two examples.
Blue - chin height extension illusion.
Extends perceived chin height or adding more sloping to contribute to a more masculine lower third.
Application: Using a very tiny amount, dab it to the bottom of your lip as high as you can get in there, smear up and down only until the product is nearly gone. Very easy to overdo, stay light.
White - philthrum length shortening.
Very easy to overdo so avoid any darker colors like brown or black and applying a miniscule portion to the base of the nose/columella to create contrast making the space between your nose and lips appear shorter.
Contour
-Mandible contour applied to the bottom of the jaw, exactly where the bone and hyoid region soft tissue connect followed by blending inward towards the neck.
-Anterior zygomatic contouring in case of overly projected soft tissue creating a flatter/puffy appearance which I've used myself during self administration of filler within the midface. Follow the same logic explained above for orange but only to the bottom of your anterior zygoma, blended up and only enough to avoid coming near the infraorbital base.
Contrast
-Corrector + concealer for tear troughs/undereye hollowingFollow steps exactly to avoid any unwanted results
Color guide pertaining to the image I've marked with references displayed below:
Yellow - Orbital depth shadowing (Inside of the eye socket)
Adds dimorphism and perceived browridge projection to a deeper set orbital appearance, adding intensity especially to those lacking contrast or brow/supraorbital projection.
Application: Apply in tiny amounts towards the furthest corner within region in taps and tap/blend outwards towards brow until evened out, making sure to avoid getting any on the upper eyelid.
Orange - Lateral zygomatic plane + ogee curve contour
Hollow cheekbone + visually sharper zygomatic plane flow that gives the male models that "flowing line" look.
Application: Draw dotted line along the lower plane of your zygomas (you can apply it slightly on the bone itself around the lower half to contribute to a higher set appearance), smudge and blend up and away from your face, towards the upper ear without smearing too far, in small consistent tap-like movements.
Green - Ramus highlighting
Absolute must, no matter who you are or what you look like, contouring this region will increase side profile angularity in motion by creating a shadow of separation between the ramus and neck tissue while also visually widening your gonial flaring as a dimorphism boost.
Application: Very simple, draw a line using a contouring stick or eyeliner and blend back and forth until it resembles a "shadow".
Red - Neck to jaw shadowing
Adds separation between the neck to jaw (obviously) and may improve perceived hyoid height when it comes to how it affects your soft tissue transitions in the area.
Application: Finding the crease connecting your submental submental region between the lower jaw and upper neck, draw a thin line from one end of the ramus to the other. Blend parallel to what you drew back and forth, in the same manner you did with the ramus.
Purple - Nose slimming
If, required, and pretty self explanatory. Apply using the same technique mentioned in the previous two examples.
Blue - chin height extension illusion.
Extends perceived chin height or adding more sloping to contribute to a more masculine lower third.
Application: Using a very tiny amount, dab it to the bottom of your lip as high as you can get in there, smear up and down only until the product is nearly gone. Very easy to overdo, stay light.
White - philthrum length shortening.
Very easy to overdo so avoid any darker colors like brown or black and applying a miniscule portion to the base of the nose/columella to create contrast making the space between your nose and lips appear shorter.
Contour
-Mandible contour applied to the bottom of the jaw, exactly where the bone and hyoid region soft tissue connect followed by blending inward towards the neck.
-Anterior zygomatic contouring in case of overly projected soft tissue creating a flatter/puffy appearance which I've used myself during self administration of filler within the midface. Follow the same logic explained above for orange but only to the bottom of your anterior zygoma, blended up and only enough to avoid coming near the infraorbital base.
Contrast
-Blush around the sharpest point of the zygos for liveliness/coloring.
-Upper waterline and only the upper portion to create denser looking lashes/eye intensity boost.
-Eyelash dye using a temporary or semi permanent dye, my personal go to is the "Just For Men 1-Day Beard & Brow Dye" which comes with a spoolie to apply on the lashes and wash out easily. Preferable if you don't want to risk overdoing semi permanent dye and risk looking off for a few weeks.
-Guyliner, but only within the outer 2/3 portions of the lower waterline if looking to avoid the obvious eyeliner look.
-Medial canthus eyeliner will never not be the best upgrade to making your eyes more striking by extending your pfl visually.
This is about everything you'll need in a short guide to lack back upon, adjust quality and methods to your liking of results.
Thank you for reading, and to those concerned about it being "gay" or anything of that nature have to realize that maxxing your traits for the sole purpose of attracting the female gender is anything but.
Adapt or stay behind in a world of ever rising competition.