




Organelle
Not so Grey
- Joined
- Jul 5, 2026
- Posts
- 31
- Reputation
- 80
I ran my first round of Lipo Vela on myself two days ago and it went clean with zero complications. Here is a comprehensive guide I put together for you guys!
⬥━━━━━━━━━━━━━━━━━━━━⬥
What is Lipo Vela
Lipo Vela is a liquid fat-dissolving solution made for stubborn localized fat. It breaks down fat cells while also supporting skin tightening and collagen so you don’t end up with loose skin after the fat is gone. It’s designed as an all-in-one treatment instead of just pure fat melting.
⬥━━━━━━━━━━━━━━━━━━━━⬥
The actual science behind Lipo Vela
It works through a combination of ingredients that attack fat from multiple angles. PPC breaks down fat cell membranes so the stored fat can be released and metabolized by the body. Sodium deoxycholate destroys the fat cells themselves. Riboflavin and cyanocobalamin support cellular energy and fat metabolism during the breakdown process. Peptides like Syn-AKE along with added collagen and growth factors help maintain skin firmness and elasticity while the fat is being cleared. This is why it doesn’t just dissolve fat but actively helps the skin recover at the same time.
⬥━━━━━━━━━━━━━━━━━━━━⬥
Why Lipo Vela mogs other dissolvers
Most other options like Aqualyx are slow release gels that take around four weeks to fully work. That slow release is why you stay bloated and puffy for so long. Lipo Vela hits the fat cells directly and clears faster, usually within about two weeks. The extra vitamins, peptides, and growth factors also protect skin quality, so you get permanent fat loss without the long bloated phase or as much risk of shitty looking skin.
⬥━━━━━━━━━━━━━━━━━━━━⬥
The real risks with facial anatomy
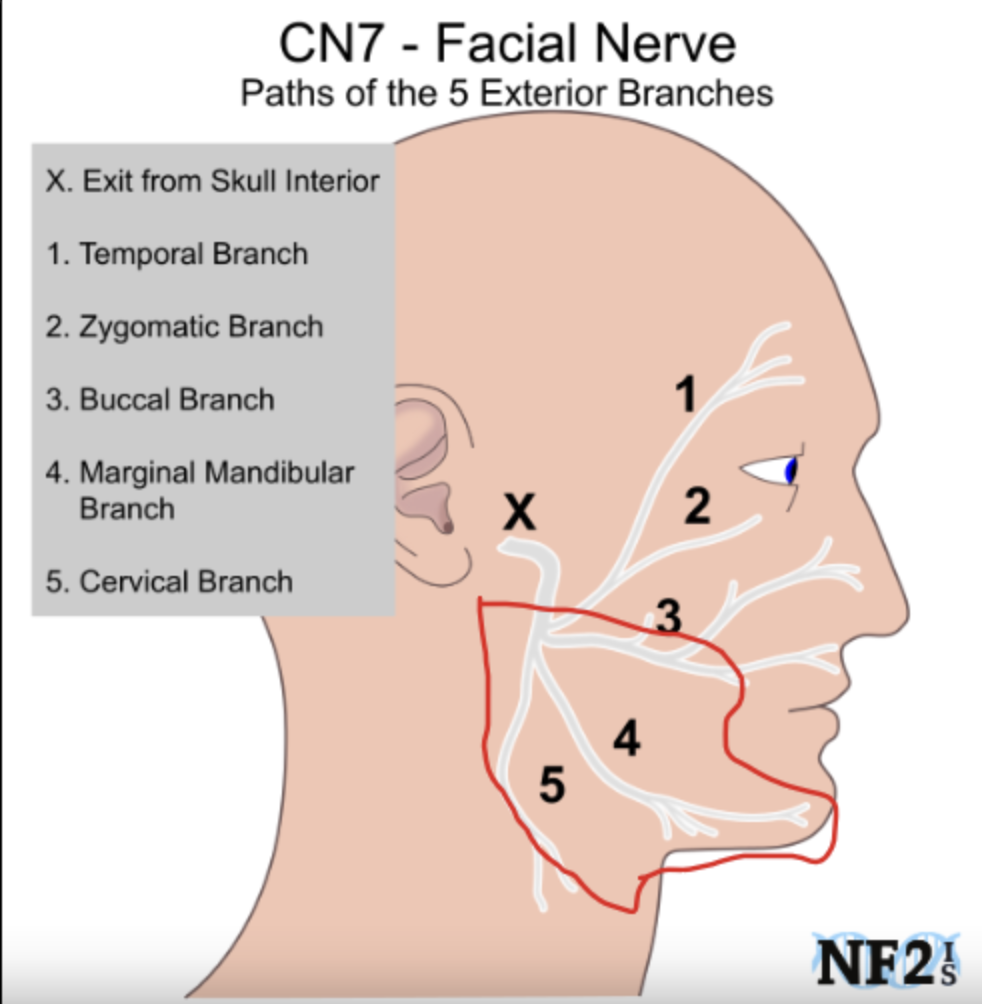
The face has a lot of important veins and arteries packed close together, so technique matters more than people realize. You can cause facial paralysis if you hit the facial nerve branches, and the marginal mandibular branch along the jawline is one of the riskiest for functionality of your lower face and jaw. Damage there can leave you with a drooping or weak lower lip. Nerve damage in general is a real possibility with bad coordination or depth. Vascular issues are another concern because if you inject into or compress a vessel you can get skin necrosis, and in very rare worst case scenarios involving certain facial vessels it can affect blood supply toward the eye and cause vision problems or even blindness. The main areas to be extra cautious are along the jawline where the marginal mandibular branch runs, near major vessels in the mid-cheek, and anywhere close to the orbital area. Stay subcutaneous, pinch properly, and never go too deep or use too much volume in one spot. These complications are uncommon with good technique, but they’re possible if you’re careless.
⬥━━━━━━━━━━━━━━━━━━━━⬥
Results from one session and how many you actually need
One well done session gives clear visible reduction in the stubborn fat you target. The fat cells that die are gone permanently. You’ll see the biggest change after the swelling drops, which is usually within a few days to a week. For extreme results, most people need two to four sessions spaced about three weeks apart. One session already makes a noticeable difference if you’re lean and targeting actual stubborn pockets.
⬥━━━━━━━━━━━━━━━━━━━━⬥
Materials you need
You only really need
- Alcohol wipes
- Lipo Vela
- 8mm. 27-31 G needles (30 is ideal)
Optional materials include
- Liquid lidocaine
- Topical lidocaine
- Surgical gloves
⬥━━━━━━━━━━━━━━━━━━━━⬥
Tutorial
For prepping I made sure everything stayed sterile by washing my hands thoroughly and wiping down the whole work area along with the skin using fresh alcohol pads and letting everything dry completely before starting.
Mapping came next where I marked points about one centimeter apart (I was so paranoid on symmetry that I used a protractor) across the cheeks while constantly checking symmetry in the mirror so both sides matched evenly.
For the dose breakdown I went with zero point two milliliters per point because the liquid spreads more than gels so overloading any single spot can cause uneven texture.
During the procedure I pinched the skin firmly before every injection to protect deeper branches, went in at about a forty five degree angle, and stayed in the subcutaneous layer the whole time while working in a steady order from bottom to top so I never lost track of which points I had already treated.
⬥━━━━━━━━━━━━━━━━━━━━⬥
Signs you succeeded
Swelling - Swelling and firmness show up in the treated area within the first twenty four to forty eight hours.
Slight pain - You can expect some aching or tenderness at the injection spots.
All these should go away in a few days to a week post procedure.
⬥━━━━━━━━━━━━━━━━━━━━⬥
Signs you messed up
Redness, heat, or swelling that lasts past seventy two hours is a warning sign along with any pus, fever, or skin that looks hot.
Severe or worsening pain that does not calm down.
Hard lumps that stay for a long time.
Facial weakness or facial paralysis.
Asymmetry.
Blurry vision or blindness.
These issues are uncommon when technique is good.
⬥━━━━━━━━━━━━━━━━━━━━⬥
Thankyou and goodluck!
⬥━━━━━━━━━━━━━━━━━━━━⬥
What is Lipo Vela
Lipo Vela is a liquid fat-dissolving solution made for stubborn localized fat. It breaks down fat cells while also supporting skin tightening and collagen so you don’t end up with loose skin after the fat is gone. It’s designed as an all-in-one treatment instead of just pure fat melting.
⬥━━━━━━━━━━━━━━━━━━━━⬥
The actual science behind Lipo Vela
It works through a combination of ingredients that attack fat from multiple angles. PPC breaks down fat cell membranes so the stored fat can be released and metabolized by the body. Sodium deoxycholate destroys the fat cells themselves. Riboflavin and cyanocobalamin support cellular energy and fat metabolism during the breakdown process. Peptides like Syn-AKE along with added collagen and growth factors help maintain skin firmness and elasticity while the fat is being cleared. This is why it doesn’t just dissolve fat but actively helps the skin recover at the same time.
⬥━━━━━━━━━━━━━━━━━━━━⬥
Why Lipo Vela mogs other dissolvers
Most other options like Aqualyx are slow release gels that take around four weeks to fully work. That slow release is why you stay bloated and puffy for so long. Lipo Vela hits the fat cells directly and clears faster, usually within about two weeks. The extra vitamins, peptides, and growth factors also protect skin quality, so you get permanent fat loss without the long bloated phase or as much risk of shitty looking skin.
⬥━━━━━━━━━━━━━━━━━━━━⬥
The real risks with facial anatomy
The face has a lot of important veins and arteries packed close together, so technique matters more than people realize. You can cause facial paralysis if you hit the facial nerve branches, and the marginal mandibular branch along the jawline is one of the riskiest for functionality of your lower face and jaw. Damage there can leave you with a drooping or weak lower lip. Nerve damage in general is a real possibility with bad coordination or depth. Vascular issues are another concern because if you inject into or compress a vessel you can get skin necrosis, and in very rare worst case scenarios involving certain facial vessels it can affect blood supply toward the eye and cause vision problems or even blindness. The main areas to be extra cautious are along the jawline where the marginal mandibular branch runs, near major vessels in the mid-cheek, and anywhere close to the orbital area. Stay subcutaneous, pinch properly, and never go too deep or use too much volume in one spot. These complications are uncommon with good technique, but they’re possible if you’re careless.
⬥━━━━━━━━━━━━━━━━━━━━⬥
Results from one session and how many you actually need
One well done session gives clear visible reduction in the stubborn fat you target. The fat cells that die are gone permanently. You’ll see the biggest change after the swelling drops, which is usually within a few days to a week. For extreme results, most people need two to four sessions spaced about three weeks apart. One session already makes a noticeable difference if you’re lean and targeting actual stubborn pockets.
⬥━━━━━━━━━━━━━━━━━━━━⬥
Materials you need
You only really need
- Alcohol wipes
- Lipo Vela
- 8mm. 27-31 G needles (30 is ideal)
Optional materials include
- Liquid lidocaine
- Topical lidocaine
- Surgical gloves
⬥━━━━━━━━━━━━━━━━━━━━⬥
Tutorial
For prepping I made sure everything stayed sterile by washing my hands thoroughly and wiping down the whole work area along with the skin using fresh alcohol pads and letting everything dry completely before starting.
Mapping came next where I marked points about one centimeter apart (I was so paranoid on symmetry that I used a protractor) across the cheeks while constantly checking symmetry in the mirror so both sides matched evenly.
For the dose breakdown I went with zero point two milliliters per point because the liquid spreads more than gels so overloading any single spot can cause uneven texture.
During the procedure I pinched the skin firmly before every injection to protect deeper branches, went in at about a forty five degree angle, and stayed in the subcutaneous layer the whole time while working in a steady order from bottom to top so I never lost track of which points I had already treated.
⬥━━━━━━━━━━━━━━━━━━━━⬥
Signs you succeeded
Swelling - Swelling and firmness show up in the treated area within the first twenty four to forty eight hours.
Slight pain - You can expect some aching or tenderness at the injection spots.
All these should go away in a few days to a week post procedure.
⬥━━━━━━━━━━━━━━━━━━━━⬥
Signs you messed up
Redness, heat, or swelling that lasts past seventy two hours is a warning sign along with any pus, fever, or skin that looks hot.
Severe or worsening pain that does not calm down.
Hard lumps that stay for a long time.
Facial weakness or facial paralysis.
Asymmetry.
Blurry vision or blindness.
These issues are uncommon when technique is good.
⬥━━━━━━━━━━━━━━━━━━━━⬥
Thankyou and goodluck!
Last edited: