





averagetotaluser
retard
- Joined
- Jun 27, 2026
- Posts
- 639
- Reputation
- 768
This thread goes specifically to @Notcel, this will turn you from a noob to a prooo, but if you're not him idc this is just to learn and have fun, Use Dark mode and 80% zoom for better understandiing!!!!!
Let's be real: most people who buy a guitar fail within the first two weeks. They buy a cheap acoustic with strings higher than a skyscraper, try to force their fingers into a clunky open G-major chord, get frustrated by the buzzing sound, and throw the guitar into the closet forever. They treat music like a magical, genetic talent instead of a predictable, mechanical interface.
Standard music school curriculum is completely unoptimized for the modern user. You do not need to memorize sheet music, and you do not need to spend months practicing nursery rhymes.
This megathread is a hard coded, hig -effort protocol designed to only learn about the acoustic guitar, decode the physical geometry of the fretboard, and break down the three primary archetypes of guitar [Acoustic, Spanish, and Electric] along with the aesthetic gadgets that make the journey beautiful.
| THE TRI-HARDWARE LAYOUT |
+-------------------------------------------------------------------------+
| 1. ACOUSTIC | 2. SPANISH / CLASSICAl | 3. ELECTRIC |
| - Steel Strings | - Nylon Strings | - Nickel / Steel Strings |
| - High Tension | - Low Tension | - Near-Zero Tension |
| - High Callouse Demand | - Wide Fretboard Neck | - Infinite Customizatio |
| - Maximum Projection | - Intricate Fingerstyle | - Lowest Mechanical Drag |
+-------------------------------------------------------------------------+
When trying out these guitars, it’s important to know how to sit when playing. Ideally, you would sit on a chair that doesn’t have any arms so that there’s space to hold your instrument I often use my harp bench without a back because it forces me to correct my posture. You can purchase a keyboard bench at any music store for the same results.
If you’re right-handed, the waist of the guitar can be placed on your right leg. Your thumb on your left hand will be placed behind the neck of the guitar. I keep my nails long on my right hand for tone and finger picking, but do what feels comfortable for you. Be sure that the nails on your left hand are trimmed enough to get the string to the fretboard for a clear tone. You don’t want to put your fingers on the frets as you will have a muffled sound, and you also don’t want to place your fingers too far away from the fret as that will produce buzzing. You’ll find the right tone in the middle.
Good posture for playing guitar ------------> https://www.wikihow.com/Use-Good-Guitar-Posture
Now that you’ve selected your guitar, the first thing to learn is how to tune it. You have six strings on your guitar. The first string is the skinniest string closest to the waist of the guitar. The numbers and names of all the guitar strings are as follows:
String 6 (Thickest): E
String 5: A
String 4: D
String 3: G
String 2: B
String 1 (Skinniest): e
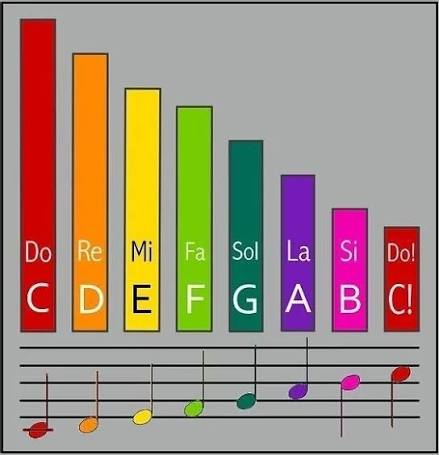
3. Musicial Alphabet
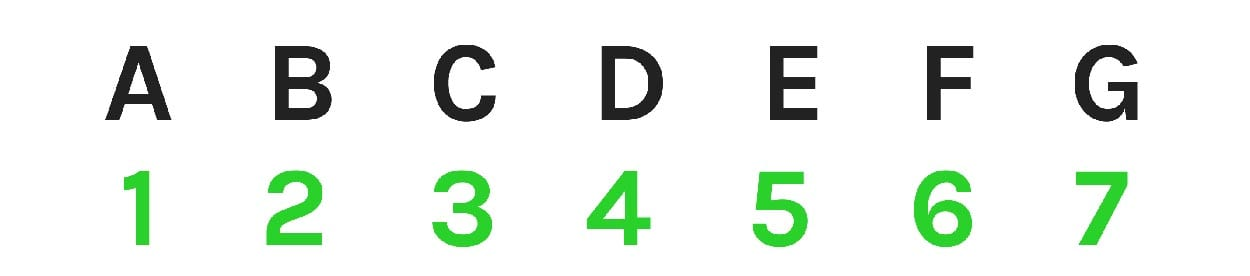
The musical alphabet starts with A and ends with G. There are seven letters in the musical alphabet and 12 including the accidentals that are sharp and flat notes. Sharp notes are a half step after the natural note. Flat notes are a half step before the natural note.
See all music notes below:

5. Ready to Play
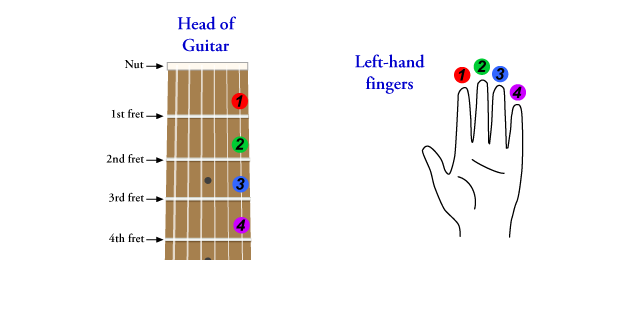
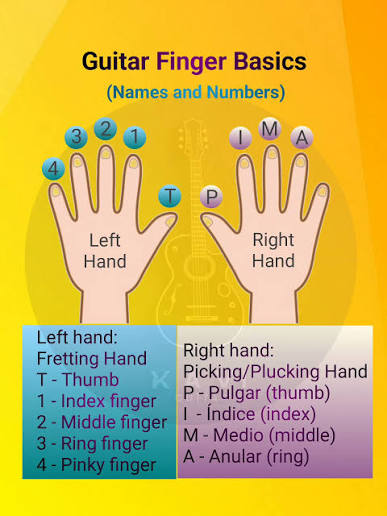
When looking at chord fingerings, your fretting hand fingers are numbered:
Counting your notes and chords is what actually creates music. Most music is written in common time ($4/4$ time), which means there are four beats in a measure. Try listening to your favorite song, tap your foot, and count along to the beat. (You can download a free Metronome app to help keep your timing steady).
For this exercise, practice by strumming downward using your thumb or a pick on every single beat:
Major Chords
1-4-5
Modified Chords
{1 - 1 - 1 - 1}
{4 - 4 - 1 - 1}
{5 - 4 - 1 - 5}
Key of C
Key of G
Use fingers 1, 2, 3, and 4 on your left hand to play frets 1, 2, 3, and 4 on a single string. Pluck each note downward with your right-hand thumb or pick.
HBD
OtJ
Let's be real: most people who buy a guitar fail within the first two weeks. They buy a cheap acoustic with strings higher than a skyscraper, try to force their fingers into a clunky open G-major chord, get frustrated by the buzzing sound, and throw the guitar into the closet forever. They treat music like a magical, genetic talent instead of a predictable, mechanical interface.
Standard music school curriculum is completely unoptimized for the modern user. You do not need to memorize sheet music, and you do not need to spend months practicing nursery rhymes.
This megathread is a hard coded, hig -effort protocol designed to only learn about the acoustic guitar, decode the physical geometry of the fretboard, and break down the three primary archetypes of guitar [Acoustic, Spanish, and Electric] along with the aesthetic gadgets that make the journey beautiful.
1. The Tri-Aesthetic Hardware Stack: Choosing Your Type of Guitar
+-------------------------------------------------------------------------+| THE TRI-HARDWARE LAYOUT |
+-------------------------------------------------------------------------+
| 1. ACOUSTIC | 2. SPANISH / CLASSICAl | 3. ELECTRIC |
| - Steel Strings | - Nylon Strings | - Nickel / Steel Strings |
| - High Tension | - Low Tension | - Near-Zero Tension |
| - High Callouse Demand | - Wide Fretboard Neck | - Infinite Customizatio |
| - Maximum Projection | - Intricate Fingerstyle | - Lowest Mechanical Drag |
+-------------------------------------------------------------------------+
I. The Acoustic Core (Steel String)
The steel-string acoustic is the raw, unamplified engine of the fretted world. It uses an internal soundboard chamber to convert physical kinetic energy directly into sound pressure waves.- The Mechanical Tension: High. The steel core wraps require substantial down-pressure to fully seat against the nickel-silver frets. Your fingertips will undergo cellular oxidation and harden into callouses within 10 to 14 days.
- The Ergonomics: The body is large (typically Dreadnought or Concert cuts) to optimize acoustic volume. This forces your dominant arm into a wider lever angle.
- The Strategic Application: Ideal for dense rhythm, percussive chording, maximum projection, and raw songwriting.
II. The Spanish Layer (Classical Nylon)
The Spanish guitar is an elegant, historically deep framework that relies on acoustic balance and absolute micro-precision.- The Mechanical Tension: Low. The three bass strings are copper-wound silk, and the three treble strings are pure extruded nylon. They are soft and merciful on beginner skin, but they require a higher arc of movement to vibrate without buzzing.
- The Ergonomics: The fretboard is completely flat (zero radius) and significantly wider than an acoustic. This removes the ability to wrap your thumb over the top. Your fretting thumb must stay locked strictly in the center-back of the neck, acting as a direct counter-weight to let your fingers stretch vertically down onto the frets.
- The Strategic Application: Intricate fingerstyle arrangement, polyphonic writing (bass lines and melodies played at the same time), and highly explosive flamenco runs.
III. The Electric Operating System (Nickel / Magnetic Pickups)
The electric guitar is a low-friction, solid-body machine designed to pass a low-voltage electrical signal down an unbalanced line to an external amplifier or Digital Audio Workstation ($DAW$).- The Mechanical Tension: Near zero. Running lighter gauges (like $.009$ to $.042$), the strings feel like soft wire. The string action can be set down to fractions of a millimeter, reducing the cognitive and physical load on your hand to almost nothing.
- The Ergonomics: Slim, highly contoured necks designed for raw velocity, upper-fret access, and sustained muscle endurance.
- The Strategic Application: Limitless sound design, high-gain leads, ambient texture processing, and fast improvisational scales.
2. Getting Comfortable
When trying out these guitars, it’s important to know how to sit when playing. Ideally, you would sit on a chair that doesn’t have any arms so that there’s space to hold your instrument I often use my harp bench without a back because it forces me to correct my posture. You can purchase a keyboard bench at any music store for the same results.
If you’re right-handed, the waist of the guitar can be placed on your right leg. Your thumb on your left hand will be placed behind the neck of the guitar. I keep my nails long on my right hand for tone and finger picking, but do what feels comfortable for you. Be sure that the nails on your left hand are trimmed enough to get the string to the fretboard for a clear tone. You don’t want to put your fingers on the frets as you will have a muffled sound, and you also don’t want to place your fingers too far away from the fret as that will produce buzzing. You’ll find the right tone in the middle.
Good posture for playing guitar ------------> https://www.wikihow.com/Use-Good-Guitar-Posture
Now that you’ve selected your guitar, the first thing to learn is how to tune it. You have six strings on your guitar. The first string is the skinniest string closest to the waist of the guitar. The numbers and names of all the guitar strings are as follows:
String 6 (Thickest): E
String 5: A
String 4: D
String 3: G
String 2: B
String 1 (Skinniest): e
3. Musicial Alphabet
The musical alphabet starts with A and ends with G. There are seven letters in the musical alphabet and 12 including the accidentals that are sharp and flat notes. Sharp notes are a half step after the natural note. Flat notes are a half step before the natural note.
See all music notes below:
4. Hand Chart
5. Ready to Play
Musical Alphabet & Hand Chart
The musical alphabet runs from A to G. There are 12 total notes when you include the accidentals (sharps and flats). Sharp ($\sharp$) notes are a half-step after a natural note, and flat ($\flat$) notes are a half-step before a natural note.When looking at chord fingerings, your fretting hand fingers are numbered:
- 1 = Index finger
- 2 = Middle finger
- 3 = Ring finger
- 4 = Pinky finger
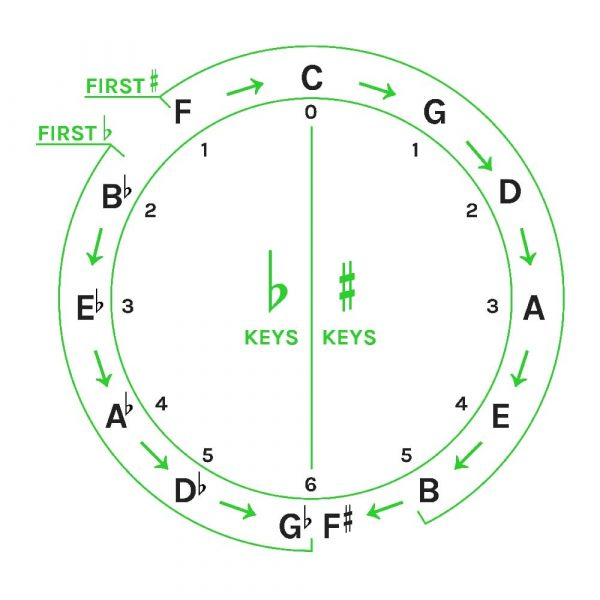
The Circle of Fifths
The Circle of Fifths helps you remember the number of sharps and flats in a major scale. It starts at the top with the key of C (which is completely natural with zero sharps or flats). The right side of the circle contains the keys with sharps, and the left side contains the keys with flats. Learning this method made me a much better improviser and opened up opportunities for me to play in avant-garde jazz, experimental, and other genres where sheet music isn't used.
Major Chords & Tempo
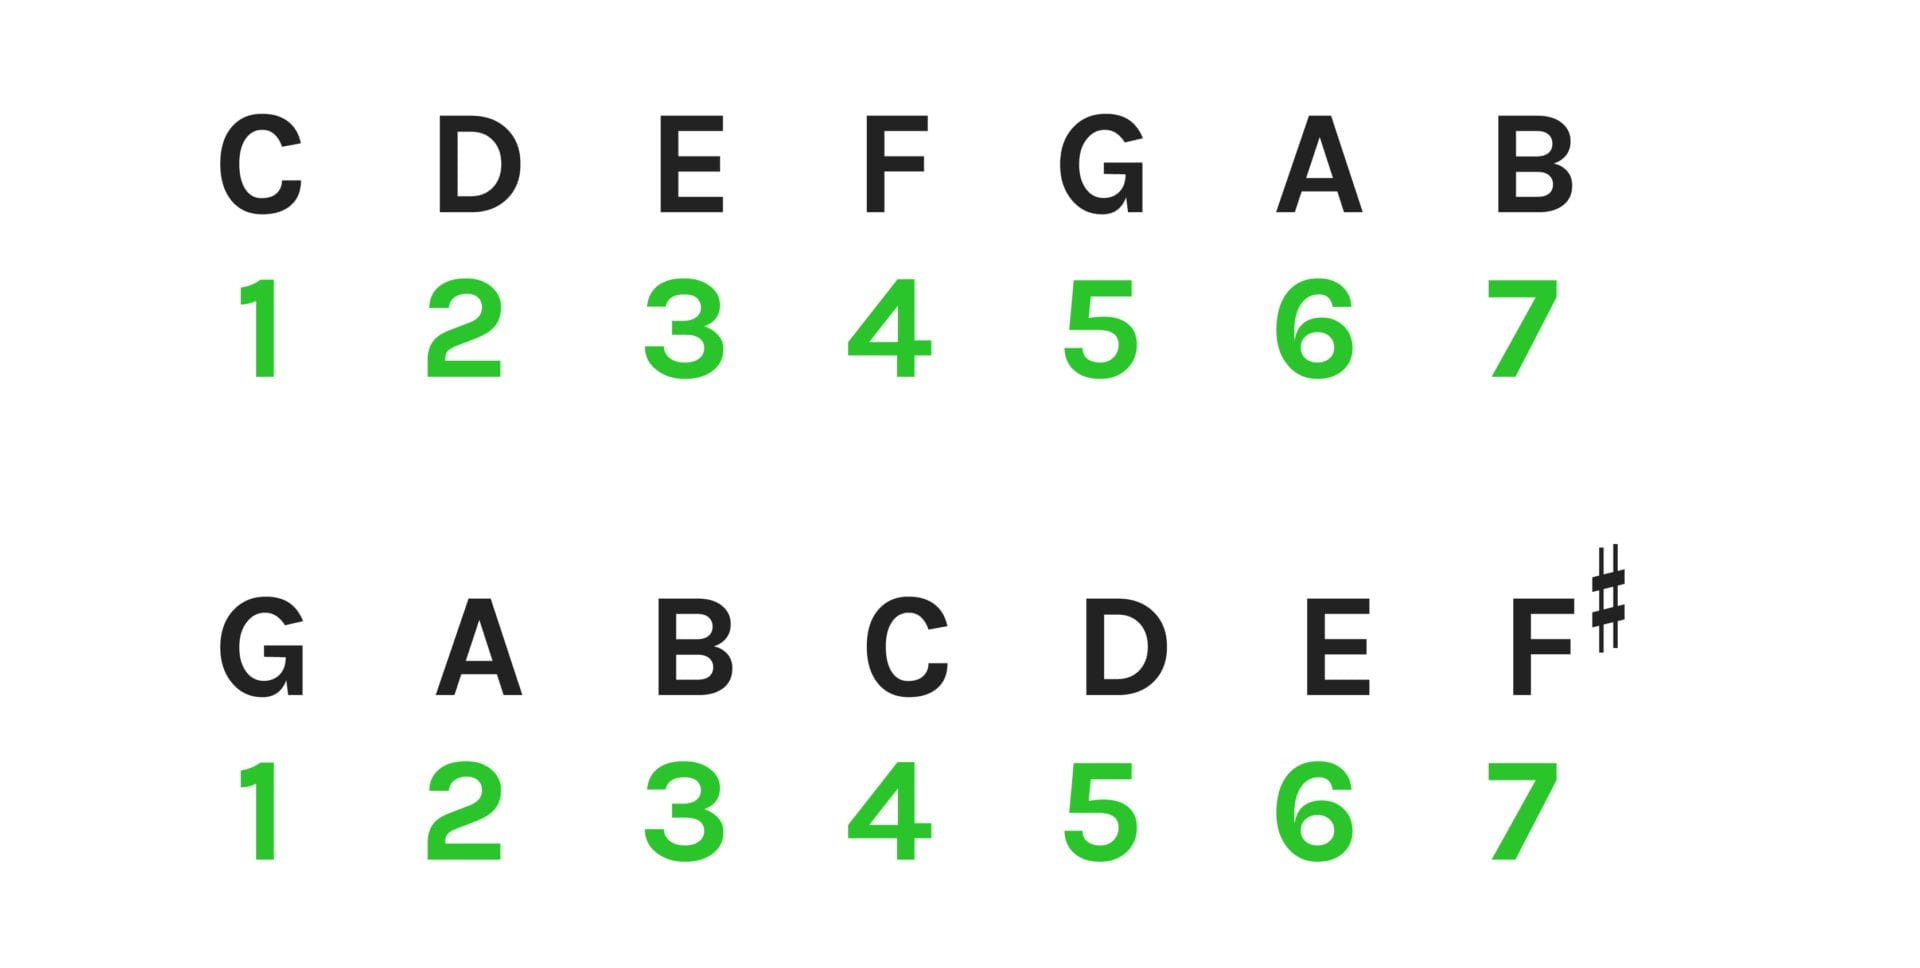
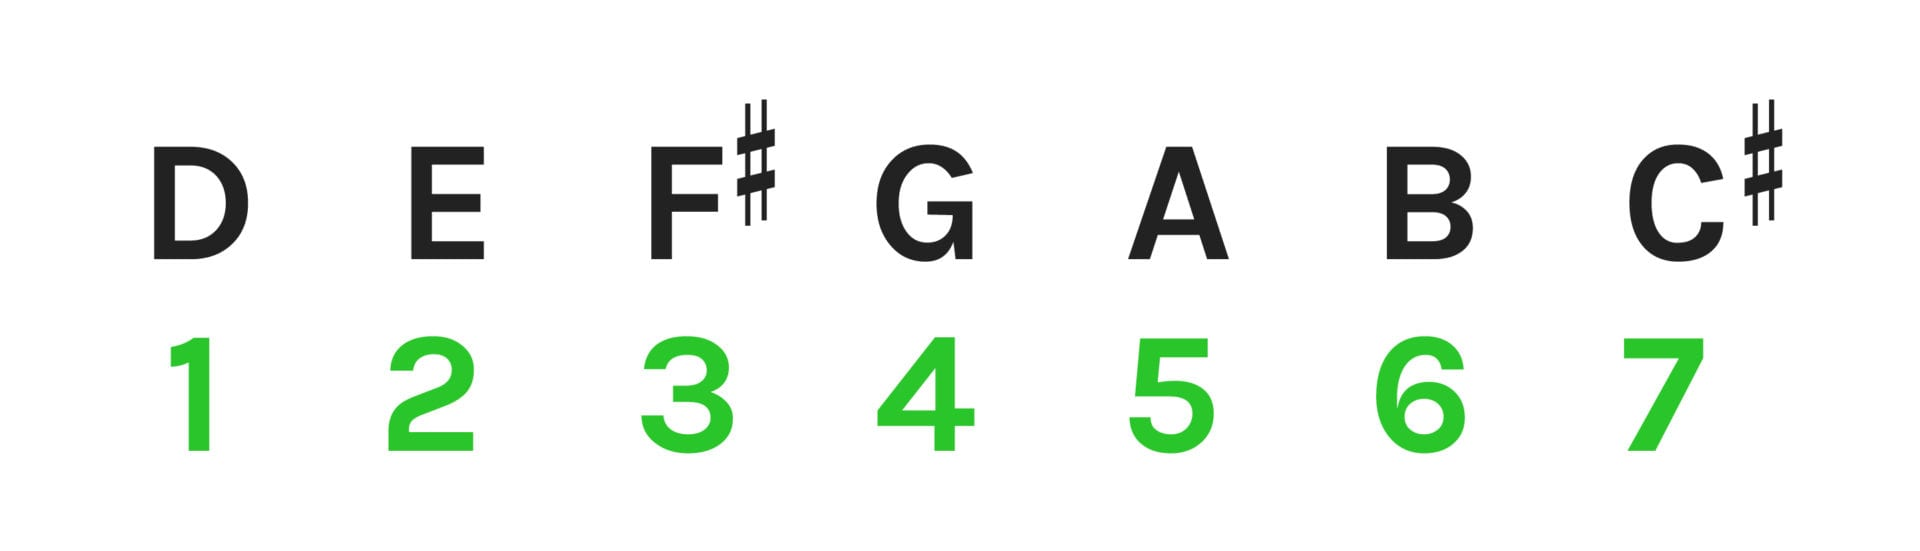
Major chords have a bright, happy sound and use the 1st, 3rd, and 5th notes of a scale. For example, a C Major chord uses the notes C - E - G, and a G Major chord uses G - B - D.Counting your notes and chords is what actually creates music. Most music is written in common time ($4/4$ time), which means there are four beats in a measure. Try listening to your favorite song, tap your foot, and count along to the beat. (You can download a free Metronome app to help keep your timing steady).
1-4-5 Progressions
The 1-4-5 progression is the foundation of Western music, including classical, rock, and pop. These progressions sound highly pleasing because they naturally resolve when you return to the 1 (the root key).For this exercise, practice by strumming downward using your thumb or a pick on every single beat:
- Key of C: C -> F -> G -> C (Example song: "La Bamba" by Ritchie Valens)
- Key of G: G -> C -> D -> G (Example song: "Good Riddance" by Green Day)
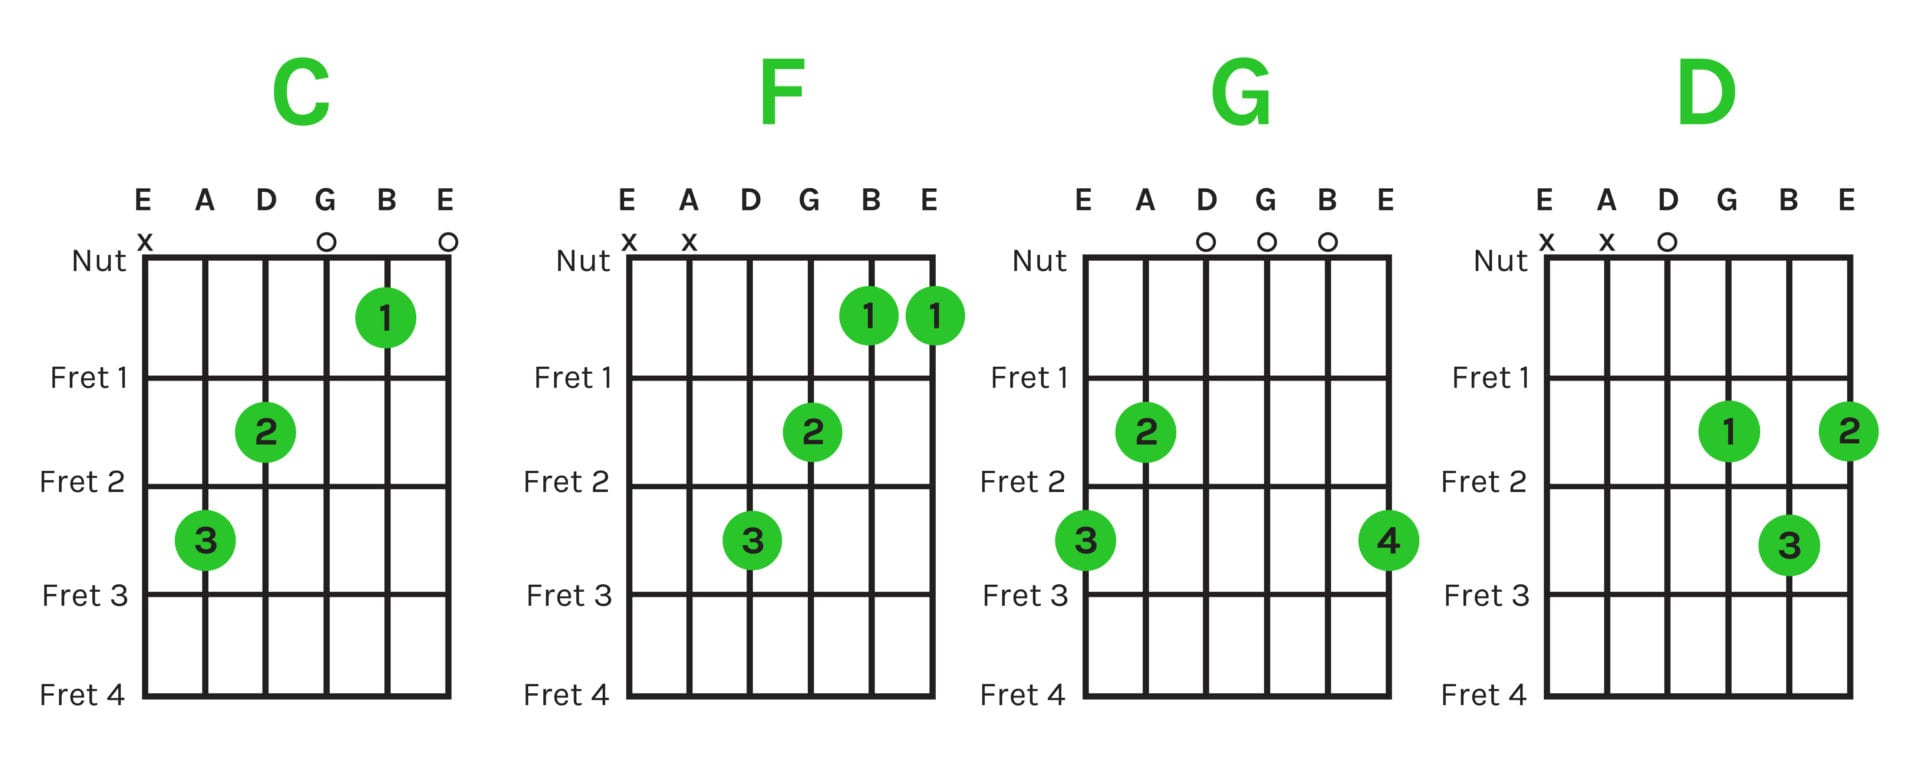
Modified Chords: If the full shapes are too tough, you can use easy, modified versions of the C, F, and G chords that use fewer strings to make getting started smoother.
Major Chords
1-4-5
Modified Chords
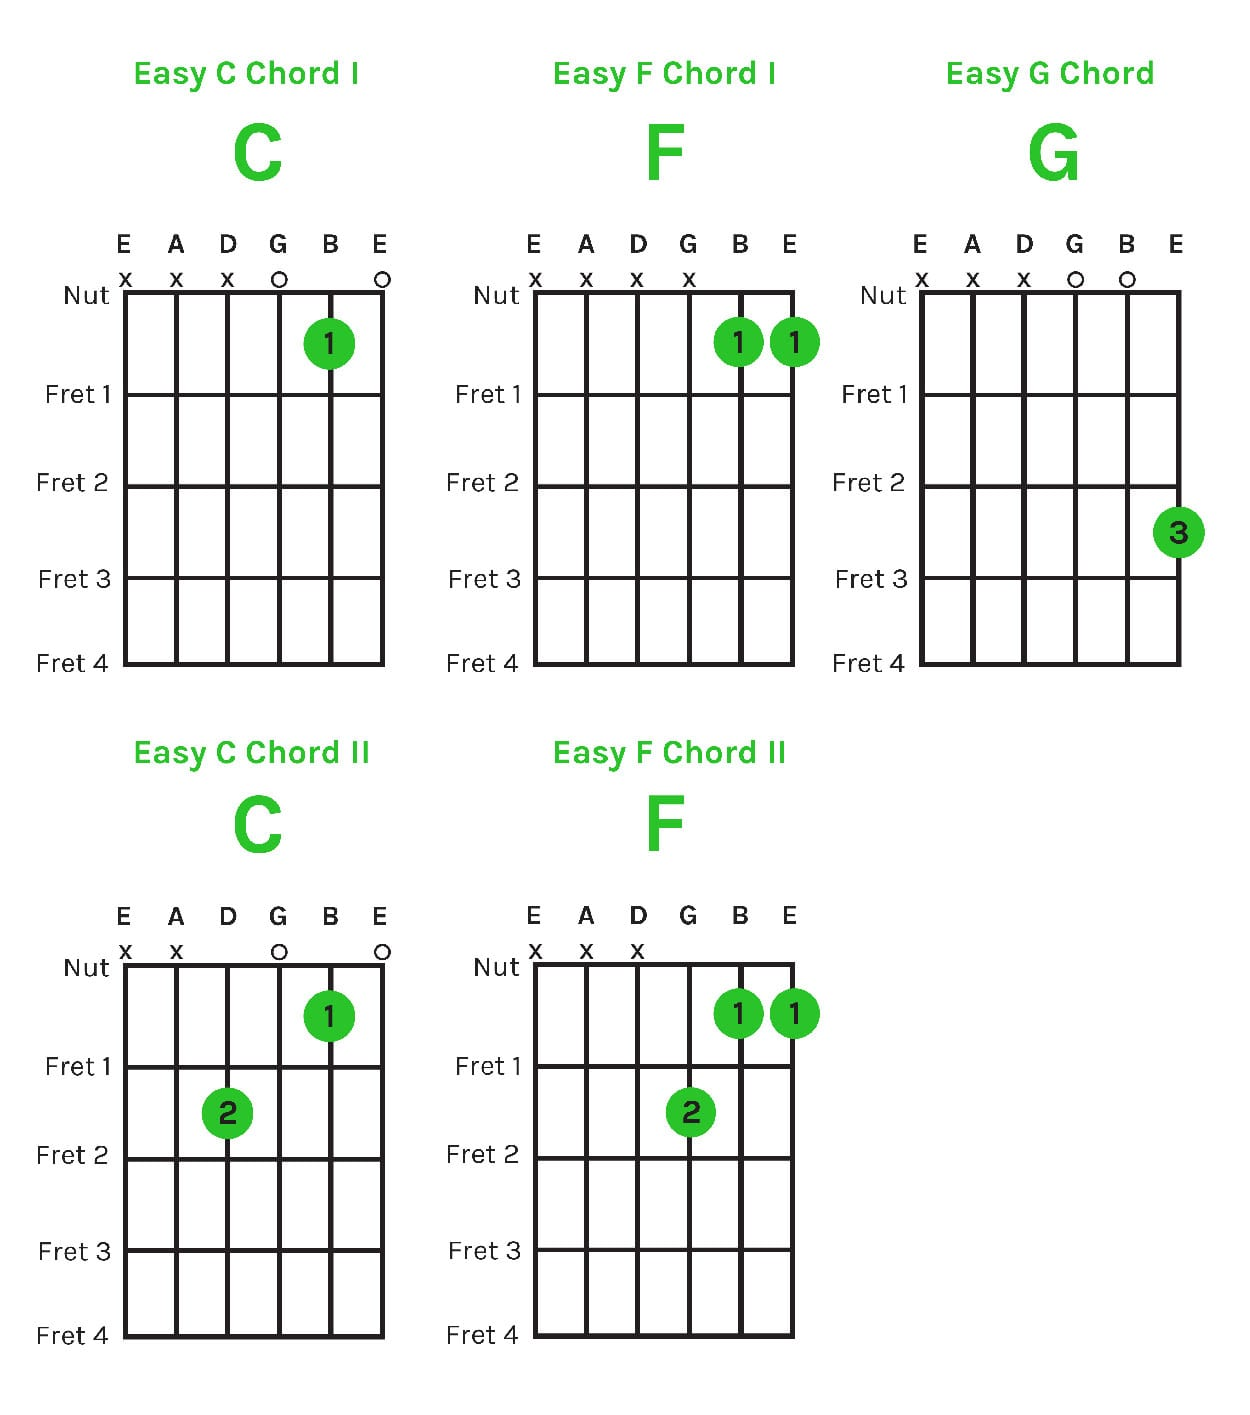
12-Bar Blues & Strumming
1-4-5 progressions are also the core blueprint of the 12-bar blues. The structure follows this exact measure count:{1 - 1 - 1 - 1}
{4 - 4 - 1 - 1}
{5 - 4 - 1 - 5}
- Rhythm Challenge: Try strumming twice per beat. Strum downward on the main beat, and strum upward on the upbeat (v = down, \= up).
Minor and Seven Chords
Now let's add minor and seven chords to your vocabulary to expand your playing.- Minor Chords: These sound warmer and moodier because the third note of the chord drops by a half-step. For example, a D Major chord uses D - F\sharp - A, but changing the \sharp to an F natural gives you a D Minor chord (D - F - A).
- Seven Chords: These add a flat seventh note to a standard major chord. A G7 chord consists of G - B - D - F, and a D7 chord consists of D - F\sharp - A - C.
The I - iii - vi - ii - V Progression
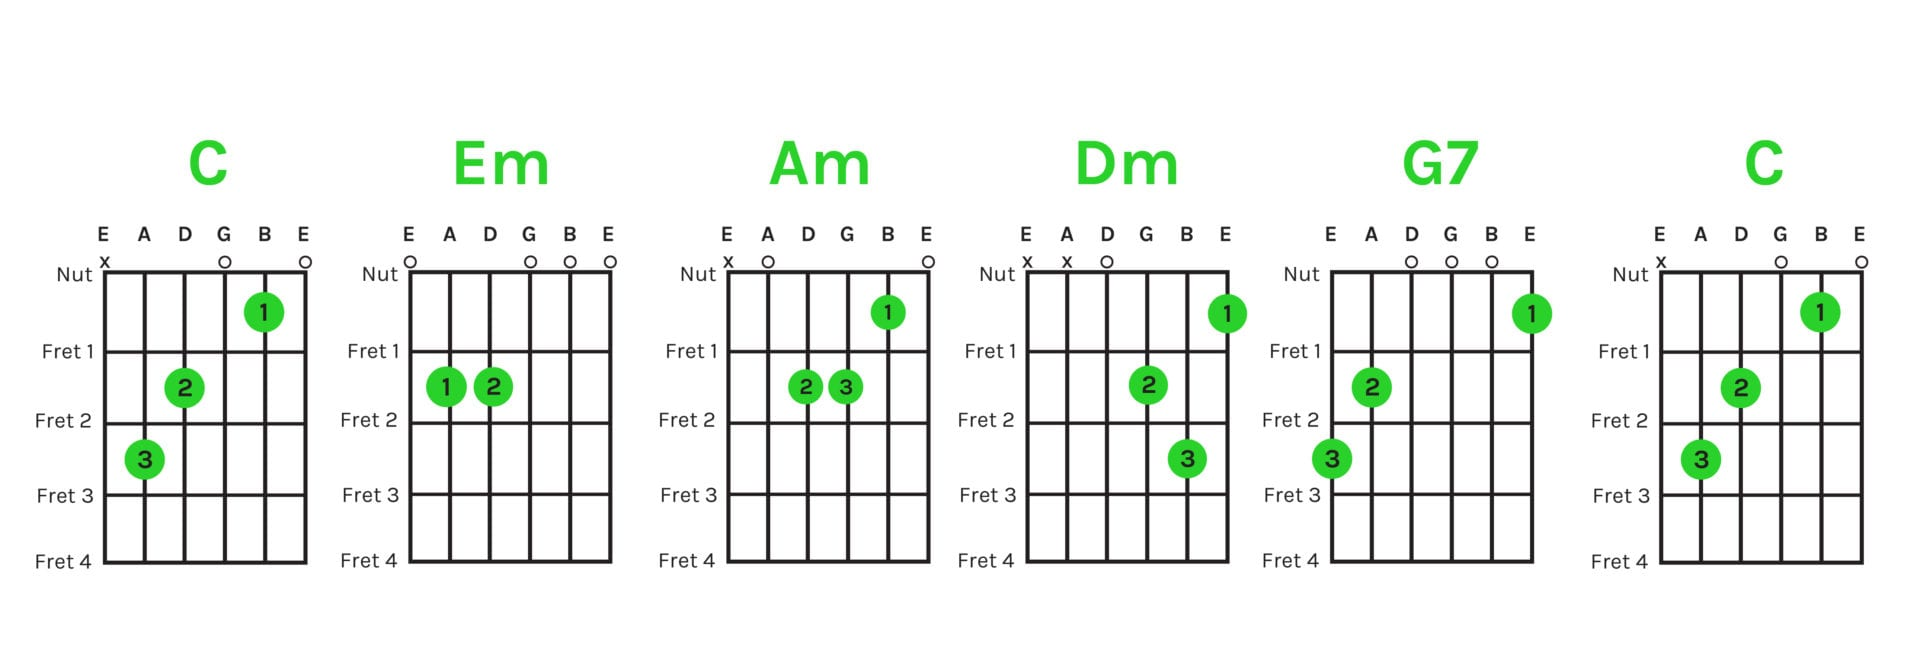
This chord order introduces minor and seven chords into a 1-3-6-2-5 progression (lowercase Roman numerals represent the minor chords). It's an excellent way to expand on basic 1-4-5 patterns:- Key of C: C -> Em -> Am -> Dm -> G7 -> C
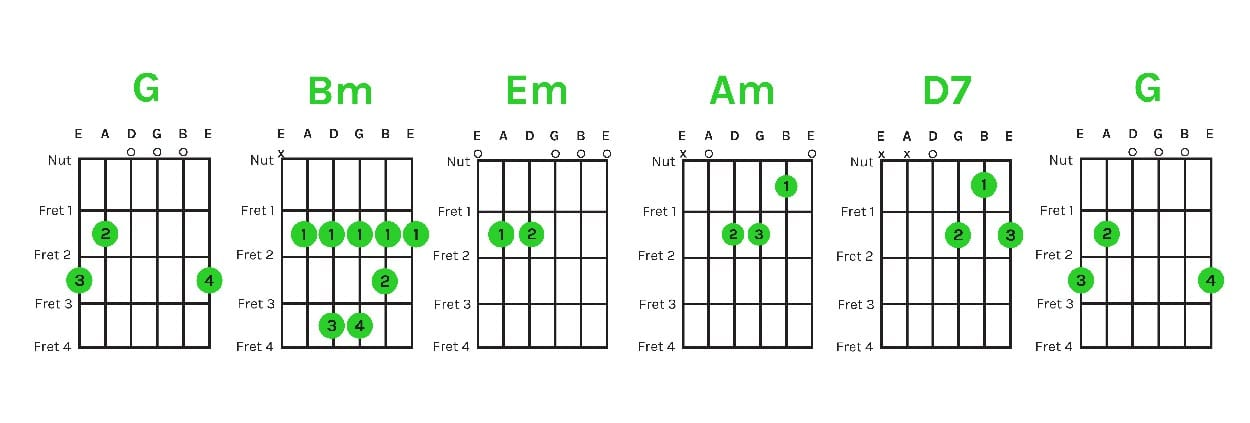
- Key of G: G -> Bm -> Em -> Am -> D7 -> G
Key of C
Key of G
Single Note Exercises & Melodies
Once you have chords down, it's time to practice single notes and lead picking to build up your finger strength and agility.Use fingers 1, 2, 3, and 4 on your left hand to play frets 1, 2, 3, and 4 on a single string. Pluck each note downward with your right-hand thumb or pick.
- Right-Hand Challenge: Try playing every other note using only your index and middle fingers instead of a pick.
Major Scales
After single notes, move on to scales (a series of eight notes starting and ending on the same letter). Major scales always follow a specific pattern of whole steps (W) and half steps (H): W - W - H - W - W - W - H. Practice running through the open C scale and open G scale.Melodies
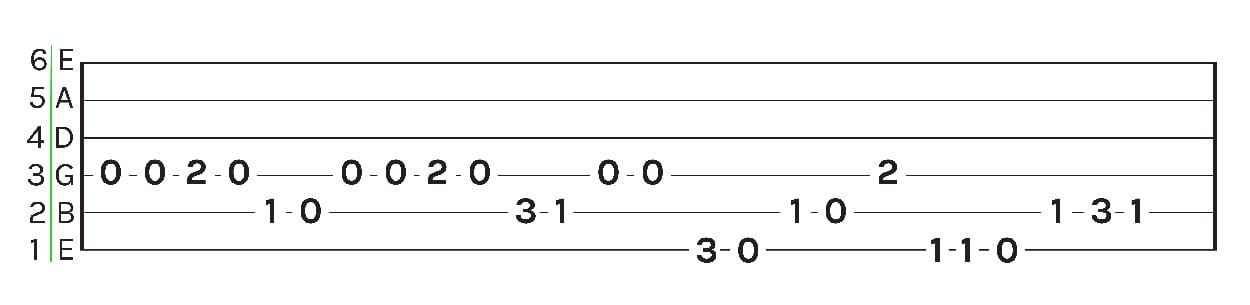
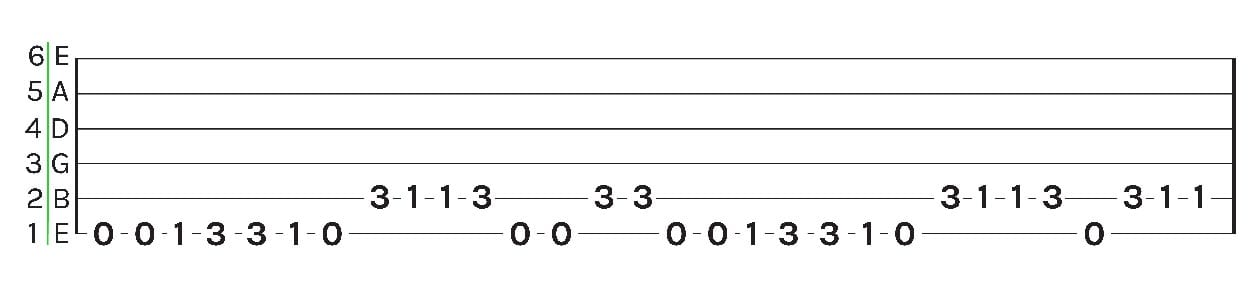
Put your single-note practice to use by learning basic melodies. This is a great ear-training exercise using songs you already know how to sing. Practice playing "Happy Birthday" and "Ode to Joy" note-by-note in the key of C.HBD
OtJ







 brutal whitepill


