

TimmyAshan1
NW5 balding, recessed chin, cleft lip, 27% bf T_T
- Joined
- Apr 21, 2026
- Posts
- 296
- Reputation
- 202
WHAT THE FUCK?!!!!!! Holy fucking shit! That's insane!
Follow along with the video below to see how to install our site as a web app on your home screen.

Note: this_feature_currently_requires_accessing_site_using_safari






You can customize your results by altering the injection spots, the injection spots in my graphic are primarily for projectionDoes this do anything for chin height/width at all or jsut projection

Instantly fix chin recession | A Guide to DIY Chin filler
Injection Videos at Chap. 4
This post is not a guide or tutorial, nor is it meant to encourage anyone to attempt the same procedure. I’m simply sharing my personal experience for informational purposes only. I was fully aware of the risks involved when I decided to do this myself. I am not responsible for any harm, complications, or outcomes that may occur if someone chooses to replicate or act on what I’ve done.
31/01/2026
Orka here, I do not recommend Revolax Deep anymore. I used it for this but my results quickly faded. Do your own research into filler types & brands and don't take advice blindly.
I will be using medeyra shape for my next chin session after dissolving this.
Table Of Contents:
1. Pre-injection planning & research
2. Risk-prevention measures & Technique
3. Injection Site Explanation
4. Injection process [ VIDEOS ]
5. Healing process & results
1. Pre-injection planning
This is the most important part, you’re going to want to do your own research and not rely solely on this thread for information.
I personally went to r/DIYCosmeticProcedures & r/DIYHeaven to ask for advice, but everybody there was high inhib asf and started telling me not to do it (it ended up being fine)
View attachment 4374630
I made a post calling them high inhib retards once I did my chin filler after they told me not to kek
The main risk during the injection process is if you accidentally fill an artery with filler (Vascular Occlusion), this cuts off extremely important blood flow and can eventually lead to necrosis. If this is your first DIY Injection I'd strongly suggest you get hyaluronidase; a dissolver for Hyaluronic Acid filler. Hyaluronidase acts fast, meaning if you botch yourself, inject incorrectly or have any complications, you can inject hyaluronidase in a nearby area to the filler & be fine. I would still seriously recommend you go to an ER or a hospital even after you dissolve the filler, you can never be too sure, and necrosis is really serious.
You can reconstitute Hyaluronidase similar to any peptide, and load it into a needle the same way aswell.
I’ll make a follow up thread on how I end up dissolving my filler (to reduce any chance of migration) in about 8-9 months.
With all this in mind, here’s what my setup looked like:
View attachment 4374248
I ended up sourcing topical lidocaine myself at a pharmacy, but they only allowed me to get 1% (you should try getting 5%, but even at 1% I didn’t feel pain from the injection).
1% Worked fine, I'm pretty sure I could've done it without lidocaine tbh, I would still recommend 5% for proper numbness,
Note: I told them I needed it to wax my dad's chest hair, she started talking about some bullshit post-waxing treatment instead of giving me my fucking lidocaine, stupid bitch.
ITEMS & DESCRIPTIONS:
Filler: This is the main thing I'll be injecting, the two caps at the top are equippable onto the syringe if one goes dull, but I only used 1 of the tops during this process
Dissolver: Hyaluronidase is an "anitdote" for Hyaluronic Acid, if you mess up, botch yourself etc. you'll be using this to dissolve the filler.
Needles & Saline for dissolver: Saline to put in with the Hyaluronidase as its in a powder form, then needles to extract and inject the dissolver ( I didn't have to. )
Lidocaine: Lidocaine is a topical numbing gel, I got it in a 1% concentration, which was just enough for me, but for people with more sensitive skin I'd recommend 5%
I used Revolax Deep with Lidocaine for the filler, and got my hyaluronidase (dissolver) from here
[ Note: The FDA in america are cracking down on sites selling botox specifically, acecosm is one of them, if you're reading this thread in the future and acecosm has shut down, feel free to contact me on here ]
On top of this, I had rubber gloves & alcohol wipes which i got at a grocery store to keep everything sterile, I just couldn't be asked to include it in the photo lol
This post is not a guide or tutorial, nor is it meant to encourage anyone to attempt the same procedure. I’m simply sharing my personal experience for informational purposes only. I was fully aware of the risks involved when I decided to do this myself. I am not responsible for any harm, complications, or outcomes that may occur if someone chooses to replicate or act on what I’ve done.
2. Risk-prevention measures & Technique
Throughout this injection I aspirated for each injection point, aspirating is when you leave your needle in the injection site for 10-12 seconds, and check if any blood starts leaking into the needle.
This is what it'll look like if the needle is inside an artery, if you see this while aspirating, you should change injection spots. No worries though, you can still use the same needle
View attachment 4371889
If blood does go into the needle, it's because of the higher blood pressure found in arteries, meaning I’d change injection sites and aspirate again.
(once you change injection spots you can still use the needle, it doesn't contaminate it)
I have hyaluronidase & saline on standby if I do end up, for whatever reason, injecting an artery on accident. My injection was done at 3AM on a Thursday, I couldn’t let my parents find out so I gave myself time to inject, then stayed up all night, by the time it was 9AM I could tell if I did anything wrong or not, and 6 hours is more than enough time to pass to be able to go to sleep afterwards.
Usually, professionals will get ultrasounds to guide them through being able to locate the arteries in real time, but you and I do not have access to a real time ultrasound of ourselves. Aspirating will have to do, it's not perfect, but it's somewhat reliable.
Now that we have a way to sorta eliminate the risk factor in this, you have to understand filler isn't just about not getting a VO, you also want an aesthetic result at the end of the day, and avoid migration as much as you can.
I'm going to be completely honest, you could study the shit out of the technique and still get it wrong, this chin filler was one of many DIY things I'll be doing to myself, practice makes perfect, studying doesn't. But you still want to try to mimick the perfect technique as much as you can, I've linked some videos below, you should try to study & analyze the technique yourself, I unfortunately cannot help you in this step.
I would not recommend using a cannula since your main goal here should be to go bone-deep. Cannula's are used for higher risk places that need to cover more surface area, I will probably never use a cannula as I try to avoid injecting superficially by any means.
This is the video I watched the most, and the technique I attempted to follow.
View attachment 4382424
The "professionals" injecting you are often also watching these tutorial videos too btw, most injectors at clinics are clueless
I injected a LOT slower than the injectors and was sweating while doing it, but the job was done at the end of the day.
This post is not a guide or tutorial, nor is it meant to encourage anyone to attempt the same procedure. I’m simply sharing my personal experience for informational purposes only. I was fully aware of the risks involved when I decided to do this myself. I am not responsible for any harm, complications, or outcomes that may occur if someone chooses to replicate or act on what I’ve done.
3. Injection Site
View attachment 4374549
This is the image you should keep in mind when doing filler, you'll see the well-known "triangle of death" forming with all the arteries that run through the midface, and you'll also notice the empty spot near the bottom of the chin; this is our safe space, where we can inject without too much risk (BUT STILL RISKY IF YOU ARENT EXPERIENCED). You can also see why injecting wider (for width) becomes even riskier.
Here’s a quick image that I kept in mind before injecting:
View attachment 4373902
But, of course, I ended up drawing my own lines since I'm a man, not a woman, which looked like this:
View attachment 4382352
For men, you want to draw your vertical lines starting from the end of the lips, even if you're just aiming for projection like I was, for women it starts at the nasal base since narrow chins look feminine, and wider chins look masculine.
I divided these injections across 2 sessions, 1st session covered the top 3, 2nd session covered the bottom 2.
Here's what I did (this is not my chin in the pic)
Black Lines:
Drew lines from the edges of my lips fully down
The curved line was just to surround and isolate my actual chin, basically go around the somewhat projected area, the natural curve on ur chin
Green Line:
From the center of my lips, drew a straight line, I then used this line to draw the red lines (to mark arteries)
Red Lines:
a few mm off of the center of my chin, I used the red lines to visualize where the center was, then drew red lines to the left and right of the center, this is usually where the arteries are, so I just avoided them.
Yellow Line:
After everything, I split my chin in half with another line, then I'd pick injection spots on the lower end to ensure I actually got more projection and didn't just even it out jfl
Circles:
I Made a mistake here & should've placed the center circle a bit lower, but the graphic is true to how I actually injected it, the left and right were fine, id just suggest you go a tiny bit lower than I did if you're recreating this.
!! IF RECREATING, WITH THE GOAL OF PROJECTION, I RECOMMEND INJECTING THE CENTER FURTHER DOWN, THIS WAS A NEWBIE MISTAKE BY ME
Here's another image of the drawings actually ON my chin:
View attachment 4371931
I drew this on with my eyebrow pen, you can use a marker, just don't make the lines too thick. I also didn't draw the circles, but I would recommend you do it.
4. Injection Process
By "I can feel it" I meant I could feel the filler on my bone, it wasn't painful, just funny to feel lol
Bonus vid in this thread:

I just finished doing my own Chin Filler [ Video ]
1.1ml, not much, I'm somewhat happy with the results but I need to wait for the swelling to calm down first. Heavily considering a second session, but no pain so far so im pretty happy Video is a timelapse for now, the original footage is 30 minutes and i cba to edit it all rn I'll release a...looksmax.org
This is the process I followed:
Needle in until i felt the texture of my bone, you'll feel a weird fuzzy feeling once you reach it, kinda like having a numb foot.
Once I reach the bone, aspirate, keep the needle in for 10-12 seconds, and monitor the needle with a nearby mirror (which was on the right, you can notice I looked at it several times)
View attachment 4376712
I usually have one of these on me with a magnifying side of the mirror ( Basically just to zoom in ), but unfortunately mine was broken during this process, I just used a mirror close to me
If the aspiration was successful and I didn't draw any blood, I would start injecting, I started pulling out slowly, then pushing back in; This is to make sure I'm not literally pushing out nothing by pressing on my bone, and that there's space for the filler to go, but not too superficially (although I did mess up for my central one and went too far out, I'd recommend staying deeper)
After feeling the filler on my bone, no blood drawn, and checking how much filler I actually used, I could finally pull the needle out and deem that area as successfully injected, and move onto the next to repeat the process.
This post is not a guide or tutorial, nor is it meant to encourage anyone to attempt the same procedure. I’m simply sharing my personal experience for informational purposes only. I was fully aware of the risks involved when I decided to do this myself. I am not responsible for any harm, complications, or outcomes that may occur if someone chooses to replicate or act on what I’ve done.
5. Healing Process & Results
Gonna be honest here, the healing process was decent, but I did several things I shouldn't have.
Don't massage or touch the filler once it's inside, the filler (at least the one I used) feels like actual bone, so you might think its fine to, but seriously, let it heal, don't touch it at all for around a week, then you're fine.
I would recommend sleeping on your back for this period, but honestly it doesn't really matter. Just make sure your injections are symmetrical & you'll be fine.
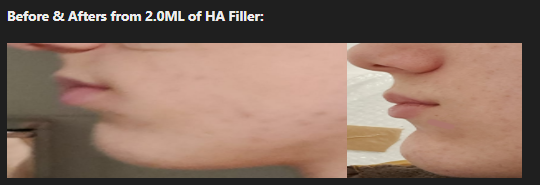
Before & Afters from 2.0ML of HA Filler:
View attachment 4382373View attachment 4382370
[ I injected too superficially as this was my first time injecting, if you could feel my chin you could actually feel a rod-like shape in the center of it lol ]
My mom started questioning why my chin was "swolen", I just dodged the questions and she didn't seem to care.
I'm sure you can come up with an excuse if you're hiding this from your parents too
View attachment 4374650
Before actually doing the filler I was just practicing reaching my bone with an empty needle without lidocaine, to test my pain tolerance (this step isnt needed), and not pushing anything inside. I thought I had hit an artery and wrote sick about it lmfao
This is not what happens when you hit an artery, this was just hitting a vein, an artery will have blood flowing out more aggressively
Wish me luck! and remember.... This post is not a guide or tutorial, nor is it meant to encourage anyone to attempt the same procedure. I’m simply sharing my personal experience for informational purposes only. I was fully aware of the risks involved when I decided to do this myself. I am not responsible for any harm, complications, or outcomes that may occur if someone chooses to replicate or act on what I’ve done.
Credits:
Videos used in this thread were recorded by @Bryce on a discord call in a groupchat.
@Sick helped me throughout this process & addressed anything I was skeptical about, also reminded me to aspirate on call since I was quite nervous.
Additional Tags:
@BigBallsLarry @Insomnia @Bryce [BWCF]

i will do itOn a serious note mirin. Not everyone has the balls to do this kind of stuff

Would you ever make a guide on increasing chin width? That would help heaps if not, do you mind providing some tips in pms?You can customize your results by altering the injection spots, the injection spots in my graphic are primarily for projection

Medeyra will last longer than revolaxWhat filler do u recommend now

do you know where i should look too find out injection spots for height and projection or is it in the video you attached also if aspiration isn’t 100% accurate all the time is it still a really low chance of hitting an artery while aspiratingYou can customize your results by altering the injection spots, the injection spots in my graphic are primarily for projection

Instantly fix chin recession | A Guide to DIY Chin filler
Injection Videos at Chap. 4
This post is not a guide or tutorial, nor is it meant to encourage anyone to attempt the same procedure. I’m simply sharing my personal experience for informational purposes only. I was fully aware of the risks involved when I decided to do this myself. I am not responsible for any harm, complications, or outcomes that may occur if someone chooses to replicate or act on what I’ve done.
31/01/2026
Orka here, I do not recommend Revolax Deep anymore. I used it for this but my results quickly faded. Do your own research into filler types & brands and don't take advice blindly.
I will be using medeyra shape for my next chin session after dissolving this.
Table Of Contents:
1. Pre-injection planning & research
2. Risk-prevention measures & Technique
3. Injection Site Explanation
4. Injection process [ VIDEOS ]
5. Healing process & results
1. Pre-injection planning
This is the most important part, you’re going to want to do your own research and not rely solely on this thread for information.
I personally went to r/DIYCosmeticProcedures & r/DIYHeaven to ask for advice, but everybody there was high inhib asf and started telling me not to do it (it ended up being fine)
View attachment 4374630
I made a post calling them high inhib retards once I did my chin filler after they told me not to kek
The main risk during the injection process is if you accidentally fill an artery with filler (Vascular Occlusion), this cuts off extremely important blood flow and can eventually lead to necrosis. If this is your first DIY Injection I'd strongly suggest you get hyaluronidase; a dissolver for Hyaluronic Acid filler. Hyaluronidase acts fast, meaning if you botch yourself, inject incorrectly or have any complications, you can inject hyaluronidase in a nearby area to the filler & be fine. I would still seriously recommend you go to an ER or a hospital even after you dissolve the filler, you can never be too sure, and necrosis is really serious.
You can reconstitute Hyaluronidase similar to any peptide, and load it into a needle the same way aswell.
I’ll make a follow up thread on how I end up dissolving my filler (to reduce any chance of migration) in about 8-9 months.
With all this in mind, here’s what my setup looked like:
View attachment 4374248
I ended up sourcing topical lidocaine myself at a pharmacy, but they only allowed me to get 1% (you should try getting 5%, but even at 1% I didn’t feel pain from the injection).
1% Worked fine, I'm pretty sure I could've done it without lidocaine tbh, I would still recommend 5% for proper numbness,
Note: I told them I needed it to wax my dad's chest hair, she started talking about some bullshit post-waxing treatment instead of giving me my fucking lidocaine, stupid bitch.
ITEMS & DESCRIPTIONS:
Filler: This is the main thing I'll be injecting, the two caps at the top are equippable onto the syringe if one goes dull, but I only used 1 of the tops during this process
Dissolver: Hyaluronidase is an "anitdote" for Hyaluronic Acid, if you mess up, botch yourself etc. you'll be using this to dissolve the filler.
Needles & Saline for dissolver: Saline to put in with the Hyaluronidase as its in a powder form, then needles to extract and inject the dissolver ( I didn't have to. )
Lidocaine: Lidocaine is a topical numbing gel, I got it in a 1% concentration, which was just enough for me, but for people with more sensitive skin I'd recommend 5%
I used Revolax Deep with Lidocaine for the filler, and got my hyaluronidase (dissolver) from here
[ Note: The FDA in america are cracking down on sites selling botox specifically, acecosm is one of them, if you're reading this thread in the future and acecosm has shut down, feel free to contact me on here ]
On top of this, I had rubber gloves & alcohol wipes which i got at a grocery store to keep everything sterile, I just couldn't be asked to include it in the photo lol
This post is not a guide or tutorial, nor is it meant to encourage anyone to attempt the same procedure. I’m simply sharing my personal experience for informational purposes only. I was fully aware of the risks involved when I decided to do this myself. I am not responsible for any harm, complications, or outcomes that may occur if someone chooses to replicate or act on what I’ve done.
2. Risk-prevention measures & Technique
Throughout this injection I aspirated for each injection point, aspirating is when you leave your needle in the injection site for 10-12 seconds, and check if any blood starts leaking into the needle.
This is what it'll look like if the needle is inside an artery, if you see this while aspirating, you should change injection spots. No worries though, you can still use the same needle
View attachment 4371889
If blood does go into the needle, it's because of the higher blood pressure found in arteries, meaning I’d change injection sites and aspirate again.
(once you change injection spots you can still use the needle, it doesn't contaminate it)
I have hyaluronidase & saline on standby if I do end up, for whatever reason, injecting an artery on accident. My injection was done at 3AM on a Thursday, I couldn’t let my parents find out so I gave myself time to inject, then stayed up all night, by the time it was 9AM I could tell if I did anything wrong or not, and 6 hours is more than enough time to pass to be able to go to sleep afterwards.
Usually, professionals will get ultrasounds to guide them through being able to locate the arteries in real time, but you and I do not have access to a real time ultrasound of ourselves. Aspirating will have to do, it's not perfect, but it's somewhat reliable.
Now that we have a way to sorta eliminate the risk factor in this, you have to understand filler isn't just about not getting a VO, you also want an aesthetic result at the end of the day, and avoid migration as much as you can.
I'm going to be completely honest, you could study the shit out of the technique and still get it wrong, this chin filler was one of many DIY things I'll be doing to myself, practice makes perfect, studying doesn't. But you still want to try to mimick the perfect technique as much as you can, I've linked some videos below, you should try to study & analyze the technique yourself, I unfortunately cannot help you in this step.
I would not recommend using a cannula since your main goal here should be to go bone-deep. Cannula's are used for higher risk places that need to cover more surface area, I will probably never use a cannula as I try to avoid injecting superficially by any means.
This is the video I watched the most, and the technique I attempted to follow.
View attachment 4382424
The "professionals" injecting you are often also watching these tutorial videos too btw, most injectors at clinics are clueless
I injected a LOT slower than the injectors and was sweating while doing it, but the job was done at the end of the day.
This post is not a guide or tutorial, nor is it meant to encourage anyone to attempt the same procedure. I’m simply sharing my personal experience for informational purposes only. I was fully aware of the risks involved when I decided to do this myself. I am not responsible for any harm, complications, or outcomes that may occur if someone chooses to replicate or act on what I’ve done.
3. Injection Site
View attachment 4374549
This is the image you should keep in mind when doing filler, you'll see the well-known "triangle of death" forming with all the arteries that run through the midface, and you'll also notice the empty spot near the bottom of the chin; this is our safe space, where we can inject without too much risk (BUT STILL RISKY IF YOU ARENT EXPERIENCED). You can also see why injecting wider (for width) becomes even riskier.
Here’s a quick image that I kept in mind before injecting:
View attachment 4373902
But, of course, I ended up drawing my own lines since I'm a man, not a woman, which looked like this:
View attachment 4382352
For men, you want to draw your vertical lines starting from the end of the lips, even if you're just aiming for projection like I was, for women it starts at the nasal base since narrow chins look feminine, and wider chins look masculine.
I divided these injections across 2 sessions, 1st session covered the top 3, 2nd session covered the bottom 2.
Here's what I did (this is not my chin in the pic)
Black Lines:
Drew lines from the edges of my lips fully down
The curved line was just to surround and isolate my actual chin, basically go around the somewhat projected area, the natural curve on ur chin
Green Line:
From the center of my lips, drew a straight line, I then used this line to draw the red lines (to mark arteries)
Red Lines:
a few mm off of the center of my chin, I used the red lines to visualize where the center was, then drew red lines to the left and right of the center, this is usually where the arteries are, so I just avoided them.
Yellow Line:
After everything, I split my chin in half with another line, then I'd pick injection spots on the lower end to ensure I actually got more projection and didn't just even it out jfl
Circles:
I Made a mistake here & should've placed the center circle a bit lower, but the graphic is true to how I actually injected it, the left and right were fine, id just suggest you go a tiny bit lower than I did if you're recreating this.
!! IF RECREATING, WITH THE GOAL OF PROJECTION, I RECOMMEND INJECTING THE CENTER FURTHER DOWN, THIS WAS A NEWBIE MISTAKE BY ME
Here's another image of the drawings actually ON my chin:
View attachment 4371931
I drew this on with my eyebrow pen, you can use a marker, just don't make the lines too thick. I also didn't draw the circles, but I would recommend you do it.
4. Injection Process
By "I can feel it" I meant I could feel the filler on my bone, it wasn't painful, just funny to feel lol
Bonus vid in this thread:
I just finished doing my own Chin Filler [ Video ]
1.1ml, not much, I'm somewhat happy with the results but I need to wait for the swelling to calm down first. Heavily considering a second session, but no pain so far so im pretty happy Video is a timelapse for now, the original footage is 30 minutes and i cba to edit it all rn I'll release a...
This is the process I followed:
Needle in until i felt the texture of my bone, you'll feel a weird fuzzy feeling once you reach it, kinda like having a numb foot.
Once I reach the bone, aspirate, keep the needle in for 10-12 seconds, and monitor the needle with a nearby mirror (which was on the right, you can notice I looked at it several times)
View attachment 4376712
I usually have one of these on me with a magnifying side of the mirror ( Basically just to zoom in ), but unfortunately mine was broken during this process, I just used a mirror close to me
If the aspiration was successful and I didn't draw any blood, I would start injecting, I started pulling out slowly, then pushing back in; This is to make sure I'm not literally pushing out nothing by pressing on my bone, and that there's space for the filler to go, but not too superficially (although I did mess up for my central one and went too far out, I'd recommend staying deeper)
After feeling the filler on my bone, no blood drawn, and checking how much filler I actually used, I could finally pull the needle out and deem that area as successfully injected, and move onto the next to repeat the process.
This post is not a guide or tutorial, nor is it meant to encourage anyone to attempt the same procedure. I’m simply sharing my personal experience for informational purposes only. I was fully aware of the risks involved when I decided to do this myself. I am not responsible for any harm, complications, or outcomes that may occur if someone chooses to replicate or act on what I’ve done.
5. Healing Process & Results
Gonna be honest here, the healing process was decent, but I did several things I shouldn't have.
Don't massage or touch the filler once it's inside, the filler (at least the one I used) feels like actual bone, so you might think its fine to, but seriously, let it heal, don't touch it at all for around a week, then you're fine.
I would recommend sleeping on your back for this period, but honestly it doesn't really matter. Just make sure your injections are symmetrical & you'll be fine.
Before & Afters from 2.0ML of HA Filler:
View attachment 4382373View attachment 4382370
[ I injected too superficially as this was my first time injecting, if you could feel my chin you could actually feel a rod-like shape in the center of it lol ]
My mom started questioning why my chin was "swolen", I just dodged the questions and she didn't seem to care.
I'm sure you can come up with an excuse if you're hiding this from your parents too
View attachment 4374650
Before actually doing the filler I was just practicing reaching my bone with an empty needle without lidocaine, to test my pain tolerance (this step isnt needed), and not pushing anything inside. I thought I had hit an artery and wrote sick about it lmfao
This is not what happens when you hit an artery, this was just hitting a vein, an artery will have blood flowing out more aggressively
Wish me luck! and remember.... This post is not a guide or tutorial, nor is it meant to encourage anyone to attempt the same procedure. I’m simply sharing my personal experience for informational purposes only. I was fully aware of the risks involved when I decided to do this myself. I am not responsible for any harm, complications, or outcomes that may occur if someone chooses to replicate or act on what I’ve done.
Credits:
Videos used in this thread were recorded by @Bryce on a discord call in a groupchat.
@Sick helped me throughout this process & addressed anything I was skeptical about, also reminded me to aspirate on call since I was quite nervous.
Additional Tags:
@BigBallsLarry @Insomnia @Bryce [BWCF]
I do coaching and consultations for people who need specific injection spotsdo you know where i should look too find out injection spots for height and projection or is it in the video you attached also if aspiration isn’t 100% accurate all the time is it still a really low chance of hitting an artery while aspirating
W course sellerI do coaching and consultations for people who need specific injection spots
Instantly fix chin recession | A Guide to DIY Chin filler
Injection Videos at Chap. 4
This post is not a guide or tutorial, nor is it meant to encourage anyone to attempt the same procedure. I’m simply sharing my personal experience for informational purposes only. I was fully aware of the risks involved when I decided to do this myself. I am not responsible for any harm, complications, or outcomes that may occur if someone chooses to replicate or act on what I’ve done.
31/01/2026
Orka here, I do not recommend Revolax Deep anymore. I used it for this but my results quickly faded. Do your own research into filler types & brands and don't take advice blindly.
I will be using medeyra shape for my next chin session after dissolving this.
Table Of Contents:
1. Pre-injection planning & research
2. Risk-prevention measures & Technique
3. Injection Site Explanation
4. Injection process [ VIDEOS ]
5. Healing process & results
1. Pre-injection planning
This is the most important part, you’re going to want to do your own research and not rely solely on this thread for information.
I personally went to r/DIYCosmeticProcedures & r/DIYHeaven to ask for advice, but everybody there was high inhib asf and started telling me not to do it (it ended up being fine)
View attachment 4374630
I made a post calling them high inhib retards once I did my chin filler after they told me not to kek
The main risk during the injection process is if you accidentally fill an artery with filler (Vascular Occlusion), this cuts off extremely important blood flow and can eventually lead to necrosis. If this is your first DIY Injection I'd strongly suggest you get hyaluronidase; a dissolver for Hyaluronic Acid filler. Hyaluronidase acts fast, meaning if you botch yourself, inject incorrectly or have any complications, you can inject hyaluronidase in a nearby area to the filler & be fine. I would still seriously recommend you go to an ER or a hospital even after you dissolve the filler, you can never be too sure, and necrosis is really serious.
You can reconstitute Hyaluronidase similar to any peptide, and load it into a needle the same way aswell.
I’ll make a follow up thread on how I end up dissolving my filler (to reduce any chance of migration) in about 8-9 months.
With all this in mind, here’s what my setup looked like:
View attachment 4374248
I ended up sourcing topical lidocaine myself at a pharmacy, but they only allowed me to get 1% (you should try getting 5%, but even at 1% I didn’t feel pain from the injection).
1% Worked fine, I'm pretty sure I could've done it without lidocaine tbh, I would still recommend 5% for proper numbness,
Note: I told them I needed it to wax my dad's chest hair, she started talking about some bullshit post-waxing treatment instead of giving me my fucking lidocaine, stupid bitch.
ITEMS & DESCRIPTIONS:
Filler: This is the main thing I'll be injecting, the two caps at the top are equippable onto the syringe if one goes dull, but I only used 1 of the tops during this process
Dissolver: Hyaluronidase is an "anitdote" for Hyaluronic Acid, if you mess up, botch yourself etc. you'll be using this to dissolve the filler.
Needles & Saline for dissolver: Saline to put in with the Hyaluronidase as its in a powder form, then needles to extract and inject the dissolver ( I didn't have to. )
Lidocaine: Lidocaine is a topical numbing gel, I got it in a 1% concentration, which was just enough for me, but for people with more sensitive skin I'd recommend 5%
I used Revolax Deep with Lidocaine for the filler, and got my hyaluronidase (dissolver) from here
[ Note: The FDA in america are cracking down on sites selling botox specifically, acecosm is one of them, if you're reading this thread in the future and acecosm has shut down, feel free to contact me on here ]
On top of this, I had rubber gloves & alcohol wipes which i got at a grocery store to keep everything sterile, I just couldn't be asked to include it in the photo lol
This post is not a guide or tutorial, nor is it meant to encourage anyone to attempt the same procedure. I’m simply sharing my personal experience for informational purposes only. I was fully aware of the risks involved when I decided to do this myself. I am not responsible for any harm, complications, or outcomes that may occur if someone chooses to replicate or act on what I’ve done.
2. Risk-prevention measures & Technique
Throughout this injection I aspirated for each injection point, aspirating is when you leave your needle in the injection site for 10-12 seconds, and check if any blood starts leaking into the needle.
This is what it'll look like if the needle is inside an artery, if you see this while aspirating, you should change injection spots. No worries though, you can still use the same needle
View attachment 4371889
If blood does go into the needle, it's because of the higher blood pressure found in arteries, meaning I’d change injection sites and aspirate again.
(once you change injection spots you can still use the needle, it doesn't contaminate it)
I have hyaluronidase & saline on standby if I do end up, for whatever reason, injecting an artery on accident. My injection was done at 3AM on a Thursday, I couldn’t let my parents find out so I gave myself time to inject, then stayed up all night, by the time it was 9AM I could tell if I did anything wrong or not, and 6 hours is more than enough time to pass to be able to go to sleep afterwards.
Usually, professionals will get ultrasounds to guide them through being able to locate the arteries in real time, but you and I do not have access to a real time ultrasound of ourselves. Aspirating will have to do, it's not perfect, but it's somewhat reliable.
Now that we have a way to sorta eliminate the risk factor in this, you have to understand filler isn't just about not getting a VO, you also want an aesthetic result at the end of the day, and avoid migration as much as you can.
I'm going to be completely honest, you could study the shit out of the technique and still get it wrong, this chin filler was one of many DIY things I'll be doing to myself, practice makes perfect, studying doesn't. But you still want to try to mimick the perfect technique as much as you can, I've linked some videos below, you should try to study & analyze the technique yourself, I unfortunately cannot help you in this step.
I would not recommend using a cannula since your main goal here should be to go bone-deep. Cannula's are used for higher risk places that need to cover more surface area, I will probably never use a cannula as I try to avoid injecting superficially by any means.
This is the video I watched the most, and the technique I attempted to follow.
View attachment 4382424
The "professionals" injecting you are often also watching these tutorial videos too btw, most injectors at clinics are clueless
I injected a LOT slower than the injectors and was sweating while doing it, but the job was done at the end of the day.
This post is not a guide or tutorial, nor is it meant to encourage anyone to attempt the same procedure. I’m simply sharing my personal experience for informational purposes only. I was fully aware of the risks involved when I decided to do this myself. I am not responsible for any harm, complications, or outcomes that may occur if someone chooses to replicate or act on what I’ve done.
3. Injection Site
View attachment 4374549
This is the image you should keep in mind when doing filler, you'll see the well-known "triangle of death" forming with all the arteries that run through the midface, and you'll also notice the empty spot near the bottom of the chin; this is our safe space, where we can inject without too much risk (BUT STILL RISKY IF YOU ARENT EXPERIENCED). You can also see why injecting wider (for width) becomes even riskier.
Here’s a quick image that I kept in mind before injecting:
View attachment 4373902
But, of course, I ended up drawing my own lines since I'm a man, not a woman, which looked like this:
View attachment 4382352
For men, you want to draw your vertical lines starting from the end of the lips, even if you're just aiming for projection like I was, for women it starts at the nasal base since narrow chins look feminine, and wider chins look masculine.
I divided these injections across 2 sessions, 1st session covered the top 3, 2nd session covered the bottom 2.
Here's what I did (this is not my chin in the pic)
Black Lines:
Drew lines from the edges of my lips fully down
The curved line was just to surround and isolate my actual chin, basically go around the somewhat projected area, the natural curve on ur chin
Green Line:
From the center of my lips, drew a straight line, I then used this line to draw the red lines (to mark arteries)
Red Lines:
a few mm off of the center of my chin, I used the red lines to visualize where the center was, then drew red lines to the left and right of the center, this is usually where the arteries are, so I just avoided them.
Yellow Line:
After everything, I split my chin in half with another line, then I'd pick injection spots on the lower end to ensure I actually got more projection and didn't just even it out jfl
Circles:
I Made a mistake here & should've placed the center circle a bit lower, but the graphic is true to how I actually injected it, the left and right were fine, id just suggest you go a tiny bit lower than I did if you're recreating this.
!! IF RECREATING, WITH THE GOAL OF PROJECTION, I RECOMMEND INJECTING THE CENTER FURTHER DOWN, THIS WAS A NEWBIE MISTAKE BY ME
Here's another image of the drawings actually ON my chin:
View attachment 4371931
I drew this on with my eyebrow pen, you can use a marker, just don't make the lines too thick. I also didn't draw the circles, but I would recommend you do it.
4. Injection Process
By "I can feel it" I meant I could feel the filler on my bone, it wasn't painful, just funny to feel lol
Bonus vid in this thread:
I just finished doing my own Chin Filler [ Video ]
1.1ml, not much, I'm somewhat happy with the results but I need to wait for the swelling to calm down first. Heavily considering a second session, but no pain so far so im pretty happy Video is a timelapse for now, the original footage is 30 minutes and i cba to edit it all rn I'll release a...
This is the process I followed:
Needle in until i felt the texture of my bone, you'll feel a weird fuzzy feeling once you reach it, kinda like having a numb foot.
Once I reach the bone, aspirate, keep the needle in for 10-12 seconds, and monitor the needle with a nearby mirror (which was on the right, you can notice I looked at it several times)
View attachment 4376712
I usually have one of these on me with a magnifying side of the mirror ( Basically just to zoom in ), but unfortunately mine was broken during this process, I just used a mirror close to me
If the aspiration was successful and I didn't draw any blood, I would start injecting, I started pulling out slowly, then pushing back in; This is to make sure I'm not literally pushing out nothing by pressing on my bone, and that there's space for the filler to go, but not too superficially (although I did mess up for my central one and went too far out, I'd recommend staying deeper)
After feeling the filler on my bone, no blood drawn, and checking how much filler I actually used, I could finally pull the needle out and deem that area as successfully injected, and move onto the next to repeat the process.
This post is not a guide or tutorial, nor is it meant to encourage anyone to attempt the same procedure. I’m simply sharing my personal experience for informational purposes only. I was fully aware of the risks involved when I decided to do this myself. I am not responsible for any harm, complications, or outcomes that may occur if someone chooses to replicate or act on what I’ve done.
5. Healing Process & Results
Gonna be honest here, the healing process was decent, but I did several things I shouldn't have.
Don't massage or touch the filler once it's inside, the filler (at least the one I used) feels like actual bone, so you might think its fine to, but seriously, let it heal, don't touch it at all for around a week, then you're fine.
I would recommend sleeping on your back for this period, but honestly it doesn't really matter. Just make sure your injections are symmetrical & you'll be fine.
Before & Afters from 2.0ML of HA Filler:
View attachment 4382373View attachment 4382370
[ I injected too superficially as this was my first time injecting, if you could feel my chin you could actually feel a rod-like shape in the center of it lol ]
My mom started questioning why my chin was "swolen", I just dodged the questions and she didn't seem to care.
I'm sure you can come up with an excuse if you're hiding this from your parents too
View attachment 4374650
Before actually doing the filler I was just practicing reaching my bone with an empty needle without lidocaine, to test my pain tolerance (this step isnt needed), and not pushing anything inside. I thought I had hit an artery and wrote sick about it lmfao
This is not what happens when you hit an artery, this was just hitting a vein, an artery will have blood flowing out more aggressively
Wish me luck! and remember.... This post is not a guide or tutorial, nor is it meant to encourage anyone to attempt the same procedure. I’m simply sharing my personal experience for informational purposes only. I was fully aware of the risks involved when I decided to do this myself. I am not responsible for any harm, complications, or outcomes that may occur if someone chooses to replicate or act on what I’ve done.
Credits:
Videos used in this thread were recorded by @Bryce on a discord call in a groupchat.
@Sick helped me throughout this process & addressed anything I was skeptical about, also reminded me to aspirate on call since I was quite nervous.
Additional Tags:
@BigBallsLarry @Insomnia @Bryce [BWCF]
Sculpting is optional, and what? nothing in this guide covers anything related to liquid rhino or zygo filler apart from the filler brand, that's a completely separate topicu didnt need to like sculpt it yourself after the fillers injected? and does this also apply to doing a liquid rhino or diy zygo filler?
i was talking abt sculpting ik thats a different topic but i js wanted too know if sculpting was also optional for zygos/noseSculpting is optional, and what? nothing in this guide covers anything related to liquid rhino or zygo filler apart from the filler brand, that's a completely separate topic
yesi was talking abt sculpting ik thats a different topic but i js wanted too know if sculpting was also optional for zygos/nose
You'd need to eyeball it, I dont have a measurementIf I may ask, how many mm was your chin recessed before? It looks like 3-4mm recession? I think I'm around 4-5mm recession myself. Could something like this work for me as well?

Where do you buy it ?This is apart of my personality augmentation program
Links I gave in the thread are 33$/1.1ml, so 66$ for my results and then 40$ for the dissolver just in case, pretty cheap tbh


is it necessary to have 5 bottles?With all this in mind, here’s what my setup looked like:


Instantly fix chin recession | A Guide to DIY Chin filler
Injection Videos at Chap. 4
This post is not a guide or tutorial, nor is it meant to encourage anyone to attempt the same procedure. I’m simply sharing my personal experience for informational purposes only. I was fully aware of the risks involved when I decided to do this myself. I am not responsible for any harm, complications, or outcomes that may occur if someone chooses to replicate or act on what I’ve done.
31/01/2026
Orka here, I do not recommend Revolax Deep anymore. I used it for this but my results quickly faded. Do your own research into filler types & brands and don't take advice blindly.
I will be using medeyra shape for my next chin session after dissolving this.
Table Of Contents:
1. Pre-injection planning & research
2. Risk-prevention measures & Technique
3. Injection Site Explanation
4. Injection process [ VIDEOS ]
5. Healing process & results
1. Pre-injection planning
This is the most important part, you’re going to want to do your own research and not rely solely on this thread for information.
I personally went to r/DIYCosmeticProcedures & r/DIYHeaven to ask for advice, but everybody there was high inhib asf and started telling me not to do it (it ended up being fine)
View attachment 4374630
I made a post calling them high inhib retards once I did my chin filler after they told me not to kek
The main risk during the injection process is if you accidentally fill an artery with filler (Vascular Occlusion), this cuts off extremely important blood flow and can eventually lead to necrosis. If this is your first DIY Injection I'd strongly suggest you get hyaluronidase; a dissolver for Hyaluronic Acid filler. Hyaluronidase acts fast, meaning if you botch yourself, inject incorrectly or have any complications, you can inject hyaluronidase in a nearby area to the filler & be fine. I would still seriously recommend you go to an ER or a hospital even after you dissolve the filler, you can never be too sure, and necrosis is really serious.
You can reconstitute Hyaluronidase similar to any peptide, and load it into a needle the same way aswell.
I’ll make a follow up thread on how I end up dissolving my filler (to reduce any chance of migration) in about 8-9 months.
With all this in mind, here’s what my setup looked like:
View attachment 4374248
I ended up sourcing topical lidocaine myself at a pharmacy, but they only allowed me to get 1% (you should try getting 5%, but even at 1% I didn’t feel pain from the injection).
1% Worked fine, I'm pretty sure I could've done it without lidocaine tbh, I would still recommend 5% for proper numbness,
Note: I told them I needed it to wax my dad's chest hair, she started talking about some bullshit post-waxing treatment instead of giving me my fucking lidocaine, stupid bitch.
ITEMS & DESCRIPTIONS:
Filler: This is the main thing I'll be injecting, the two caps at the top are equippable onto the syringe if one goes dull, but I only used 1 of the tops during this process
Dissolver: Hyaluronidase is an "anitdote" for Hyaluronic Acid, if you mess up, botch yourself etc. you'll be using this to dissolve the filler.
Needles & Saline for dissolver: Saline to put in with the Hyaluronidase as its in a powder form, then needles to extract and inject the dissolver ( I didn't have to. )
Lidocaine: Lidocaine is a topical numbing gel, I got it in a 1% concentration, which was just enough for me, but for people with more sensitive skin I'd recommend 5%
I used Revolax Deep with Lidocaine for the filler, and got my hyaluronidase (dissolver) from here
[ Note: The FDA in america are cracking down on sites selling botox specifically, acecosm is one of them, if you're reading this thread in the future and acecosm has shut down, feel free to contact me on here ]
On top of this, I had rubber gloves & alcohol wipes which i got at a grocery store to keep everything sterile, I just couldn't be asked to include it in the photo lol
This post is not a guide or tutorial, nor is it meant to encourage anyone to attempt the same procedure. I’m simply sharing my personal experience for informational purposes only. I was fully aware of the risks involved when I decided to do this myself. I am not responsible for any harm, complications, or outcomes that may occur if someone chooses to replicate or act on what I’ve done.
2. Risk-prevention measures & Technique
Throughout this injection I aspirated for each injection point, aspirating is when you leave your needle in the injection site for 10-12 seconds, and check if any blood starts leaking into the needle.
This is what it'll look like if the needle is inside an artery, if you see this while aspirating, you should change injection spots. No worries though, you can still use the same needle
View attachment 4371889
If blood does go into the needle, it's because of the higher blood pressure found in arteries, meaning I’d change injection sites and aspirate again.
(once you change injection spots you can still use the needle, it doesn't contaminate it)
I have hyaluronidase & saline on standby if I do end up, for whatever reason, injecting an artery on accident. My injection was done at 3AM on a Thursday, I couldn’t let my parents find out so I gave myself time to inject, then stayed up all night, by the time it was 9AM I could tell if I did anything wrong or not, and 6 hours is more than enough time to pass to be able to go to sleep afterwards.
Usually, professionals will get ultrasounds to guide them through being able to locate the arteries in real time, but you and I do not have access to a real time ultrasound of ourselves. Aspirating will have to do, it's not perfect, but it's somewhat reliable.
Now that we have a way to sorta eliminate the risk factor in this, you have to understand filler isn't just about not getting a VO, you also want an aesthetic result at the end of the day, and avoid migration as much as you can.
I'm going to be completely honest, you could study the shit out of the technique and still get it wrong, this chin filler was one of many DIY things I'll be doing to myself, practice makes perfect, studying doesn't. But you still want to try to mimick the perfect technique as much as you can, I've linked some videos below, you should try to study & analyze the technique yourself, I unfortunately cannot help you in this step.
I would not recommend using a cannula since your main goal here should be to go bone-deep. Cannula's are used for higher risk places that need to cover more surface area, I will probably never use a cannula as I try to avoid injecting superficially by any means.
This is the video I watched the most, and the technique I attempted to follow.
View attachment 4382424
The "professionals" injecting you are often also watching these tutorial videos too btw, most injectors at clinics are clueless
I injected a LOT slower than the injectors and was sweating while doing it, but the job was done at the end of the day.
This post is not a guide or tutorial, nor is it meant to encourage anyone to attempt the same procedure. I’m simply sharing my personal experience for informational purposes only. I was fully aware of the risks involved when I decided to do this myself. I am not responsible for any harm, complications, or outcomes that may occur if someone chooses to replicate or act on what I’ve done.
3. Injection Site
View attachment 4374549
This is the image you should keep in mind when doing filler, you'll see the well-known "triangle of death" forming with all the arteries that run through the midface, and you'll also notice the empty spot near the bottom of the chin; this is our safe space, where we can inject without too much risk (BUT STILL RISKY IF YOU ARENT EXPERIENCED). You can also see why injecting wider (for width) becomes even riskier.
Here’s a quick image that I kept in mind before injecting:
View attachment 4373902
But, of course, I ended up drawing my own lines since I'm a man, not a woman, which looked like this:
View attachment 4382352
For men, you want to draw your vertical lines starting from the end of the lips, even if you're just aiming for projection like I was, for women it starts at the nasal base since narrow chins look feminine, and wider chins look masculine.
I divided these injections across 2 sessions, 1st session covered the top 3, 2nd session covered the bottom 2.
Here's what I did (this is not my chin in the pic)
Black Lines:
Drew lines from the edges of my lips fully down
The curved line was just to surround and isolate my actual chin, basically go around the somewhat projected area, the natural curve on ur chin
Green Line:
From the center of my lips, drew a straight line, I then used this line to draw the red lines (to mark arteries)
Red Lines:
a few mm off of the center of my chin, I used the red lines to visualize where the center was, then drew red lines to the left and right of the center, this is usually where the arteries are, so I just avoided them.
Yellow Line:
After everything, I split my chin in half with another line, then I'd pick injection spots on the lower end to ensure I actually got more projection and didn't just even it out jfl
Circles:
I Made a mistake here & should've placed the center circle a bit lower, but the graphic is true to how I actually injected it, the left and right were fine, id just suggest you go a tiny bit lower than I did if you're recreating this.
!! IF RECREATING, WITH THE GOAL OF PROJECTION, I RECOMMEND INJECTING THE CENTER FURTHER DOWN, THIS WAS A NEWBIE MISTAKE BY ME
Here's another image of the drawings actually ON my chin:
View attachment 4371931
I drew this on with my eyebrow pen, you can use a marker, just don't make the lines too thick. I also didn't draw the circles, but I would recommend you do it.
4. Injection Process
By "I can feel it" I meant I could feel the filler on my bone, it wasn't painful, just funny to feel lol
Bonus vid in this thread:
I just finished doing my own Chin Filler [ Video ]
1.1ml, not much, I'm somewhat happy with the results but I need to wait for the swelling to calm down first. Heavily considering a second session, but no pain so far so im pretty happy Video is a timelapse for now, the original footage is 30 minutes and i cba to edit it all rn I'll release a...
This is the process I followed:
Needle in until i felt the texture of my bone, you'll feel a weird fuzzy feeling once you reach it, kinda like having a numb foot.
Once I reach the bone, aspirate, keep the needle in for 10-12 seconds, and monitor the needle with a nearby mirror (which was on the right, you can notice I looked at it several times)
View attachment 4376712
I usually have one of these on me with a magnifying side of the mirror ( Basically just to zoom in ), but unfortunately mine was broken during this process, I just used a mirror close to me
If the aspiration was successful and I didn't draw any blood, I would start injecting, I started pulling out slowly, then pushing back in; This is to make sure I'm not literally pushing out nothing by pressing on my bone, and that there's space for the filler to go, but not too superficially (although I did mess up for my central one and went too far out, I'd recommend staying deeper)
After feeling the filler on my bone, no blood drawn, and checking how much filler I actually used, I could finally pull the needle out and deem that area as successfully injected, and move onto the next to repeat the process.
This post is not a guide or tutorial, nor is it meant to encourage anyone to attempt the same procedure. I’m simply sharing my personal experience for informational purposes only. I was fully aware of the risks involved when I decided to do this myself. I am not responsible for any harm, complications, or outcomes that may occur if someone chooses to replicate or act on what I’ve done.
5. Healing Process & Results
Gonna be honest here, the healing process was decent, but I did several things I shouldn't have.
Don't massage or touch the filler once it's inside, the filler (at least the one I used) feels like actual bone, so you might think its fine to, but seriously, let it heal, don't touch it at all for around a week, then you're fine.
I would recommend sleeping on your back for this period, but honestly it doesn't really matter. Just make sure your injections are symmetrical & you'll be fine.
Before & Afters from 2.0ML of HA Filler:
View attachment 4382373View attachment 4382370
[ I injected too superficially as this was my first time injecting, if you could feel my chin you could actually feel a rod-like shape in the center of it lol ]
My mom started questioning why my chin was "swolen", I just dodged the questions and she didn't seem to care.
I'm sure you can come up with an excuse if you're hiding this from your parents too
View attachment 4374650
Before actually doing the filler I was just practicing reaching my bone with an empty needle without lidocaine, to test my pain tolerance (this step isnt needed), and not pushing anything inside. I thought I had hit an artery and wrote sick about it lmfao
This is not what happens when you hit an artery, this was just hitting a vein, an artery will have blood flowing out more aggressively
Wish me luck! and remember.... This post is not a guide or tutorial, nor is it meant to encourage anyone to attempt the same procedure. I’m simply sharing my personal experience for informational purposes only. I was fully aware of the risks involved when I decided to do this myself. I am not responsible for any harm, complications, or outcomes that may occur if someone chooses to replicate or act on what I’ve done.
Credits:
Videos used in this thread were recorded by @Bryce on a discord call in a groupchat.
@Sick helped me throughout this process & addressed anything I was skeptical about, also reminded me to aspirate on call since I was quite nervous.
Additional Tags:
@BigBallsLarry @Insomnia @Bryce [BWCF]

STFUPthe thread is high effort but id strongly go against the diy injection part especially because the op admits he was a first timer and injected too superficially in some places aspiration doesnt magically make diy filler safe either vascular occlusion can still happen and serious complications can develop quickly professional injectors can use better anatomical knowledge and sometimes ultrasound guidance while copying injection points from a forum gives u none of that the before and after can look convincing but one persons result doesnt prove the method is safe or consistently effective if someone genuinely has chin recession the sensible move is getting assessed by a qualified professional and discussing filler or other options instead of injecting yourself especially if youre young
You've got no idea what you're talking about. Don't interact with my threads again, your reply is completely AIthe thread is high effort but id strongly go against the diy injection part especially because the op admits he was a first timer and injected too superficially in some places aspiration doesnt magically make diy filler safe either vascular occlusion can still happen and serious complications can develop quickly professional injectors can use better anatomical knowledge and sometimes ultrasound guidance while copying injection points from a forum gives u none of that the before and after can look convincing but one persons result doesnt prove the method is safe or consistently effective if someone genuinely has chin recession the sensible move is getting assessed by a qualified professional and discussing filler or other options instead of injecting yourself especially if youre young


PostsYou've got no idea what you're talking about. Don't interact with my threads again, your reply is completely AI
hes retardedYou've got no idea what you're talking about. Don't interact with my threads again, your reply is completely AI

Instantly fix chin recession | A Guide to DIY Chin filler
Injection Videos at Chap. 4
This post is not a guide or tutorial, nor is it meant to encourage anyone to attempt the same procedure. I’m simply sharing my personal experience for informational purposes only. I was fully aware of the risks involved when I decided to do this myself. I am not responsible for any harm, complications, or outcomes that may occur if someone chooses to replicate or act on what I’ve done.
31/01/2026
Orka here, I do not recommend Revolax Deep anymore. I used it for this but my results quickly faded. Do your own research into filler types & brands and don't take advice blindly.
I will be using medeyra shape for my next chin session after dissolving this.
Table Of Contents:
1. Pre-injection planning & research
2. Risk-prevention measures & Technique
3. Injection Site Explanation
4. Injection process [ VIDEOS ]
5. Healing process & results
1. Pre-injection planning
This is the most important part, you’re going to want to do your own research and not rely solely on this thread for information.
I personally went to r/DIYCosmeticProcedures & r/DIYHeaven to ask for advice, but everybody there was high inhib asf and started telling me not to do it (it ended up being fine)
View attachment 4374630
I made a post calling them high inhib retards once I did my chin filler after they told me not to kek
The main risk during the injection process is if you accidentally fill an artery with filler (Vascular Occlusion), this cuts off extremely important blood flow and can eventually lead to necrosis. If this is your first DIY Injection I'd strongly suggest you get hyaluronidase; a dissolver for Hyaluronic Acid filler. Hyaluronidase acts fast, meaning if you botch yourself, inject incorrectly or have any complications, you can inject hyaluronidase in a nearby area to the filler & be fine. I would still seriously recommend you go to an ER or a hospital even after you dissolve the filler, you can never be too sure, and necrosis is really serious.
You can reconstitute Hyaluronidase similar to any peptide, and load it into a needle the same way aswell.
I’ll make a follow up thread on how I end up dissolving my filler (to reduce any chance of migration) in about 8-9 months.
With all this in mind, here’s what my setup looked like:
View attachment 4374248
I ended up sourcing topical lidocaine myself at a pharmacy, but they only allowed me to get 1% (you should try getting 5%, but even at 1% I didn’t feel pain from the injection).
1% Worked fine, I'm pretty sure I could've done it without lidocaine tbh, I would still recommend 5% for proper numbness,
Note: I told them I needed it to wax my dad's chest hair, she started talking about some bullshit post-waxing treatment instead of giving me my fucking lidocaine, stupid bitch.
ITEMS & DESCRIPTIONS:
Filler: This is the main thing I'll be injecting, the two caps at the top are equippable onto the syringe if one goes dull, but I only used 1 of the tops during this process
Dissolver: Hyaluronidase is an "anitdote" for Hyaluronic Acid, if you mess up, botch yourself etc. you'll be using this to dissolve the filler.
Needles & Saline for dissolver: Saline to put in with the Hyaluronidase as its in a powder form, then needles to extract and inject the dissolver ( I didn't have to. )
Lidocaine: Lidocaine is a topical numbing gel, I got it in a 1% concentration, which was just enough for me, but for people with more sensitive skin I'd recommend 5%
I used Revolax Deep with Lidocaine for the filler, and got my hyaluronidase (dissolver) from here
[ Note: The FDA in america are cracking down on sites selling botox specifically, acecosm is one of them, if you're reading this thread in the future and acecosm has shut down, feel free to contact me on here ]
On top of this, I had rubber gloves & alcohol wipes which i got at a grocery store to keep everything sterile, I just couldn't be asked to include it in the photo lol
This post is not a guide or tutorial, nor is it meant to encourage anyone to attempt the same procedure. I’m simply sharing my personal experience for informational purposes only. I was fully aware of the risks involved when I decided to do this myself. I am not responsible for any harm, complications, or outcomes that may occur if someone chooses to replicate or act on what I’ve done.
2. Risk-prevention measures & Technique
Throughout this injection I aspirated for each injection point, aspirating is when you leave your needle in the injection site for 10-12 seconds, and check if any blood starts leaking into the needle.
This is what it'll look like if the needle is inside an artery, if you see this while aspirating, you should change injection spots. No worries though, you can still use the same needle
View attachment 4371889
If blood does go into the needle, it's because of the higher blood pressure found in arteries, meaning I’d change injection sites and aspirate again.
(once you change injection spots you can still use the needle, it doesn't contaminate it)
I have hyaluronidase & saline on standby if I do end up, for whatever reason, injecting an artery on accident. My injection was done at 3AM on a Thursday, I couldn’t let my parents find out so I gave myself time to inject, then stayed up all night, by the time it was 9AM I could tell if I did anything wrong or not, and 6 hours is more than enough time to pass to be able to go to sleep afterwards.
Usually, professionals will get ultrasounds to guide them through being able to locate the arteries in real time, but you and I do not have access to a real time ultrasound of ourselves. Aspirating will have to do, it's not perfect, but it's somewhat reliable.
Now that we have a way to sorta eliminate the risk factor in this, you have to understand filler isn't just about not getting a VO, you also want an aesthetic result at the end of the day, and avoid migration as much as you can.
I'm going to be completely honest, you could study the shit out of the technique and still get it wrong, this chin filler was one of many DIY things I'll be doing to myself, practice makes perfect, studying doesn't. But you still want to try to mimick the perfect technique as much as you can, I've linked some videos below, you should try to study & analyze the technique yourself, I unfortunately cannot help you in this step.
I would not recommend using a cannula since your main goal here should be to go bone-deep. Cannula's are used for higher risk places that need to cover more surface area, I will probably never use a cannula as I try to avoid injecting superficially by any means.
This is the video I watched the most, and the technique I attempted to follow.
View attachment 4382424
The "professionals" injecting you are often also watching these tutorial videos too btw, most injectors at clinics are clueless
I injected a LOT slower than the injectors and was sweating while doing it, but the job was done at the end of the day.
This post is not a guide or tutorial, nor is it meant to encourage anyone to attempt the same procedure. I’m simply sharing my personal experience for informational purposes only. I was fully aware of the risks involved when I decided to do this myself. I am not responsible for any harm, complications, or outcomes that may occur if someone chooses to replicate or act on what I’ve done.
3. Injection Site
View attachment 4374549
This is the image you should keep in mind when doing filler, you'll see the well-known "triangle of death" forming with all the arteries that run through the midface, and you'll also notice the empty spot near the bottom of the chin; this is our safe space, where we can inject without too much risk (BUT STILL RISKY IF YOU ARENT EXPERIENCED). You can also see why injecting wider (for width) becomes even riskier.
Here’s a quick image that I kept in mind before injecting:
View attachment 4373902
But, of course, I ended up drawing my own lines since I'm a man, not a woman, which looked like this:
View attachment 4382352
For men, you want to draw your vertical lines starting from the end of the lips, even if you're just aiming for projection like I was, for women it starts at the nasal base since narrow chins look feminine, and wider chins look masculine.
I divided these injections across 2 sessions, 1st session covered the top 3, 2nd session covered the bottom 2.
Here's what I did (this is not my chin in the pic)
Black Lines:
Drew lines from the edges of my lips fully down
The curved line was just to surround and isolate my actual chin, basically go around the somewhat projected area, the natural curve on ur chin
Green Line:
From the center of my lips, drew a straight line, I then used this line to draw the red lines (to mark arteries)
Red Lines:
a few mm off of the center of my chin, I used the red lines to visualize where the center was, then drew red lines to the left and right of the center, this is usually where the arteries are, so I just avoided them.
Yellow Line:
After everything, I split my chin in half with another line, then I'd pick injection spots on the lower end to ensure I actually got more projection and didn't just even it out jfl
Circles:
I Made a mistake here & should've placed the center circle a bit lower, but the graphic is true to how I actually injected it, the left and right were fine, id just suggest you go a tiny bit lower than I did if you're recreating this.
!! IF RECREATING, WITH THE GOAL OF PROJECTION, I RECOMMEND INJECTING THE CENTER FURTHER DOWN, THIS WAS A NEWBIE MISTAKE BY ME
Here's another image of the drawings actually ON my chin:
View attachment 4371931
I drew this on with my eyebrow pen, you can use a marker, just don't make the lines too thick. I also didn't draw the circles, but I would recommend you do it.
4. Injection Process
By "I can feel it" I meant I could feel the filler on my bone, it wasn't painful, just funny to feel lol
Bonus vid in this thread:
I just finished doing my own Chin Filler [ Video ]
1.1ml, not much, I'm somewhat happy with the results but I need to wait for the swelling to calm down first. Heavily considering a second session, but no pain so far so im pretty happy Video is a timelapse for now, the original footage is 30 minutes and i cba to edit it all rn I'll release a...
This is the process I followed:
Needle in until i felt the texture of my bone, you'll feel a weird fuzzy feeling once you reach it, kinda like having a numb foot.
Once I reach the bone, aspirate, keep the needle in for 10-12 seconds, and monitor the needle with a nearby mirror (which was on the right, you can notice I looked at it several times)
View attachment 4376712
I usually have one of these on me with a magnifying side of the mirror ( Basically just to zoom in ), but unfortunately mine was broken during this process, I just used a mirror close to me
If the aspiration was successful and I didn't draw any blood, I would start injecting, I started pulling out slowly, then pushing back in; This is to make sure I'm not literally pushing out nothing by pressing on my bone, and that there's space for the filler to go, but not too superficially (although I did mess up for my central one and went too far out, I'd recommend staying deeper)
After feeling the filler on my bone, no blood drawn, and checking how much filler I actually used, I could finally pull the needle out and deem that area as successfully injected, and move onto the next to repeat the process.
This post is not a guide or tutorial, nor is it meant to encourage anyone to attempt the same procedure. I’m simply sharing my personal experience for informational purposes only. I was fully aware of the risks involved when I decided to do this myself. I am not responsible for any harm, complications, or outcomes that may occur if someone chooses to replicate or act on what I’ve done.
5. Healing Process & Results
Gonna be honest here, the healing process was decent, but I did several things I shouldn't have.
Don't massage or touch the filler once it's inside, the filler (at least the one I used) feels like actual bone, so you might think its fine to, but seriously, let it heal, don't touch it at all for around a week, then you're fine.
I would recommend sleeping on your back for this period, but honestly it doesn't really matter. Just make sure your injections are symmetrical & you'll be fine.
Before & Afters from 2.0ML of HA Filler:
View attachment 4382373View attachment 4382370
[ I injected too superficially as this was my first time injecting, if you could feel my chin you could actually feel a rod-like shape in the center of it lol ]
My mom started questioning why my chin was "swolen", I just dodged the questions and she didn't seem to care.
I'm sure you can come up with an excuse if you're hiding this from your parents too
View attachment 4374650
Before actually doing the filler I was just practicing reaching my bone with an empty needle without lidocaine, to test my pain tolerance (this step isnt needed), and not pushing anything inside. I thought I had hit an artery and wrote sick about it lmfao
This is not what happens when you hit an artery, this was just hitting a vein, an artery will have blood flowing out more aggressively
Wish me luck! and remember.... This post is not a guide or tutorial, nor is it meant to encourage anyone to attempt the same procedure. I’m simply sharing my personal experience for informational purposes only. I was fully aware of the risks involved when I decided to do this myself. I am not responsible for any harm, complications, or outcomes that may occur if someone chooses to replicate or act on what I’ve done.
Credits:
Videos used in this thread were recorded by @Bryce on a discord call in a groupchat.
@Sick helped me throughout this process & addressed anything I was skeptical about, also reminded me to aspirate on call since I was quite nervous.
Additional Tags:
@BigBallsLarry @Insomnia @Bryce [BWCF]
Recommendeding filler for teens fagYou've got no idea what you're talking about. Don't interact with my threads again, your reply is completely AI
Flexing botted posts gotta be new thingPosts
913
Reputation
350
Points
8
Yes, now explain why this is a bad idea without opening whichever AI agent it is that you use. You can't because you can't think for yourselfRecommendeding filler for teens fag
retardFlexing botted posts gotta be new thing

He probably doesn't even know about aspiration being used in clinics and how our body manages to dissolve most of the filler in a year. Besides that there are so many clinics without licensed cosmetologists doing procedures where they are relying on guides/videos, that spending a week on research could make you even more knowledgeable on the topic then them. Only thing he's right about that Orka did also mention is that clinics should usually use ultrasound for locating blood vessels.Yes, now explain why this is a bad idea without opening whichever AI agent it is that you use. You can't because you can't think for yourself
retard
Retard fagYes, now explain why this is a bad idea without opening whichever AI agent it is that you use. You can't because you can't think for yourself
retard

Instantly fix chin recession | A Guide to DIY Chin filler
Injection Videos at Chap. 4
This post is not a guide or tutorial, nor is it meant to encourage anyone to attempt the same procedure. I’m simply sharing my personal experience for informational purposes only. I was fully aware of the risks involved when I decided to do this myself. I am not responsible for any harm, complications, or outcomes that may occur if someone chooses to replicate or act on what I’ve done.
31/01/2026
Orka here, I do not recommend Revolax Deep anymore. I used it for this but my results quickly faded. Do your own research into filler types & brands and don't take advice blindly.
I will be using medeyra shape for my next chin session after dissolving this.
Table Of Contents:
1. Pre-injection planning & research
2. Risk-prevention measures & Technique
3. Injection Site Explanation
4. Injection process [ VIDEOS ]
5. Healing process & results
1. Pre-injection planning
This is the most important part, you’re going to want to do your own research and not rely solely on this thread for information.
I personally went to r/DIYCosmeticProcedures & r/DIYHeaven to ask for advice, but everybody there was high inhib asf and started telling me not to do it (it ended up being fine)
View attachment 4374630
I made a post calling them high inhib retards once I did my chin filler after they told me not to kek
The main risk during the injection process is if you accidentally fill an artery with filler (Vascular Occlusion), this cuts off extremely important blood flow and can eventually lead to necrosis. If this is your first DIY Injection I'd strongly suggest you get hyaluronidase; a dissolver for Hyaluronic Acid filler. Hyaluronidase acts fast, meaning if you botch yourself, inject incorrectly or have any complications, you can inject hyaluronidase in a nearby area to the filler & be fine. I would still seriously recommend you go to an ER or a hospital even after you dissolve the filler, you can never be too sure, and necrosis is really serious.
You can reconstitute Hyaluronidase similar to any peptide, and load it into a needle the same way aswell.
I’ll make a follow up thread on how I end up dissolving my filler (to reduce any chance of migration) in about 8-9 months.
With all this in mind, here’s what my setup looked like:
View attachment 4374248
I ended up sourcing topical lidocaine myself at a pharmacy, but they only allowed me to get 1% (you should try getting 5%, but even at 1% I didn’t feel pain from the injection).
1% Worked fine, I'm pretty sure I could've done it without lidocaine tbh, I would still recommend 5% for proper numbness,
Note: I told them I needed it to wax my dad's chest hair, she started talking about some bullshit post-waxing treatment instead of giving me my fucking lidocaine, stupid bitch.
ITEMS & DESCRIPTIONS:
Filler: This is the main thing I'll be injecting, the two caps at the top are equippable onto the syringe if one goes dull, but I only used 1 of the tops during this process
Dissolver: Hyaluronidase is an "anitdote" for Hyaluronic Acid, if you mess up, botch yourself etc. you'll be using this to dissolve the filler.
Needles & Saline for dissolver: Saline to put in with the Hyaluronidase as its in a powder form, then needles to extract and inject the dissolver ( I didn't have to. )
Lidocaine: Lidocaine is a topical numbing gel, I got it in a 1% concentration, which was just enough for me, but for people with more sensitive skin I'd recommend 5%
I used Revolax Deep with Lidocaine for the filler, and got my hyaluronidase (dissolver) from here
[ Note: The FDA in america are cracking down on sites selling botox specifically, acecosm is one of them, if you're reading this thread in the future and acecosm has shut down, feel free to contact me on here ]
On top of this, I had rubber gloves & alcohol wipes which i got at a grocery store to keep everything sterile, I just couldn't be asked to include it in the photo lol
This post is not a guide or tutorial, nor is it meant to encourage anyone to attempt the same procedure. I’m simply sharing my personal experience for informational purposes only. I was fully aware of the risks involved when I decided to do this myself. I am not responsible for any harm, complications, or outcomes that may occur if someone chooses to replicate or act on what I’ve done.
2. Risk-prevention measures & Technique
Throughout this injection I aspirated for each injection point, aspirating is when you leave your needle in the injection site for 10-12 seconds, and check if any blood starts leaking into the needle.
This is what it'll look like if the needle is inside an artery, if you see this while aspirating, you should change injection spots. No worries though, you can still use the same needle
View attachment 4371889
If blood does go into the needle, it's because of the higher blood pressure found in arteries, meaning I’d change injection sites and aspirate again.
(once you change injection spots you can still use the needle, it doesn't contaminate it)
I have hyaluronidase & saline on standby if I do end up, for whatever reason, injecting an artery on accident. My injection was done at 3AM on a Thursday, I couldn’t let my parents find out so I gave myself time to inject, then stayed up all night, by the time it was 9AM I could tell if I did anything wrong or not, and 6 hours is more than enough time to pass to be able to go to sleep afterwards.
Usually, professionals will get ultrasounds to guide them through being able to locate the arteries in real time, but you and I do not have access to a real time ultrasound of ourselves. Aspirating will have to do, it's not perfect, but it's somewhat reliable.
Now that we have a way to sorta eliminate the risk factor in this, you have to understand filler isn't just about not getting a VO, you also want an aesthetic result at the end of the day, and avoid migration as much as you can.
I'm going to be completely honest, you could study the shit out of the technique and still get it wrong, this chin filler was one of many DIY things I'll be doing to myself, practice makes perfect, studying doesn't. But you still want to try to mimick the perfect technique as much as you can, I've linked some videos below, you should try to study & analyze the technique yourself, I unfortunately cannot help you in this step.
I would not recommend using a cannula since your main goal here should be to go bone-deep. Cannula's are used for higher risk places that need to cover more surface area, I will probably never use a cannula as I try to avoid injecting superficially by any means.
This is the video I watched the most, and the technique I attempted to follow.
View attachment 4382424
The "professionals" injecting you are often also watching these tutorial videos too btw, most injectors at clinics are clueless
I injected a LOT slower than the injectors and was sweating while doing it, but the job was done at the end of the day.
This post is not a guide or tutorial, nor is it meant to encourage anyone to attempt the same procedure. I’m simply sharing my personal experience for informational purposes only. I was fully aware of the risks involved when I decided to do this myself. I am not responsible for any harm, complications, or outcomes that may occur if someone chooses to replicate or act on what I’ve done.
3. Injection Site
View attachment 4374549
This is the image you should keep in mind when doing filler, you'll see the well-known "triangle of death" forming with all the arteries that run through the midface, and you'll also notice the empty spot near the bottom of the chin; this is our safe space, where we can inject without too much risk (BUT STILL RISKY IF YOU ARENT EXPERIENCED). You can also see why injecting wider (for width) becomes even riskier.
Here’s a quick image that I kept in mind before injecting:
View attachment 4373902
But, of course, I ended up drawing my own lines since I'm a man, not a woman, which looked like this:
View attachment 4382352
For men, you want to draw your vertical lines starting from the end of the lips, even if you're just aiming for projection like I was, for women it starts at the nasal base since narrow chins look feminine, and wider chins look masculine.
I divided these injections across 2 sessions, 1st session covered the top 3, 2nd session covered the bottom 2.
Here's what I did (this is not my chin in the pic)
Black Lines:
Drew lines from the edges of my lips fully down
The curved line was just to surround and isolate my actual chin, basically go around the somewhat projected area, the natural curve on ur chin
Green Line:
From the center of my lips, drew a straight line, I then used this line to draw the red lines (to mark arteries)
Red Lines:
a few mm off of the center of my chin, I used the red lines to visualize where the center was, then drew red lines to the left and right of the center, this is usually where the arteries are, so I just avoided them.
Yellow Line:
After everything, I split my chin in half with another line, then I'd pick injection spots on the lower end to ensure I actually got more projection and didn't just even it out jfl
Circles:
I Made a mistake here & should've placed the center circle a bit lower, but the graphic is true to how I actually injected it, the left and right were fine, id just suggest you go a tiny bit lower than I did if you're recreating this.
!! IF RECREATING, WITH THE GOAL OF PROJECTION, I RECOMMEND INJECTING THE CENTER FURTHER DOWN, THIS WAS A NEWBIE MISTAKE BY ME
Here's another image of the drawings actually ON my chin:
View attachment 4371931
I drew this on with my eyebrow pen, you can use a marker, just don't make the lines too thick. I also didn't draw the circles, but I would recommend you do it.
4. Injection Process
By "I can feel it" I meant I could feel the filler on my bone, it wasn't painful, just funny to feel lol
Bonus vid in this thread:
I just finished doing my own Chin Filler [ Video ]
1.1ml, not much, I'm somewhat happy with the results but I need to wait for the swelling to calm down first. Heavily considering a second session, but no pain so far so im pretty happy Video is a timelapse for now, the original footage is 30 minutes and i cba to edit it all rn I'll release a...
This is the process I followed:
Needle in until i felt the texture of my bone, you'll feel a weird fuzzy feeling once you reach it, kinda like having a numb foot.
Once I reach the bone, aspirate, keep the needle in for 10-12 seconds, and monitor the needle with a nearby mirror (which was on the right, you can notice I looked at it several times)
View attachment 4376712
I usually have one of these on me with a magnifying side of the mirror ( Basically just to zoom in ), but unfortunately mine was broken during this process, I just used a mirror close to me
If the aspiration was successful and I didn't draw any blood, I would start injecting, I started pulling out slowly, then pushing back in; This is to make sure I'm not literally pushing out nothing by pressing on my bone, and that there's space for the filler to go, but not too superficially (although I did mess up for my central one and went too far out, I'd recommend staying deeper)
After feeling the filler on my bone, no blood drawn, and checking how much filler I actually used, I could finally pull the needle out and deem that area as successfully injected, and move onto the next to repeat the process.
This post is not a guide or tutorial, nor is it meant to encourage anyone to attempt the same procedure. I’m simply sharing my personal experience for informational purposes only. I was fully aware of the risks involved when I decided to do this myself. I am not responsible for any harm, complications, or outcomes that may occur if someone chooses to replicate or act on what I’ve done.
5. Healing Process & Results
Gonna be honest here, the healing process was decent, but I did several things I shouldn't have.
Don't massage or touch the filler once it's inside, the filler (at least the one I used) feels like actual bone, so you might think its fine to, but seriously, let it heal, don't touch it at all for around a week, then you're fine.
I would recommend sleeping on your back for this period, but honestly it doesn't really matter. Just make sure your injections are symmetrical & you'll be fine.
Before & Afters from 2.0ML of HA Filler:
View attachment 4382373View attachment 4382370
[ I injected too superficially as this was my first time injecting, if you could feel my chin you could actually feel a rod-like shape in the center of it lol ]
My mom started questioning why my chin was "swolen", I just dodged the questions and she didn't seem to care.
I'm sure you can come up with an excuse if you're hiding this from your parents too
View attachment 4374650
Before actually doing the filler I was just practicing reaching my bone with an empty needle without lidocaine, to test my pain tolerance (this step isnt needed), and not pushing anything inside. I thought I had hit an artery and wrote sick about it lmfao
This is not what happens when you hit an artery, this was just hitting a vein, an artery will have blood flowing out more aggressively
Wish me luck! and remember.... This post is not a guide or tutorial, nor is it meant to encourage anyone to attempt the same procedure. I’m simply sharing my personal experience for informational purposes only. I was fully aware of the risks involved when I decided to do this myself. I am not responsible for any harm, complications, or outcomes that may occur if someone chooses to replicate or act on what I’ve done.
Credits:
Videos used in this thread were recorded by @Bryce on a discord call in a groupchat.
@Sick helped me throughout this process & addressed anything I was skeptical about, also reminded me to aspirate on call since I was quite nervous.
Additional Tags:
@BigBallsLarry @Insomnia @Bryce [BWCF]

elite jack pfpBump great job cheers

Instantly fix chin recession | A Guide to DIY Chin filler
Injection Videos at Chap. 4
This post is not a guide or tutorial, nor is it meant to encourage anyone to attempt the same procedure. I’m simply sharing my personal experience for informational purposes only. I was fully aware of the risks involved when I decided to do this myself. I am not responsible for any harm, complications, or outcomes that may occur if someone chooses to replicate or act on what I’ve done.
31/01/2026
Orka here, I do not recommend Revolax Deep anymore. I used it for this but my results quickly faded. Do your own research into filler types & brands and don't take advice blindly.
I will be using medeyra shape for my next chin session after dissolving this.
Table Of Contents:
1. Pre-injection planning & research
2. Risk-prevention measures & Technique
3. Injection Site Explanation
4. Injection process [ VIDEOS ]
5. Healing process & results
1. Pre-injection planning
This is the most important part, you’re going to want to do your own research and not rely solely on this thread for information.
I personally went to r/DIYCosmeticProcedures & r/DIYHeaven to ask for advice, but everybody there was high inhib asf and started telling me not to do it (it ended up being fine)
View attachment 4374630
I made a post calling them high inhib retards once I did my chin filler after they told me not to kek
The main risk during the injection process is if you accidentally fill an artery with filler (Vascular Occlusion), this cuts off extremely important blood flow and can eventually lead to necrosis. If this is your first DIY Injection I'd strongly suggest you get hyaluronidase; a dissolver for Hyaluronic Acid filler. Hyaluronidase acts fast, meaning if you botch yourself, inject incorrectly or have any complications, you can inject hyaluronidase in a nearby area to the filler & be fine. I would still seriously recommend you go to an ER or a hospital even after you dissolve the filler, you can never be too sure, and necrosis is really serious.
You can reconstitute Hyaluronidase similar to any peptide, and load it into a needle the same way aswell.
I’ll make a follow up thread on how I end up dissolving my filler (to reduce any chance of migration) in about 8-9 months.
With all this in mind, here’s what my setup looked like:
View attachment 4374248
I ended up sourcing topical lidocaine myself at a pharmacy, but they only allowed me to get 1% (you should try getting 5%, but even at 1% I didn’t feel pain from the injection).
1% Worked fine, I'm pretty sure I could've done it without lidocaine tbh, I would still recommend 5% for proper numbness,
Note: I told them I needed it to wax my dad's chest hair, she started talking about some bullshit post-waxing treatment instead of giving me my fucking lidocaine, stupid bitch.
ITEMS & DESCRIPTIONS:
Filler: This is the main thing I'll be injecting, the two caps at the top are equippable onto the syringe if one goes dull, but I only used 1 of the tops during this process
Dissolver: Hyaluronidase is an "anitdote" for Hyaluronic Acid, if you mess up, botch yourself etc. you'll be using this to dissolve the filler.
Needles & Saline for dissolver: Saline to put in with the Hyaluronidase as its in a powder form, then needles to extract and inject the dissolver ( I didn't have to. )
Lidocaine: Lidocaine is a topical numbing gel, I got it in a 1% concentration, which was just enough for me, but for people with more sensitive skin I'd recommend 5%
I used Revolax Deep with Lidocaine for the filler, and got my hyaluronidase (dissolver) from here
[ Note: The FDA in america are cracking down on sites selling botox specifically, acecosm is one of them, if you're reading this thread in the future and acecosm has shut down, feel free to contact me on here ]
On top of this, I had rubber gloves & alcohol wipes which i got at a grocery store to keep everything sterile, I just couldn't be asked to include it in the photo lol
This post is not a guide or tutorial, nor is it meant to encourage anyone to attempt the same procedure. I’m simply sharing my personal experience for informational purposes only. I was fully aware of the risks involved when I decided to do this myself. I am not responsible for any harm, complications, or outcomes that may occur if someone chooses to replicate or act on what I’ve done.
2. Risk-prevention measures & Technique
Throughout this injection I aspirated for each injection point, aspirating is when you leave your needle in the injection site for 10-12 seconds, and check if any blood starts leaking into the needle.
This is what it'll look like if the needle is inside an artery, if you see this while aspirating, you should change injection spots. No worries though, you can still use the same needle
View attachment 4371889
If blood does go into the needle, it's because of the higher blood pressure found in arteries, meaning I’d change injection sites and aspirate again.
(once you change injection spots you can still use the needle, it doesn't contaminate it)
I have hyaluronidase & saline on standby if I do end up, for whatever reason, injecting an artery on accident. My injection was done at 3AM on a Thursday, I couldn’t let my parents find out so I gave myself time to inject, then stayed up all night, by the time it was 9AM I could tell if I did anything wrong or not, and 6 hours is more than enough time to pass to be able to go to sleep afterwards.
Usually, professionals will get ultrasounds to guide them through being able to locate the arteries in real time, but you and I do not have access to a real time ultrasound of ourselves. Aspirating will have to do, it's not perfect, but it's somewhat reliable.
Now that we have a way to sorta eliminate the risk factor in this, you have to understand filler isn't just about not getting a VO, you also want an aesthetic result at the end of the day, and avoid migration as much as you can.
I'm going to be completely honest, you could study the shit out of the technique and still get it wrong, this chin filler was one of many DIY things I'll be doing to myself, practice makes perfect, studying doesn't. But you still want to try to mimick the perfect technique as much as you can, I've linked some videos below, you should try to study & analyze the technique yourself, I unfortunately cannot help you in this step.
I would not recommend using a cannula since your main goal here should be to go bone-deep. Cannula's are used for higher risk places that need to cover more surface area, I will probably never use a cannula as I try to avoid injecting superficially by any means.
This is the video I watched the most, and the technique I attempted to follow.
View attachment 4382424
The "professionals" injecting you are often also watching these tutorial videos too btw, most injectors at clinics are clueless
I injected a LOT slower than the injectors and was sweating while doing it, but the job was done at the end of the day.
This post is not a guide or tutorial, nor is it meant to encourage anyone to attempt the same procedure. I’m simply sharing my personal experience for informational purposes only. I was fully aware of the risks involved when I decided to do this myself. I am not responsible for any harm, complications, or outcomes that may occur if someone chooses to replicate or act on what I’ve done.
3. Injection Site
View attachment 4374549
This is the image you should keep in mind when doing filler, you'll see the well-known "triangle of death" forming with all the arteries that run through the midface, and you'll also notice the empty spot near the bottom of the chin; this is our safe space, where we can inject without too much risk (BUT STILL RISKY IF YOU ARENT EXPERIENCED). You can also see why injecting wider (for width) becomes even riskier.
Here’s a quick image that I kept in mind before injecting:
View attachment 4373902
But, of course, I ended up drawing my own lines since I'm a man, not a woman, which looked like this:
View attachment 4382352
For men, you want to draw your vertical lines starting from the end of the lips, even if you're just aiming for projection like I was, for women it starts at the nasal base since narrow chins look feminine, and wider chins look masculine.
I divided these injections across 2 sessions, 1st session covered the top 3, 2nd session covered the bottom 2.
Here's what I did (this is not my chin in the pic)
Black Lines:
Drew lines from the edges of my lips fully down
The curved line was just to surround and isolate my actual chin, basically go around the somewhat projected area, the natural curve on ur chin
Green Line:
From the center of my lips, drew a straight line, I then used this line to draw the red lines (to mark arteries)
Red Lines:
a few mm off of the center of my chin, I used the red lines to visualize where the center was, then drew red lines to the left and right of the center, this is usually where the arteries are, so I just avoided them.
Yellow Line:
After everything, I split my chin in half with another line, then I'd pick injection spots on the lower end to ensure I actually got more projection and didn't just even it out jfl
Circles:
I Made a mistake here & should've placed the center circle a bit lower, but the graphic is true to how I actually injected it, the left and right were fine, id just suggest you go a tiny bit lower than I did if you're recreating this.
!! IF RECREATING, WITH THE GOAL OF PROJECTION, I RECOMMEND INJECTING THE CENTER FURTHER DOWN, THIS WAS A NEWBIE MISTAKE BY ME
Here's another image of the drawings actually ON my chin:
View attachment 4371931
I drew this on with my eyebrow pen, you can use a marker, just don't make the lines too thick. I also didn't draw the circles, but I would recommend you do it.
4. Injection Process
By "I can feel it" I meant I could feel the filler on my bone, it wasn't painful, just funny to feel lol
Bonus vid in this thread:
I just finished doing my own Chin Filler [ Video ]
1.1ml, not much, I'm somewhat happy with the results but I need to wait for the swelling to calm down first. Heavily considering a second session, but no pain so far so im pretty happy Video is a timelapse for now, the original footage is 30 minutes and i cba to edit it all rn I'll release a...
This is the process I followed:
Needle in until i felt the texture of my bone, you'll feel a weird fuzzy feeling once you reach it, kinda like having a numb foot.
Once I reach the bone, aspirate, keep the needle in for 10-12 seconds, and monitor the needle with a nearby mirror (which was on the right, you can notice I looked at it several times)
View attachment 4376712
I usually have one of these on me with a magnifying side of the mirror ( Basically just to zoom in ), but unfortunately mine was broken during this process, I just used a mirror close to me
If the aspiration was successful and I didn't draw any blood, I would start injecting, I started pulling out slowly, then pushing back in; This is to make sure I'm not literally pushing out nothing by pressing on my bone, and that there's space for the filler to go, but not too superficially (although I did mess up for my central one and went too far out, I'd recommend staying deeper)
After feeling the filler on my bone, no blood drawn, and checking how much filler I actually used, I could finally pull the needle out and deem that area as successfully injected, and move onto the next to repeat the process.
This post is not a guide or tutorial, nor is it meant to encourage anyone to attempt the same procedure. I’m simply sharing my personal experience for informational purposes only. I was fully aware of the risks involved when I decided to do this myself. I am not responsible for any harm, complications, or outcomes that may occur if someone chooses to replicate or act on what I’ve done.
5. Healing Process & Results
Gonna be honest here, the healing process was decent, but I did several things I shouldn't have.
Don't massage or touch the filler once it's inside, the filler (at least the one I used) feels like actual bone, so you might think its fine to, but seriously, let it heal, don't touch it at all for around a week, then you're fine.
I would recommend sleeping on your back for this period, but honestly it doesn't really matter. Just make sure your injections are symmetrical & you'll be fine.
Before & Afters from 2.0ML of HA Filler:
View attachment 4382373View attachment 4382370
[ I injected too superficially as this was my first time injecting, if you could feel my chin you could actually feel a rod-like shape in the center of it lol ]
My mom started questioning why my chin was "swolen", I just dodged the questions and she didn't seem to care.
I'm sure you can come up with an excuse if you're hiding this from your parents too
View attachment 4374650
Before actually doing the filler I was just practicing reaching my bone with an empty needle without lidocaine, to test my pain tolerance (this step isnt needed), and not pushing anything inside. I thought I had hit an artery and wrote sick about it lmfao
This is not what happens when you hit an artery, this was just hitting a vein, an artery will have blood flowing out more aggressively
Wish me luck! and remember.... This post is not a guide or tutorial, nor is it meant to encourage anyone to attempt the same procedure. I’m simply sharing my personal experience for informational purposes only. I was fully aware of the risks involved when I decided to do this myself. I am not responsible for any harm, complications, or outcomes that may occur if someone chooses to replicate or act on what I’ve done.
Credits:
Videos used in this thread were recorded by @Bryce on a discord call in a groupchat.
@Sick helped me throughout this process & addressed anything I was skeptical about, also reminded me to aspirate on call since I was quite nervous.
Additional Tags:
@BigBallsLarry @Insomnia @Bryce [BWCF]
You can't "reuse it" for multiple sessions, you can inject, take it out, move to another point and inject again, since the needle isnt left out for long enough for the bacteria from your body to grow on it, and you're (hopefully) not touching anything else with the needle, so it remains sterile for the time being.Why are you able to reuse the filler needles? this is the primary thing I am worried about as I got an infection from previous injections.
Thank you so much this is a huge help!You can't "reuse it" for multiple sessions, you can inject, take it out, move to another point and inject again, since the needle isnt left out for long enough for the bacteria from your body to grow on it, and you're (hopefully) not touching anything else with the needle, so it remains sterile for the time being.
Needles only become dangerous to use if you're leaving them out for several minutes (8+)

Instantly fix chin recession | A Guide to DIY Chin filler
Injection Videos at Chap. 4
This post is not a guide or tutorial, nor is it meant to encourage anyone to attempt the same procedure. I’m simply sharing my personal experience for informational purposes only. I was fully aware of the risks involved when I decided to do this myself. I am not responsible for any harm, complications, or outcomes that may occur if someone chooses to replicate or act on what I’ve done.
31/01/2026
Orka here, I do not recommend Revolax Deep anymore. I used it for this but my results quickly faded. Do your own research into filler types & brands and don't take advice blindly.
I will be using medeyra shape for my next chin session after dissolving this.
Table Of Contents:
1. Pre-injection planning & research
2. Risk-prevention measures & Technique
3. Injection Site Explanation
4. Injection process [ VIDEOS ]
5. Healing process & results
1. Pre-injection planning
This is the most important part, you’re going to want to do your own research and not rely solely on this thread for information.
I personally went to r/DIYCosmeticProcedures & r/DIYHeaven to ask for advice, but everybody there was high inhib asf and started telling me not to do it (it ended up being fine)
View attachment 4374630
I made a post calling them high inhib retards once I did my chin filler after they told me not to kek
The main risk during the injection process is if you accidentally fill an artery with filler (Vascular Occlusion), this cuts off extremely important blood flow and can eventually lead to necrosis. If this is your first DIY Injection I'd strongly suggest you get hyaluronidase; a dissolver for Hyaluronic Acid filler. Hyaluronidase acts fast, meaning if you botch yourself, inject incorrectly or have any complications, you can inject hyaluronidase in a nearby area to the filler & be fine. I would still seriously recommend you go to an ER or a hospital even after you dissolve the filler, you can never be too sure, and necrosis is really serious.
You can reconstitute Hyaluronidase similar to any peptide, and load it into a needle the same way aswell.
I’ll make a follow up thread on how I end up dissolving my filler (to reduce any chance of migration) in about 8-9 months.
With all this in mind, here’s what my setup looked like:
View attachment 4374248
I ended up sourcing topical lidocaine myself at a pharmacy, but they only allowed me to get 1% (you should try getting 5%, but even at 1% I didn’t feel pain from the injection).
1% Worked fine, I'm pretty sure I could've done it without lidocaine tbh, I would still recommend 5% for proper numbness,
Note: I told them I needed it to wax my dad's chest hair, she started talking about some bullshit post-waxing treatment instead of giving me my fucking lidocaine, stupid bitch.
ITEMS & DESCRIPTIONS:
Filler: This is the main thing I'll be injecting, the two caps at the top are equippable onto the syringe if one goes dull, but I only used 1 of the tops during this process
Dissolver: Hyaluronidase is an "anitdote" for Hyaluronic Acid, if you mess up, botch yourself etc. you'll be using this to dissolve the filler.
Needles & Saline for dissolver: Saline to put in with the Hyaluronidase as its in a powder form, then needles to extract and inject the dissolver ( I didn't have to. )
Lidocaine: Lidocaine is a topical numbing gel, I got it in a 1% concentration, which was just enough for me, but for people with more sensitive skin I'd recommend 5%
I used Revolax Deep with Lidocaine for the filler, and got my hyaluronidase (dissolver) from here
[ Note: The FDA in america are cracking down on sites selling botox specifically, acecosm is one of them, if you're reading this thread in the future and acecosm has shut down, feel free to contact me on here ]
On top of this, I had rubber gloves & alcohol wipes which i got at a grocery store to keep everything sterile, I just couldn't be asked to include it in the photo lol
This post is not a guide or tutorial, nor is it meant to encourage anyone to attempt the same procedure. I’m simply sharing my personal experience for informational purposes only. I was fully aware of the risks involved when I decided to do this myself. I am not responsible for any harm, complications, or outcomes that may occur if someone chooses to replicate or act on what I’ve done.
2. Risk-prevention measures & Technique
Throughout this injection I aspirated for each injection point, aspirating is when you leave your needle in the injection site for 10-12 seconds, and check if any blood starts leaking into the needle.
This is what it'll look like if the needle is inside an artery, if you see this while aspirating, you should change injection spots. No worries though, you can still use the same needle
View attachment 4371889
If blood does go into the needle, it's because of the higher blood pressure found in arteries, meaning I’d change injection sites and aspirate again.
(once you change injection spots you can still use the needle, it doesn't contaminate it)
I have hyaluronidase & saline on standby if I do end up, for whatever reason, injecting an artery on accident. My injection was done at 3AM on a Thursday, I couldn’t let my parents find out so I gave myself time to inject, then stayed up all night, by the time it was 9AM I could tell if I did anything wrong or not, and 6 hours is more than enough time to pass to be able to go to sleep afterwards.
Usually, professionals will get ultrasounds to guide them through being able to locate the arteries in real time, but you and I do not have access to a real time ultrasound of ourselves. Aspirating will have to do, it's not perfect, but it's somewhat reliable.
Now that we have a way to sorta eliminate the risk factor in this, you have to understand filler isn't just about not getting a VO, you also want an aesthetic result at the end of the day, and avoid migration as much as you can.
I'm going to be completely honest, you could study the shit out of the technique and still get it wrong, this chin filler was one of many DIY things I'll be doing to myself, practice makes perfect, studying doesn't. But you still want to try to mimick the perfect technique as much as you can, I've linked some videos below, you should try to study & analyze the technique yourself, I unfortunately cannot help you in this step.
I would not recommend using a cannula since your main goal here should be to go bone-deep. Cannula's are used for higher risk places that need to cover more surface area, I will probably never use a cannula as I try to avoid injecting superficially by any means.
This is the video I watched the most, and the technique I attempted to follow.
View attachment 4382424
The "professionals" injecting you are often also watching these tutorial videos too btw, most injectors at clinics are clueless
I injected a LOT slower than the injectors and was sweating while doing it, but the job was done at the end of the day.
This post is not a guide or tutorial, nor is it meant to encourage anyone to attempt the same procedure. I’m simply sharing my personal experience for informational purposes only. I was fully aware of the risks involved when I decided to do this myself. I am not responsible for any harm, complications, or outcomes that may occur if someone chooses to replicate or act on what I’ve done.
3. Injection Site
View attachment 4374549
This is the image you should keep in mind when doing filler, you'll see the well-known "triangle of death" forming with all the arteries that run through the midface, and you'll also notice the empty spot near the bottom of the chin; this is our safe space, where we can inject without too much risk (BUT STILL RISKY IF YOU ARENT EXPERIENCED). You can also see why injecting wider (for width) becomes even riskier.
Here’s a quick image that I kept in mind before injecting:
View attachment 4373902
But, of course, I ended up drawing my own lines since I'm a man, not a woman, which looked like this:
View attachment 4382352
For men, you want to draw your vertical lines starting from the end of the lips, even if you're just aiming for projection like I was, for women it starts at the nasal base since narrow chins look feminine, and wider chins look masculine.
I divided these injections across 2 sessions, 1st session covered the top 3, 2nd session covered the bottom 2.
Here's what I did (this is not my chin in the pic)
Black Lines:
Drew lines from the edges of my lips fully down
The curved line was just to surround and isolate my actual chin, basically go around the somewhat projected area, the natural curve on ur chin
Green Line:
From the center of my lips, drew a straight line, I then used this line to draw the red lines (to mark arteries)
Red Lines:
a few mm off of the center of my chin, I used the red lines to visualize where the center was, then drew red lines to the left and right of the center, this is usually where the arteries are, so I just avoided them.
Yellow Line:
After everything, I split my chin in half with another line, then I'd pick injection spots on the lower end to ensure I actually got more projection and didn't just even it out jfl
Circles:
I Made a mistake here & should've placed the center circle a bit lower, but the graphic is true to how I actually injected it, the left and right were fine, id just suggest you go a tiny bit lower than I did if you're recreating this.
!! IF RECREATING, WITH THE GOAL OF PROJECTION, I RECOMMEND INJECTING THE CENTER FURTHER DOWN, THIS WAS A NEWBIE MISTAKE BY ME
Here's another image of the drawings actually ON my chin:
View attachment 4371931
I drew this on with my eyebrow pen, you can use a marker, just don't make the lines too thick. I also didn't draw the circles, but I would recommend you do it.
4. Injection Process
By "I can feel it" I meant I could feel the filler on my bone, it wasn't painful, just funny to feel lol
Bonus vid in this thread:
I just finished doing my own Chin Filler [ Video ]
1.1ml, not much, I'm somewhat happy with the results but I need to wait for the swelling to calm down first. Heavily considering a second session, but no pain so far so im pretty happy Video is a timelapse for now, the original footage is 30 minutes and i cba to edit it all rn I'll release a...
This is the process I followed:
Needle in until i felt the texture of my bone, you'll feel a weird fuzzy feeling once you reach it, kinda like having a numb foot.
Once I reach the bone, aspirate, keep the needle in for 10-12 seconds, and monitor the needle with a nearby mirror (which was on the right, you can notice I looked at it several times)
View attachment 4376712
I usually have one of these on me with a magnifying side of the mirror ( Basically just to zoom in ), but unfortunately mine was broken during this process, I just used a mirror close to me
If the aspiration was successful and I didn't draw any blood, I would start injecting, I started pulling out slowly, then pushing back in; This is to make sure I'm not literally pushing out nothing by pressing on my bone, and that there's space for the filler to go, but not too superficially (although I did mess up for my central one and went too far out, I'd recommend staying deeper)
After feeling the filler on my bone, no blood drawn, and checking how much filler I actually used, I could finally pull the needle out and deem that area as successfully injected, and move onto the next to repeat the process.
This post is not a guide or tutorial, nor is it meant to encourage anyone to attempt the same procedure. I’m simply sharing my personal experience for informational purposes only. I was fully aware of the risks involved when I decided to do this myself. I am not responsible for any harm, complications, or outcomes that may occur if someone chooses to replicate or act on what I’ve done.
5. Healing Process & Results
Gonna be honest here, the healing process was decent, but I did several things I shouldn't have.
Don't massage or touch the filler once it's inside, the filler (at least the one I used) feels like actual bone, so you might think its fine to, but seriously, let it heal, don't touch it at all for around a week, then you're fine.
I would recommend sleeping on your back for this period, but honestly it doesn't really matter. Just make sure your injections are symmetrical & you'll be fine.
Before & Afters from 2.0ML of HA Filler:
View attachment 4382373View attachment 4382370
[ I injected too superficially as this was my first time injecting, if you could feel my chin you could actually feel a rod-like shape in the center of it lol ]
My mom started questioning why my chin was "swolen", I just dodged the questions and she didn't seem to care.
I'm sure you can come up with an excuse if you're hiding this from your parents too
View attachment 4374650
Before actually doing the filler I was just practicing reaching my bone with an empty needle without lidocaine, to test my pain tolerance (this step isnt needed), and not pushing anything inside. I thought I had hit an artery and wrote sick about it lmfao
This is not what happens when you hit an artery, this was just hitting a vein, an artery will have blood flowing out more aggressively
Wish me luck! and remember.... This post is not a guide or tutorial, nor is it meant to encourage anyone to attempt the same procedure. I’m simply sharing my personal experience for informational purposes only. I was fully aware of the risks involved when I decided to do this myself. I am not responsible for any harm, complications, or outcomes that may occur if someone chooses to replicate or act on what I’ve done.
Credits:
Videos used in this thread were recorded by @Bryce on a discord call in a groupchat.
@Sick helped me throughout this process & addressed anything I was skeptical about, also reminded me to aspirate on call since I was quite nervous.
Additional Tags:
@BigBallsLarry @Insomnia @Bryce [BWCF]

Instantly fix chin recession | A Guide to DIY Chin filler
Injection Videos at Chap. 4
This post is not a guide or tutorial, nor is it meant to encourage anyone to attempt the same procedure. I’m simply sharing my personal experience for informational purposes only. I was fully aware of the risks involved when I decided to do this myself. I am not responsible for any harm, complications, or outcomes that may occur if someone chooses to replicate or act on what I’ve done.
31/01/2026
Orka here, I do not recommend Revolax Deep anymore. I used it for this but my results quickly faded. Do your own research into filler types & brands and don't take advice blindly.
I will be using medeyra shape for my next chin session after dissolving this.
Table Of Contents:
1. Pre-injection planning & research
2. Risk-prevention measures & Technique
3. Injection Site Explanation
4. Injection process [ VIDEOS ]
5. Healing process & results
1. Pre-injection planning
This is the most important part, you’re going to want to do your own research and not rely solely on this thread for information.
I personally went to r/DIYCosmeticProcedures & r/DIYHeaven to ask for advice, but everybody there was high inhib asf and started telling me not to do it (it ended up being fine)
View attachment 4374630
I made a post calling them high inhib retards once I did my chin filler after they told me not to kek
The main risk during the injection process is if you accidentally fill an artery with filler (Vascular Occlusion), this cuts off extremely important blood flow and can eventually lead to necrosis. If this is your first DIY Injection I'd strongly suggest you get hyaluronidase; a dissolver for Hyaluronic Acid filler. Hyaluronidase acts fast, meaning if you botch yourself, inject incorrectly or have any complications, you can inject hyaluronidase in a nearby area to the filler & be fine. I would still seriously recommend you go to an ER or a hospital even after you dissolve the filler, you can never be too sure, and necrosis is really serious.
You can reconstitute Hyaluronidase similar to any peptide, and load it into a needle the same way aswell.
I’ll make a follow up thread on how I end up dissolving my filler (to reduce any chance of migration) in about 8-9 months.
With all this in mind, here’s what my setup looked like:
View attachment 4374248
I ended up sourcing topical lidocaine myself at a pharmacy, but they only allowed me to get 1% (you should try getting 5%, but even at 1% I didn’t feel pain from the injection).
1% Worked fine, I'm pretty sure I could've done it without lidocaine tbh, I would still recommend 5% for proper numbness,
Note: I told them I needed it to wax my dad's chest hair, she started talking about some bullshit post-waxing treatment instead of giving me my fucking lidocaine, stupid bitch.
ITEMS & DESCRIPTIONS:
Filler: This is the main thing I'll be injecting, the two caps at the top are equippable onto the syringe if one goes dull, but I only used 1 of the tops during this process
Dissolver: Hyaluronidase is an "anitdote" for Hyaluronic Acid, if you mess up, botch yourself etc. you'll be using this to dissolve the filler.
Needles & Saline for dissolver: Saline to put in with the Hyaluronidase as its in a powder form, then needles to extract and inject the dissolver ( I didn't have to. )
Lidocaine: Lidocaine is a topical numbing gel, I got it in a 1% concentration, which was just enough for me, but for people with more sensitive skin I'd recommend 5%
I used Revolax Deep with Lidocaine for the filler, and got my hyaluronidase (dissolver) from here
[ Note: The FDA in america are cracking down on sites selling botox specifically, acecosm is one of them, if you're reading this thread in the future and acecosm has shut down, feel free to contact me on here ]
On top of this, I had rubber gloves & alcohol wipes which i got at a grocery store to keep everything sterile, I just couldn't be asked to include it in the photo lol
This post is not a guide or tutorial, nor is it meant to encourage anyone to attempt the same procedure. I’m simply sharing my personal experience for informational purposes only. I was fully aware of the risks involved when I decided to do this myself. I am not responsible for any harm, complications, or outcomes that may occur if someone chooses to replicate or act on what I’ve done.
2. Risk-prevention measures & Technique
Throughout this injection I aspirated for each injection point, aspirating is when you leave your needle in the injection site for 10-12 seconds, and check if any blood starts leaking into the needle.
This is what it'll look like if the needle is inside an artery, if you see this while aspirating, you should change injection spots. No worries though, you can still use the same needle
View attachment 4371889
If blood does go into the needle, it's because of the higher blood pressure found in arteries, meaning I’d change injection sites and aspirate again.
(once you change injection spots you can still use the needle, it doesn't contaminate it)
I have hyaluronidase & saline on standby if I do end up, for whatever reason, injecting an artery on accident. My injection was done at 3AM on a Thursday, I couldn’t let my parents find out so I gave myself time to inject, then stayed up all night, by the time it was 9AM I could tell if I did anything wrong or not, and 6 hours is more than enough time to pass to be able to go to sleep afterwards.
Usually, professionals will get ultrasounds to guide them through being able to locate the arteries in real time, but you and I do not have access to a real time ultrasound of ourselves. Aspirating will have to do, it's not perfect, but it's somewhat reliable.
Now that we have a way to sorta eliminate the risk factor in this, you have to understand filler isn't just about not getting a VO, you also want an aesthetic result at the end of the day, and avoid migration as much as you can.
I'm going to be completely honest, you could study the shit out of the technique and still get it wrong, this chin filler was one of many DIY things I'll be doing to myself, practice makes perfect, studying doesn't. But you still want to try to mimick the perfect technique as much as you can, I've linked some videos below, you should try to study & analyze the technique yourself, I unfortunately cannot help you in this step.
I would not recommend using a cannula since your main goal here should be to go bone-deep. Cannula's are used for higher risk places that need to cover more surface area, I will probably never use a cannula as I try to avoid injecting superficially by any means.
This is the video I watched the most, and the technique I attempted to follow.
View attachment 4382424
The "professionals" injecting you are often also watching these tutorial videos too btw, most injectors at clinics are clueless
I injected a LOT slower than the injectors and was sweating while doing it, but the job was done at the end of the day.
This post is not a guide or tutorial, nor is it meant to encourage anyone to attempt the same procedure. I’m simply sharing my personal experience for informational purposes only. I was fully aware of the risks involved when I decided to do this myself. I am not responsible for any harm, complications, or outcomes that may occur if someone chooses to replicate or act on what I’ve done.
3. Injection Site
View attachment 4374549
This is the image you should keep in mind when doing filler, you'll see the well-known "triangle of death" forming with all the arteries that run through the midface, and you'll also notice the empty spot near the bottom of the chin; this is our safe space, where we can inject without too much risk (BUT STILL RISKY IF YOU ARENT EXPERIENCED). You can also see why injecting wider (for width) becomes even riskier.
Here’s a quick image that I kept in mind before injecting:
View attachment 4373902
But, of course, I ended up drawing my own lines since I'm a man, not a woman, which looked like this:
View attachment 4382352
For men, you want to draw your vertical lines starting from the end of the lips, even if you're just aiming for projection like I was, for women it starts at the nasal base since narrow chins look feminine, and wider chins look masculine.
I divided these injections across 2 sessions, 1st session covered the top 3, 2nd session covered the bottom 2.
Here's what I did (this is not my chin in the pic)
Black Lines:
Drew lines from the edges of my lips fully down
The curved line was just to surround and isolate my actual chin, basically go around the somewhat projected area, the natural curve on ur chin
Green Line:
From the center of my lips, drew a straight line, I then used this line to draw the red lines (to mark arteries)
Red Lines:
a few mm off of the center of my chin, I used the red lines to visualize where the center was, then drew red lines to the left and right of the center, this is usually where the arteries are, so I just avoided them.
Yellow Line:
After everything, I split my chin in half with another line, then I'd pick injection spots on the lower end to ensure I actually got more projection and didn't just even it out jfl
Circles:
I Made a mistake here & should've placed the center circle a bit lower, but the graphic is true to how I actually injected it, the left and right were fine, id just suggest you go a tiny bit lower than I did if you're recreating this.
!! IF RECREATING, WITH THE GOAL OF PROJECTION, I RECOMMEND INJECTING THE CENTER FURTHER DOWN, THIS WAS A NEWBIE MISTAKE BY ME
Here's another image of the drawings actually ON my chin:
View attachment 4371931
I drew this on with my eyebrow pen, you can use a marker, just don't make the lines too thick. I also didn't draw the circles, but I would recommend you do it.
4. Injection Process
By "I can feel it" I meant I could feel the filler on my bone, it wasn't painful, just funny to feel lol
Bonus vid in this thread:
I just finished doing my own Chin Filler [ Video ]
1.1ml, not much, I'm somewhat happy with the results but I need to wait for the swelling to calm down first. Heavily considering a second session, but no pain so far so im pretty happy Video is a timelapse for now, the original footage is 30 minutes and i cba to edit it all rn I'll release a...
This is the process I followed:
Needle in until i felt the texture of my bone, you'll feel a weird fuzzy feeling once you reach it, kinda like having a numb foot.
Once I reach the bone, aspirate, keep the needle in for 10-12 seconds, and monitor the needle with a nearby mirror (which was on the right, you can notice I looked at it several times)
View attachment 4376712
I usually have one of these on me with a magnifying side of the mirror ( Basically just to zoom in ), but unfortunately mine was broken during this process, I just used a mirror close to me
If the aspiration was successful and I didn't draw any blood, I would start injecting, I started pulling out slowly, then pushing back in; This is to make sure I'm not literally pushing out nothing by pressing on my bone, and that there's space for the filler to go, but not too superficially (although I did mess up for my central one and went too far out, I'd recommend staying deeper)
After feeling the filler on my bone, no blood drawn, and checking how much filler I actually used, I could finally pull the needle out and deem that area as successfully injected, and move onto the next to repeat the process.
This post is not a guide or tutorial, nor is it meant to encourage anyone to attempt the same procedure. I’m simply sharing my personal experience for informational purposes only. I was fully aware of the risks involved when I decided to do this myself. I am not responsible for any harm, complications, or outcomes that may occur if someone chooses to replicate or act on what I’ve done.
5. Healing Process & Results
Gonna be honest here, the healing process was decent, but I did several things I shouldn't have.
Don't massage or touch the filler once it's inside, the filler (at least the one I used) feels like actual bone, so you might think its fine to, but seriously, let it heal, don't touch it at all for around a week, then you're fine.
I would recommend sleeping on your back for this period, but honestly it doesn't really matter. Just make sure your injections are symmetrical & you'll be fine.
Before & Afters from 2.0ML of HA Filler:
View attachment 4382373View attachment 4382370
[ I injected too superficially as this was my first time injecting, if you could feel my chin you could actually feel a rod-like shape in the center of it lol ]
My mom started questioning why my chin was "swolen", I just dodged the questions and she didn't seem to care.
I'm sure you can come up with an excuse if you're hiding this from your parents too
View attachment 4374650
Before actually doing the filler I was just practicing reaching my bone with an empty needle without lidocaine, to test my pain tolerance (this step isnt needed), and not pushing anything inside. I thought I had hit an artery and wrote sick about it lmfao
This is not what happens when you hit an artery, this was just hitting a vein, an artery will have blood flowing out more aggressively
Wish me luck! and remember.... This post is not a guide or tutorial, nor is it meant to encourage anyone to attempt the same procedure. I’m simply sharing my personal experience for informational purposes only. I was fully aware of the risks involved when I decided to do this myself. I am not responsible for any harm, complications, or outcomes that may occur if someone chooses to replicate or act on what I’ve done.
Credits:
Videos used in this thread were recorded by @Bryce on a discord call in a groupchat.
@Sick helped me throughout this process & addressed anything I was skeptical about, also reminded me to aspirate on call since I was quite nervous.
Additional Tags:
@BigBallsLarry @Insomnia @Bryce [BWCF]
Clearly greycel didn't read the thread Instantly fix chin recession | A Guide to DIY Chin filler
Injection Videos at Chap. 4
This post is not a guide or tutorial, nor is it meant to encourage anyone to attempt the same procedure. I’m simply sharing my personal experience for informational purposes only. I was fully aware of the risks involved when I decided to do this myself. I am not responsible for any harm, complications, or outcomes that may occur if someone chooses to replicate or act on what I’ve done.
31/01/2026
Orka here, I do not recommend Revolax Deep anymore. I used it for this but my results quickly faded. Do your own research into filler types & brands and don't take advice blindly.
I will be using medeyra shape for my next chin session after dissolving this.
Table Of Contents:
1. Pre-injection planning & research
2. Risk-prevention measures & Technique
3. Injection Site Explanation
4. Injection process [ VIDEOS ]
5. Healing process & results
1. Pre-injection planning
This is the most important part, you’re going to want to do your own research and not rely solely on this thread for information.
I personally went to r/DIYCosmeticProcedures & r/DIYHeaven to ask for advice, but everybody there was high inhib asf and started telling me not to do it (it ended up being fine)
View attachment 4374630
I made a post calling them high inhib retards once I did my chin filler after they told me not to kek
The main risk during the injection process is if you accidentally fill an artery with filler (Vascular Occlusion), this cuts off extremely important blood flow and can eventually lead to necrosis. If this is your first DIY Injection I'd strongly suggest you get hyaluronidase; a dissolver for Hyaluronic Acid filler. Hyaluronidase acts fast, meaning if you botch yourself, inject incorrectly or have any complications, you can inject hyaluronidase in a nearby area to the filler & be fine. I would still seriously recommend you go to an ER or a hospital even after you dissolve the filler, you can never be too sure, and necrosis is really serious.
You can reconstitute Hyaluronidase similar to any peptide, and load it into a needle the same way aswell.
I’ll make a follow up thread on how I end up dissolving my filler (to reduce any chance of migration) in about 8-9 months.
With all this in mind, here’s what my setup looked like:
View attachment 4374248
I ended up sourcing topical lidocaine myself at a pharmacy, but they only allowed me to get 1% (you should try getting 5%, but even at 1% I didn’t feel pain from the injection).
1% Worked fine, I'm pretty sure I could've done it without lidocaine tbh, I would still recommend 5% for proper numbness,
Note: I told them I needed it to wax my dad's chest hair, she started talking about some bullshit post-waxing treatment instead of giving me my fucking lidocaine, stupid bitch.
ITEMS & DESCRIPTIONS:
Filler: This is the main thing I'll be injecting, the two caps at the top are equippable onto the syringe if one goes dull, but I only used 1 of the tops during this process
Dissolver: Hyaluronidase is an "anitdote" for Hyaluronic Acid, if you mess up, botch yourself etc. you'll be using this to dissolve the filler.
Needles & Saline for dissolver: Saline to put in with the Hyaluronidase as its in a powder form, then needles to extract and inject the dissolver ( I didn't have to. )
Lidocaine: Lidocaine is a topical numbing gel, I got it in a 1% concentration, which was just enough for me, but for people with more sensitive skin I'd recommend 5%
I used Revolax Deep with Lidocaine for the filler, and got my hyaluronidase (dissolver) from here
[ Note: The FDA in america are cracking down on sites selling botox specifically, acecosm is one of them, if you're reading this thread in the future and acecosm has shut down, feel free to contact me on here ]
On top of this, I had rubber gloves & alcohol wipes which i got at a grocery store to keep everything sterile, I just couldn't be asked to include it in the photo lol
This post is not a guide or tutorial, nor is it meant to encourage anyone to attempt the same procedure. I’m simply sharing my personal experience for informational purposes only. I was fully aware of the risks involved when I decided to do this myself. I am not responsible for any harm, complications, or outcomes that may occur if someone chooses to replicate or act on what I’ve done.
2. Risk-prevention measures & Technique
Throughout this injection I aspirated for each injection point, aspirating is when you leave your needle in the injection site for 10-12 seconds, and check if any blood starts leaking into the needle.
This is what it'll look like if the needle is inside an artery, if you see this while aspirating, you should change injection spots. No worries though, you can still use the same needle
View attachment 4371889
If blood does go into the needle, it's because of the higher blood pressure found in arteries, meaning I’d change injection sites and aspirate again.
(once you change injection spots you can still use the needle, it doesn't contaminate it)
I have hyaluronidase & saline on standby if I do end up, for whatever reason, injecting an artery on accident. My injection was done at 3AM on a Thursday, I couldn’t let my parents find out so I gave myself time to inject, then stayed up all night, by the time it was 9AM I could tell if I did anything wrong or not, and 6 hours is more than enough time to pass to be able to go to sleep afterwards.
Usually, professionals will get ultrasounds to guide them through being able to locate the arteries in real time, but you and I do not have access to a real time ultrasound of ourselves. Aspirating will have to do, it's not perfect, but it's somewhat reliable.
Now that we have a way to sorta eliminate the risk factor in this, you have to understand filler isn't just about not getting a VO, you also want an aesthetic result at the end of the day, and avoid migration as much as you can.
I'm going to be completely honest, you could study the shit out of the technique and still get it wrong, this chin filler was one of many DIY things I'll be doing to myself, practice makes perfect, studying doesn't. But you still want to try to mimick the perfect technique as much as you can, I've linked some videos below, you should try to study & analyze the technique yourself, I unfortunately cannot help you in this step.
I would not recommend using a cannula since your main goal here should be to go bone-deep. Cannula's are used for higher risk places that need to cover more surface area, I will probably never use a cannula as I try to avoid injecting superficially by any means.
This is the video I watched the most, and the technique I attempted to follow.
View attachment 4382424
The "professionals" injecting you are often also watching these tutorial videos too btw, most injectors at clinics are clueless
I injected a LOT slower than the injectors and was sweating while doing it, but the job was done at the end of the day.
This post is not a guide or tutorial, nor is it meant to encourage anyone to attempt the same procedure. I’m simply sharing my personal experience for informational purposes only. I was fully aware of the risks involved when I decided to do this myself. I am not responsible for any harm, complications, or outcomes that may occur if someone chooses to replicate or act on what I’ve done.
3. Injection Site
View attachment 4374549
This is the image you should keep in mind when doing filler, you'll see the well-known "triangle of death" forming with all the arteries that run through the midface, and you'll also notice the empty spot near the bottom of the chin; this is our safe space, where we can inject without too much risk (BUT STILL RISKY IF YOU ARENT EXPERIENCED). You can also see why injecting wider (for width) becomes even riskier.
Here’s a quick image that I kept in mind before injecting:
View attachment 4373902
But, of course, I ended up drawing my own lines since I'm a man, not a woman, which looked like this:
View attachment 4382352
For men, you want to draw your vertical lines starting from the end of the lips, even if you're just aiming for projection like I was, for women it starts at the nasal base since narrow chins look feminine, and wider chins look masculine.
I divided these injections across 2 sessions, 1st session covered the top 3, 2nd session covered the bottom 2.
Here's what I did (this is not my chin in the pic)
Black Lines:
Drew lines from the edges of my lips fully down
The curved line was just to surround and isolate my actual chin, basically go around the somewhat projected area, the natural curve on ur chin
Green Line:
From the center of my lips, drew a straight line, I then used this line to draw the red lines (to mark arteries)
Red Lines:
a few mm off of the center of my chin, I used the red lines to visualize where the center was, then drew red lines to the left and right of the center, this is usually where the arteries are, so I just avoided them.
Yellow Line:
After everything, I split my chin in half with another line, then I'd pick injection spots on the lower end to ensure I actually got more projection and didn't just even it out jfl
Circles:
I Made a mistake here & should've placed the center circle a bit lower, but the graphic is true to how I actually injected it, the left and right were fine, id just suggest you go a tiny bit lower than I did if you're recreating this.
!! IF RECREATING, WITH THE GOAL OF PROJECTION, I RECOMMEND INJECTING THE CENTER FURTHER DOWN, THIS WAS A NEWBIE MISTAKE BY ME
Here's another image of the drawings actually ON my chin:
View attachment 4371931
I drew this on with my eyebrow pen, you can use a marker, just don't make the lines too thick. I also didn't draw the circles, but I would recommend you do it.
4. Injection Process
By "I can feel it" I meant I could feel the filler on my bone, it wasn't painful, just funny to feel lol
Bonus vid in this thread:
I just finished doing my own Chin Filler [ Video ]
1.1ml, not much, I'm somewhat happy with the results but I need to wait for the swelling to calm down first. Heavily considering a second session, but no pain so far so im pretty happy Video is a timelapse for now, the original footage is 30 minutes and i cba to edit it all rn I'll release a...
This is the process I followed:
Needle in until i felt the texture of my bone, you'll feel a weird fuzzy feeling once you reach it, kinda like having a numb foot.
Once I reach the bone, aspirate, keep the needle in for 10-12 seconds, and monitor the needle with a nearby mirror (which was on the right, you can notice I looked at it several times)
View attachment 4376712
I usually have one of these on me with a magnifying side of the mirror ( Basically just to zoom in ), but unfortunately mine was broken during this process, I just used a mirror close to me
If the aspiration was successful and I didn't draw any blood, I would start injecting, I started pulling out slowly, then pushing back in; This is to make sure I'm not literally pushing out nothing by pressing on my bone, and that there's space for the filler to go, but not too superficially (although I did mess up for my central one and went too far out, I'd recommend staying deeper)
After feeling the filler on my bone, no blood drawn, and checking how much filler I actually used, I could finally pull the needle out and deem that area as successfully injected, and move onto the next to repeat the process.
This post is not a guide or tutorial, nor is it meant to encourage anyone to attempt the same procedure. I’m simply sharing my personal experience for informational purposes only. I was fully aware of the risks involved when I decided to do this myself. I am not responsible for any harm, complications, or outcomes that may occur if someone chooses to replicate or act on what I’ve done.
5. Healing Process & Results
Gonna be honest here, the healing process was decent, but I did several things I shouldn't have.
Don't massage or touch the filler once it's inside, the filler (at least the one I used) feels like actual bone, so you might think its fine to, but seriously, let it heal, don't touch it at all for around a week, then you're fine.
I would recommend sleeping on your back for this period, but honestly it doesn't really matter. Just make sure your injections are symmetrical & you'll be fine.
Before & Afters from 2.0ML of HA Filler:
View attachment 4382373View attachment 4382370
[ I injected too superficially as this was my first time injecting, if you could feel my chin you could actually feel a rod-like shape in the center of it lol ]
My mom started questioning why my chin was "swolen", I just dodged the questions and she didn't seem to care.
I'm sure you can come up with an excuse if you're hiding this from your parents too
View attachment 4374650
Before actually doing the filler I was just practicing reaching my bone with an empty needle without lidocaine, to test my pain tolerance (this step isnt needed), and not pushing anything inside. I thought I had hit an artery and wrote sick about it lmfao
This is not what happens when you hit an artery, this was just hitting a vein, an artery will have blood flowing out more aggressively
Wish me luck! and remember.... This post is not a guide or tutorial, nor is it meant to encourage anyone to attempt the same procedure. I’m simply sharing my personal experience for informational purposes only. I was fully aware of the risks involved when I decided to do this myself. I am not responsible for any harm, complications, or outcomes that may occur if someone chooses to replicate or act on what I’ve done.
Credits:
Videos used in this thread were recorded by @Bryce on a discord call in a groupchat.
@Sick helped me throughout this process & addressed anything I was skeptical about, also reminded me to aspirate on call since I was quite nervous.
Additional Tags:
@BigBallsLarry @Insomnia @Bryce [BWCF]
high effort post

Instantly fix chin recession | A Guide to DIY Chin filler
Injection Videos at Chap. 4
This post is not a guide or tutorial, nor is it meant to encourage anyone to attempt the same procedure. I’m simply sharing my personal experience for informational purposes only. I was fully aware of the risks involved when I decided to do this myself. I am not responsible for any harm, complications, or outcomes that may occur if someone chooses to replicate or act on what I’ve done.
31/01/2026
Orka here, I do not recommend Revolax Deep anymore. I used it for this but my results quickly faded. Do your own research into filler types & brands and don't take advice blindly.
I will be using medeyra shape for my next chin session after dissolving this.
Table Of Contents:
1. Pre-injection planning & research
2. Risk-prevention measures & Technique
3. Injection Site Explanation
4. Injection process [ VIDEOS ]
5. Healing process & results
1. Pre-injection planning
This is the most important part, you’re going to want to do your own research and not rely solely on this thread for information.
I personally went to r/DIYCosmeticProcedures & r/DIYHeaven to ask for advice, but everybody there was high inhib asf and started telling me not to do it (it ended up being fine)
View attachment 4374630
I made a post calling them high inhib retards once I did my chin filler after they told me not to kek
The main risk during the injection process is if you accidentally fill an artery with filler (Vascular Occlusion), this cuts off extremely important blood flow and can eventually lead to necrosis. If this is your first DIY Injection I'd strongly suggest you get hyaluronidase; a dissolver for Hyaluronic Acid filler. Hyaluronidase acts fast, meaning if you botch yourself, inject incorrectly or have any complications, you can inject hyaluronidase in a nearby area to the filler & be fine. I would still seriously recommend you go to an ER or a hospital even after you dissolve the filler, you can never be too sure, and necrosis is really serious.
You can reconstitute Hyaluronidase similar to any peptide, and load it into a needle the same way aswell.
I’ll make a follow up thread on how I end up dissolving my filler (to reduce any chance of migration) in about 8-9 months.
With all this in mind, here’s what my setup looked like:
View attachment 4374248
I ended up sourcing topical lidocaine myself at a pharmacy, but they only allowed me to get 1% (you should try getting 5%, but even at 1% I didn’t feel pain from the injection).
1% Worked fine, I'm pretty sure I could've done it without lidocaine tbh, I would still recommend 5% for proper numbness,
Note: I told them I needed it to wax my dad's chest hair, she started talking about some bullshit post-waxing treatment instead of giving me my fucking lidocaine, stupid bitch.
ITEMS & DESCRIPTIONS:
Filler: This is the main thing I'll be injecting, the two caps at the top are equippable onto the syringe if one goes dull, but I only used 1 of the tops during this process
Dissolver: Hyaluronidase is an "anitdote" for Hyaluronic Acid, if you mess up, botch yourself etc. you'll be using this to dissolve the filler.
Needles & Saline for dissolver: Saline to put in with the Hyaluronidase as its in a powder form, then needles to extract and inject the dissolver ( I didn't have to. )
Lidocaine: Lidocaine is a topical numbing gel, I got it in a 1% concentration, which was just enough for me, but for people with more sensitive skin I'd recommend 5%
I used Revolax Deep with Lidocaine for the filler, and got my hyaluronidase (dissolver) from here
[ Note: The FDA in america are cracking down on sites selling botox specifically, acecosm is one of them, if you're reading this thread in the future and acecosm has shut down, feel free to contact me on here ]
On top of this, I had rubber gloves & alcohol wipes which i got at a grocery store to keep everything sterile, I just couldn't be asked to include it in the photo lol
This post is not a guide or tutorial, nor is it meant to encourage anyone to attempt the same procedure. I’m simply sharing my personal experience for informational purposes only. I was fully aware of the risks involved when I decided to do this myself. I am not responsible for any harm, complications, or outcomes that may occur if someone chooses to replicate or act on what I’ve done.
2. Risk-prevention measures & Technique
Throughout this injection I aspirated for each injection point, aspirating is when you leave your needle in the injection site for 10-12 seconds, and check if any blood starts leaking into the needle.
This is what it'll look like if the needle is inside an artery, if you see this while aspirating, you should change injection spots. No worries though, you can still use the same needle
View attachment 4371889
If blood does go into the needle, it's because of the higher blood pressure found in arteries, meaning I’d change injection sites and aspirate again.
(once you change injection spots you can still use the needle, it doesn't contaminate it)
I have hyaluronidase & saline on standby if I do end up, for whatever reason, injecting an artery on accident. My injection was done at 3AM on a Thursday, I couldn’t let my parents find out so I gave myself time to inject, then stayed up all night, by the time it was 9AM I could tell if I did anything wrong or not, and 6 hours is more than enough time to pass to be able to go to sleep afterwards.
Usually, professionals will get ultrasounds to guide them through being able to locate the arteries in real time, but you and I do not have access to a real time ultrasound of ourselves. Aspirating will have to do, it's not perfect, but it's somewhat reliable.
Now that we have a way to sorta eliminate the risk factor in this, you have to understand filler isn't just about not getting a VO, you also want an aesthetic result at the end of the day, and avoid migration as much as you can.
I'm going to be completely honest, you could study the shit out of the technique and still get it wrong, this chin filler was one of many DIY things I'll be doing to myself, practice makes perfect, studying doesn't. But you still want to try to mimick the perfect technique as much as you can, I've linked some videos below, you should try to study & analyze the technique yourself, I unfortunately cannot help you in this step.
I would not recommend using a cannula since your main goal here should be to go bone-deep. Cannula's are used for higher risk places that need to cover more surface area, I will probably never use a cannula as I try to avoid injecting superficially by any means.
This is the video I watched the most, and the technique I attempted to follow.
View attachment 4382424
The "professionals" injecting you are often also watching these tutorial videos too btw, most injectors at clinics are clueless
I injected a LOT slower than the injectors and was sweating while doing it, but the job was done at the end of the day.
This post is not a guide or tutorial, nor is it meant to encourage anyone to attempt the same procedure. I’m simply sharing my personal experience for informational purposes only. I was fully aware of the risks involved when I decided to do this myself. I am not responsible for any harm, complications, or outcomes that may occur if someone chooses to replicate or act on what I’ve done.
3. Injection Site
View attachment 4374549
This is the image you should keep in mind when doing filler, you'll see the well-known "triangle of death" forming with all the arteries that run through the midface, and you'll also notice the empty spot near the bottom of the chin; this is our safe space, where we can inject without too much risk (BUT STILL RISKY IF YOU ARENT EXPERIENCED). You can also see why injecting wider (for width) becomes even riskier.
Here’s a quick image that I kept in mind before injecting:
View attachment 4373902
But, of course, I ended up drawing my own lines since I'm a man, not a woman, which looked like this:
View attachment 4382352
For men, you want to draw your vertical lines starting from the end of the lips, even if you're just aiming for projection like I was, for women it starts at the nasal base since narrow chins look feminine, and wider chins look masculine.
I divided these injections across 2 sessions, 1st session covered the top 3, 2nd session covered the bottom 2.
Here's what I did (this is not my chin in the pic)
Black Lines:
Drew lines from the edges of my lips fully down
The curved line was just to surround and isolate my actual chin, basically go around the somewhat projected area, the natural curve on ur chin
Green Line:
From the center of my lips, drew a straight line, I then used this line to draw the red lines (to mark arteries)
Red Lines:
a few mm off of the center of my chin, I used the red lines to visualize where the center was, then drew red lines to the left and right of the center, this is usually where the arteries are, so I just avoided them.
Yellow Line:
After everything, I split my chin in half with another line, then I'd pick injection spots on the lower end to ensure I actually got more projection and didn't just even it out jfl
Circles:
I Made a mistake here & should've placed the center circle a bit lower, but the graphic is true to how I actually injected it, the left and right were fine, id just suggest you go a tiny bit lower than I did if you're recreating this.
!! IF RECREATING, WITH THE GOAL OF PROJECTION, I RECOMMEND INJECTING THE CENTER FURTHER DOWN, THIS WAS A NEWBIE MISTAKE BY ME
Here's another image of the drawings actually ON my chin:
View attachment 4371931
I drew this on with my eyebrow pen, you can use a marker, just don't make the lines too thick. I also didn't draw the circles, but I would recommend you do it.
4. Injection Process
By "I can feel it" I meant I could feel the filler on my bone, it wasn't painful, just funny to feel lol
Bonus vid in this thread:
I just finished doing my own Chin Filler [ Video ]
1.1ml, not much, I'm somewhat happy with the results but I need to wait for the swelling to calm down first. Heavily considering a second session, but no pain so far so im pretty happy Video is a timelapse for now, the original footage is 30 minutes and i cba to edit it all rn I'll release a...
This is the process I followed:
Needle in until i felt the texture of my bone, you'll feel a weird fuzzy feeling once you reach it, kinda like having a numb foot.
Once I reach the bone, aspirate, keep the needle in for 10-12 seconds, and monitor the needle with a nearby mirror (which was on the right, you can notice I looked at it several times)
View attachment 4376712
I usually have one of these on me with a magnifying side of the mirror ( Basically just to zoom in ), but unfortunately mine was broken during this process, I just used a mirror close to me
If the aspiration was successful and I didn't draw any blood, I would start injecting, I started pulling out slowly, then pushing back in; This is to make sure I'm not literally pushing out nothing by pressing on my bone, and that there's space for the filler to go, but not too superficially (although I did mess up for my central one and went too far out, I'd recommend staying deeper)
After feeling the filler on my bone, no blood drawn, and checking how much filler I actually used, I could finally pull the needle out and deem that area as successfully injected, and move onto the next to repeat the process.
This post is not a guide or tutorial, nor is it meant to encourage anyone to attempt the same procedure. I’m simply sharing my personal experience for informational purposes only. I was fully aware of the risks involved when I decided to do this myself. I am not responsible for any harm, complications, or outcomes that may occur if someone chooses to replicate or act on what I’ve done.
5. Healing Process & Results
Gonna be honest here, the healing process was decent, but I did several things I shouldn't have.
Don't massage or touch the filler once it's inside, the filler (at least the one I used) feels like actual bone, so you might think its fine to, but seriously, let it heal, don't touch it at all for around a week, then you're fine.
I would recommend sleeping on your back for this period, but honestly it doesn't really matter. Just make sure your injections are symmetrical & you'll be fine.
Before & Afters from 2.0ML of HA Filler:
View attachment 4382373View attachment 4382370
[ I injected too superficially as this was my first time injecting, if you could feel my chin you could actually feel a rod-like shape in the center of it lol ]
My mom started questioning why my chin was "swolen", I just dodged the questions and she didn't seem to care.
I'm sure you can come up with an excuse if you're hiding this from your parents too
View attachment 4374650
Before actually doing the filler I was just practicing reaching my bone with an empty needle without lidocaine, to test my pain tolerance (this step isnt needed), and not pushing anything inside. I thought I had hit an artery and wrote sick about it lmfao
This is not what happens when you hit an artery, this was just hitting a vein, an artery will have blood flowing out more aggressively
Wish me luck! and remember.... This post is not a guide or tutorial, nor is it meant to encourage anyone to attempt the same procedure. I’m simply sharing my personal experience for informational purposes only. I was fully aware of the risks involved when I decided to do this myself. I am not responsible for any harm, complications, or outcomes that may occur if someone chooses to replicate or act on what I’ve done.
Credits:
Videos used in this thread were recorded by @Bryce on a discord call in a groupchat.
@Sick helped me throughout this process & addressed anything I was skeptical about, also reminded me to aspirate on call since I was quite nervous.
Additional Tags:
@BigBallsLarry @Insomnia @Bryce [BWCF]


meaning gaining chin width is also possible from it?You can customize your results by altering the injection spots, the injection spots in my graphic are primarily for projection
You're adding mass to an area of your face, you can shape it however you wantmeaning gaining chin width is also possible from it?
i didnt fully ask in depth, the answer is still probably yes but i was asking because i wasnt sure if the chin width also affected the fat pads in my cheeks, will it cause the illusion of having less empty mass in my hollows themselves? like from a bit wider than the mouth to the width of the mandible after. Or do i need fat grafts? Not in the same department really but if you know that would helpYou're adding mass to an area of your face, you can shape it however you want
The answer is yes incase that wasnt clear


This sounds like ai niggathe thread is high effort but id strongly go against the diy injection part especially because the op admits he was a first timer and injected too superficially in some places aspiration doesnt magically make diy filler safe either vascular occlusion can still happen and serious complications can develop quickly professional injectors can use better anatomical knowledge and sometimes ultrasound guidance while copying injection points from a forum gives u none of that the before and after can look convincing but one persons result doesnt prove the method is safe or consistently effective if someone genuinely has chin recession the sensible move is getting assessed by a qualified professional and discussing filler or other options instead of injecting yourself especially if youre young


