


prolific
Iron
- Joined
- Jun 12, 2026
- Posts
- 25
- Reputation
- 12
This method is theoretical and works only if you're 15 or under. I haven't tried it yet but I will in the near future. I’m not an orthodontist or a doctor so applying this method in real life is at your own risk.
This expander is specifically a rapid palatal expander aka a hyrax expander, without screws drilled into your skull. This method should be under 150$ but you can cut costs if you make multiple appliances or do it with your friends.
Before you start on this guide I recommend you learn the basics and do some research for your age and if the expander is good for you.
This guide is a bit rushed but i will make a better one in the future.
Table of contents
1. Materials
2. Dental spacing
3. Impressions and measurements
4. Crafting the expander
5. Installing the appliance
6. Routine
7. Reverse pull hooks(optional)
1. Materials
I recommend getting your materials very cheap from places like ebay or aliexpress. There are some specific parts that i havent found on aliexpress so thats why i also use ebay. I recommend not getting the cheapest items because they might be low quality. The only exception will be the dental plaster and the play dough since it's too heavy and you will pay unnecessary shipping so just buy it from a local (online) store.
All materials you need:
This expander is specifically a rapid palatal expander aka a hyrax expander, without screws drilled into your skull. This method should be under 150$ but you can cut costs if you make multiple appliances or do it with your friends.
Before you start on this guide I recommend you learn the basics and do some research for your age and if the expander is good for you.
This guide is a bit rushed but i will make a better one in the future.
Table of contents
1. Materials
2. Dental spacing
3. Impressions and measurements
4. Crafting the expander
5. Installing the appliance
6. Routine
7. Reverse pull hooks(optional)
1. Materials
I recommend getting your materials very cheap from places like ebay or aliexpress. There are some specific parts that i havent found on aliexpress so thats why i also use ebay. I recommend not getting the cheapest items because they might be low quality. The only exception will be the dental plaster and the play dough since it's too heavy and you will pay unnecessary shipping so just buy it from a local (online) store.
All materials you need:
1. Elastic separators 5-10$
2. Dental floss string / nylon floss 2-10$
3. Dental impression tray 5-10$
4. Dental impression putty 10-30$
5. Dental plaster (alginate) +- 10$ / 500g
6. Play dough (any kind that doesn't move easily) 2-10$
7. Orthodontic expander kit(rapid palatal expander or hyrax) 5-15$
8. 0.9 - 1.0 mm stainless steel dental wire 2.5$
9. Molar bands 3-8$
10. Soldering iron/kit 6-20$
11. Rounded nose pliers 5-10$, flat nose pliers 5-10$ and side cutters 5-15$ or combination pliers 10-20$ (if you have orthodontic pliers, use them)
12. Double headed mouth opener 1$
13. Dental mirror 3$
Total:
Min 69.5$ (excl. Pliers = 54.5$)
Max 164.5 (excl. Pliers = 129.5$)
If you have the pliers you can exclude pliers from the list.
2. Dental spacing
For the molar bands(9) to fit you will need space around the first molar. On some rare occasions you might have some space but most likely not. To create space in between the first molar we will use dental elastic separators(1). You will have to wear them for around one week. For some people it might hurt but it will be worth it.
To place the elastic separators(1) you will need 2 pieces of dental floss(2). And follow the steps from the video I provided.
https://www.youtube.com/watch?v=yq5UaNOmVx0
3. Impressions and measurements
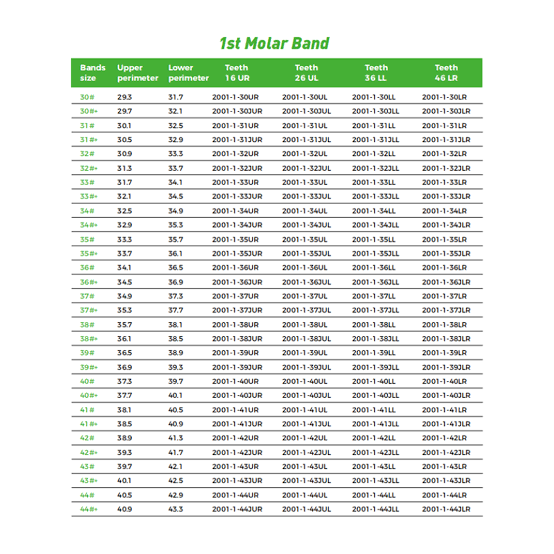
Before we even start purchasing our materials, you need to check what size your molars are so your molar bands(9) fit. For that we will use dental floss or nylon floss(2). Wrap the dental floss around your molar at the bottom and mark it with a marker so you know the lower perimeter.
Some dentists guess the size, and fit it until they get it right but I know some people don't have the money for that or you could just buy an expander pre-made. Use this chart i provided to find your size and add 2 sizes to it so you're sure it fits.
2. Dental floss string / nylon floss 2-10$
3. Dental impression tray 5-10$
4. Dental impression putty 10-30$
5. Dental plaster (alginate) +- 10$ / 500g
6. Play dough (any kind that doesn't move easily) 2-10$
7. Orthodontic expander kit(rapid palatal expander or hyrax) 5-15$
8. 0.9 - 1.0 mm stainless steel dental wire 2.5$
9. Molar bands 3-8$
10. Soldering iron/kit 6-20$
11. Rounded nose pliers 5-10$, flat nose pliers 5-10$ and side cutters 5-15$ or combination pliers 10-20$ (if you have orthodontic pliers, use them)
12. Double headed mouth opener 1$
13. Dental mirror 3$
Total:
Min 69.5$ (excl. Pliers = 54.5$)
Max 164.5 (excl. Pliers = 129.5$)
If you have the pliers you can exclude pliers from the list.
2. Dental spacing
For the molar bands(9) to fit you will need space around the first molar. On some rare occasions you might have some space but most likely not. To create space in between the first molar we will use dental elastic separators(1). You will have to wear them for around one week. For some people it might hurt but it will be worth it.
To place the elastic separators(1) you will need 2 pieces of dental floss(2). And follow the steps from the video I provided.
https://www.youtube.com/watch?v=yq5UaNOmVx0
3. Impressions and measurements
Before we even start purchasing our materials, you need to check what size your molars are so your molar bands(9) fit. For that we will use dental floss or nylon floss(2). Wrap the dental floss around your molar at the bottom and mark it with a marker so you know the lower perimeter.
Some dentists guess the size, and fit it until they get it right but I know some people don't have the money for that or you could just buy an expander pre-made. Use this chart i provided to find your size and add 2 sizes to it so you're sure it fits.
Now after dental spacing we are gonna make a mold of our upper arch. For that you need your dental impression tray(3) and your dental impression putty(4). Mix the 2 parts of the dental impression putty and put it in the impression tray. Make sure the roof of your mouth is also clear so you can know where to put the expander. Before the next step make sure your mouth is very clean and then put the impression tray in your mouth and make sure the handle is aligned with your nose. Now, bite on it and make sure your impression is clear. Put your tongue under it so it isn't part of the impression. Leave the impression tray as long as the manufacturer's instructions specify, usually around 2-5 minutes. Now rinse your mouth.
The next stage is pouring the dental stone(5). Start by mixing the powder with water, the ratio usually depends on the specific brand since there isn't an universal ratio. Now pouring the dental stone can get very messy so put something on your table or whatever you're working on. Pour the dental stone slowly and gently from left to right and back. If you have a vibrator or something like a phone, use it on the impression so the air bubbles go to the top, feel free to pop them. Now let it sit until it dries up and hardens. Dental stone hardens fast so be quick. You can also ask an orthodontist to do your impression.
4. Crafting the expander
To craft an expander you need your dental impression ready. First fit the molar band(9) onto the first molar. Try to fit and shape the band on the molar. If there is stone in between the teeth, carefully chip it away so it matches your teeth, don't mess this up because it's the most expensive part to redo the dental impression. Once the molar band is in, keep it there. Next, we are gonna weld the wire(8) that touches the premolars to the molar band with the soldering iron(10). It has to touch the second premolar and the first one and place it as low as possible. Sometimes you have to bend the wire to touch both premolars. Make sure it doesn't touch the soft tissue or you will damage it. After that, get your expander and test it to see if it expands. If it works, draw a line along the mid-palatine suture and place your expander(7) parallel with the suture as close as possible without it touching the roof of your mouth. If it does touch it, bend the wires so it doesn't touch the palate. When it’s in place, put a small piece of play dough under it so it doesn't move. Mark the place where you will cut the wires of the expander, just where it's touching or a little higher. Then cut it and place the expander back, you can see where it was placed because of the play dough. Then take your soldering iron and weld the expander to the molar bands. I know you might not understand everything at first so I provided a video.
5. Installing the appliance
Let your appliance cool down and clean it with some water. Make sure to also sterilize it. If the appliance fits on the dental impression it should also fit in your mouth. To install the appliance you need your double headed mouth opener(12) in for space but this part is optional. If the appliance fits and you don't feel the need to adjust it, congratulations you did it, you successfully crafted your rapid palatal expander. I don't recommend cementing it. Try it out for a few days or a week to see if it's good.
6. Routine
The routine depends on the patient, do research for yourself instead of just turning whenever you feel like. After expansion keep the expander in or use a retainer so you dont relapse.
7. Reverse pull hooks
This method is optional but if you also want to use a reverse pull face mask during your expansion you need to add reverse pull hooks on your expander. To make them, get some steel wire and bend it so you have 2 equal hooks. Then weld them to the molar bands. Get ¼ elastics for your reverse pull face mask and the face mask.


