







ahmaszein
100% Pure Looksmaxxing
- Joined
- Feb 17, 2026
- Posts
- 200
- Reputation
- 147
Disclaimer: This is not medical advice. This is a DIY procedure with real risks. I'm sharing what I've learned and what worked for me. I'm not encouraging anyone to do this. If you're considering it, read the warnings. If you're not sure, don't do it. Simple as that.
My Old Guide : https://looksmax.org/threads/the-ul...nthus-cutting-guide-hardmaxx-edition.2328607/
Intro:
Alright, so I've been getting a lot of DMs about my previous medial canthus thread. The old one was decent, but I've refined the process, learned from mistakes, and figured out the optimal recut timing. This is the updated, best version. It's longer, more detailed, and includes everything I wish I knew when I started.
Before we get into it: this is a procedure that involves cutting near your eye. It's not a game. If you're careless, you can get an infection, a nasty scar, or worse. I'm not your doctor, and I'm not responsible if you fuck yourself up. Read everything, understand the risks, and proceed at your own discretion.
Why Medial Canthus Cutting?
For those new to this: the medial canthus is the inner corner of your eye. By cutting and scarring it in a controlled way, you can make the eye appear longer horizontally. It changes your PSL, especially your eye area. It's not a magic pill, but it's one of the few hardmaxxes that can actually change your eye shape permanently.
The Anatomy – What You Need to Know
Before you even think about cutting, you need to understand the layers:
The Tools
You don't need much, but you need the right stuff:
Post-Cut Care
Recutting – The Deep Analysis
A single cut heals too softly. The epidermis closes, the scab falls off, and the corner returns to its original position. You need to recut to train the scar tissue to hold the new shape.
Healing Phases (Epidermis-Only Cut)
If you miss the window: Wait until the scar is fully mature (8 weeks), then start a new series of cuts. Do not try to recut a hard, mature scar—it will tear irregularly.
Pre-Recut Preparation
Recut Timeframe Analysis Summary
Key Rules from the PDF
This is the updated, most comprehensive guide I can put together. It's not a walk in the park. It takes patience, precision, and a tolerance for some pain. But if you follow the depth limit strictly, keep everything clean, and wait the proper time between cuts, you can see results.
Good luck, and stay safe.
My Old Guide : https://looksmax.org/threads/the-ul...nthus-cutting-guide-hardmaxx-edition.2328607/
Intro:
Alright, so I've been getting a lot of DMs about my previous medial canthus thread. The old one was decent, but I've refined the process, learned from mistakes, and figured out the optimal recut timing. This is the updated, best version. It's longer, more detailed, and includes everything I wish I knew when I started.
Before we get into it: this is a procedure that involves cutting near your eye. It's not a game. If you're careless, you can get an infection, a nasty scar, or worse. I'm not your doctor, and I'm not responsible if you fuck yourself up. Read everything, understand the risks, and proceed at your own discretion.
Why Medial Canthus Cutting?
For those new to this: the medial canthus is the inner corner of your eye. By cutting and scarring it in a controlled way, you can make the eye appear longer horizontally. It changes your PSL, especially your eye area. It's not a magic pill, but it's one of the few hardmaxxes that can actually change your eye shape permanently.
The Anatomy – What You Need to Know
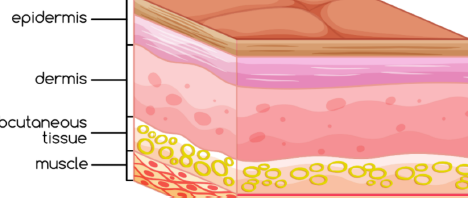
Before you even think about cutting, you need to understand the layers:
- Epidermis: The top layer. It's thin and easy to cut. This is the only layer you should be cutting.
- Dermis: The layer below. It's tough and fibrous. If you feel resistance, you're hitting the dermis. Stop.
- Subcutaneous layer: Contains arteries and veins. Around the medial canthus, these are about 1–3mm deep. If you cut into this layer, you risk hitting a vessel. That's a hospital trip.
- The tendon: There's a tendon under the skin. You're not cutting that. You're just scarring the skin to create a new shape.
The Tools
You don't need much, but you need the right stuff:
- A mirror (obviously)
- Clean cloth pieces
- Cotton wool
- A blade – ideally a surgical blade or scalpel. An eyebrow razor works in a pinch, but it's not ideal. It might tear rather than cut cleanly. Use very light strokes.
- Isopropyl alcohol (for sterilizing)
- Antibiotic cream
- Ice cubes
- Set up: Sit against a mirror in bright light. Tie back your hair. Keep your face still.
- Sterilize the blade: Soak it in isopropyl alcohol for 10 minutes. Air-dry. Do not touch the cutting edge.
- Clean the area: Close your eyes. Wipe the medial canthus area with an alcohol pad or cotton wool soaked in isopropyl alcohol. Let it dry. Do not get alcohol in your eye.
- Numb (optional): You can hold an ice cube wrapped in a cloth against the inner corner for 1–2 minutes to reduce pain. Don't over-ice.
- Mark the line (if possible): The PDF says mark 4–5 mm at a 45-degree downward angle. If you don't have a marker, visualize a short diagonal line at the inner corner, angled down and slightly inward. Stay within the inner corner area—do not go onto the nose or the eyeball.
- Hold the blade: Use your dominant hand. Rest your other hand on your cheek to steady.
- Position: Look straight into the mirror. Locate the medial canthus—the pinkish inner corner where the upper and lower lids meet.
- First scratch: With the tip of the blade, make a very light scratch along your imagined 4–5 mm line. You are only cutting the epidermis. It should feel like a cat scratch—superficial.
- Check depth: If you feel resistance and need to press hard, you are hitting the dermis. Stop. Do not force it. Only the epidermis should be cut.
- Bleeding: Mild capillary oozing is normal. If it gushes, you went too deep or hit a vessel. Apply pressure with clean cotton wool or cloth for 2–3 minutes.
- Clean: Wipe blood with cotton wool. You can clean with isopropyl alcohol (it stings) or sterile saline if you have it. Use alcohol sparingly and keep it out of the eye.
- Antibiotic cream: Apply a thin layer of antibiotic cream to the cut.
- Ice: Hold an ice cube wrapped in cloth against the area for 5 minutes to reduce swelling.
Post-Cut Care
- First 24 hours: Keep the area dry. Do not rub. Apply antibiotic cream 2–3 times.
- Days 1–3: A small scab will form. Do not pick it. Keep it clean. Ice if swollen.
- Days 4–7: The scab falls off. The cut heals. You may see a slight change in the corner shape.
- After healing: You need to repeat the cut multiple times until the scar holds the extended shape. Wait 1–2 weeks between sessions to let the skin recover. Cut again along the same line.
- Timeline: Expect 3–5 sessions over 1–2 months for a visible permanent change. Each session adds a small amount of length.
- Pus at the site
- Increasing redness, swelling, or pain
- Vision changes
- Fever
- Heavy bleeding that won't stop
Recutting – The Deep Analysis
A single cut heals too softly. The epidermis closes, the scab falls off, and the corner returns to its original position. You need to recut to train the scar tissue to hold the new shape.
Healing Phases (Epidermis-Only Cut)
- Hemostasis: Immediate. Blood clots, capillary oozing stops.
- Inflammation: Day 0–3. Redness, mild swelling, scab forms.
- Proliferation: Day 3–7. New epidermal cells migrate across the wound. Scab loosens.
- Early Remodeling: Day 7–14. Skin is closed but fragile. Collagen is being laid down. The scar is still soft and modifiable.
- Late Remodeling: Day 14–60+. Collagen cross-links. Scar contracts and matures. The shape becomes fixed.
- Too early (before Day 7): Skin is not closed. Recutting reopens the wound, increases infection risk, and causes irregular scarring.
- Optimal (Day 10–14): Skin is closed, scab is gone, but the scar is still soft. Recutting now interrupts early remodeling and forces the new shape.
- Too late (after Day 21–28): The scar has begun to mature and contract. Recutting is less effective.
- After full maturation (8+ weeks): The scar is permanent. Recutting at this stage is essentially a new cut, not a refinement.
- First cut: Day 0
- Recut 1: Day 10–14
- Recut 2: Day 24–28
- Recut 3: Day 38–42
- Final assessment: 6–8 weeks after last cut
If you miss the window: Wait until the scar is fully mature (8 weeks), then start a new series of cuts. Do not try to recut a hard, mature scar—it will tear irregularly.
Pre-Recut Preparation
- Assess readiness: Look at the previous cut site. The scab must be gone. The skin must be closed. There should be no redness, pus, or pain. If any of these are present, wait another 3–5 days.
- Set up: Sit against a mirror in bright light. Tie back hair. Keep your head steady.
- Sterilize the blade: Soak in isopropyl alcohol for 10 minutes. Air-dry.
- Clean the area: Close your eyes. Wipe the medial canthus with alcohol-soaked cotton wool. Let it dry.
- Numb (optional): Hold an ice cube wrapped in cloth against the inner corner for 1–2 minutes.
- Locate the previous line: You should see a faint scar or a slightly different texture along the original cut. If you cannot see it, trace the same 4–5 mm diagonal line at 45 degrees downward from the inner corner.
- Hold the blade: Dominant hand. Rest your other hand on your cheek to steady.
- Position: Look straight into the mirror. Locate the medial canthus.
- Light scratches: With the tip of the blade, make very light scratches along the same line. You are only reopening the epidermis. It should feel like a cat scratch—superficial.
- Do NOT press hard: If you feel resistance, you are hitting the dermis. Stop. Do not force it.
- Bleeding: Mild capillary oozing is normal. If it gushes, you went too deep. Apply pressure with clean cotton wool for 2–3 minutes.
- Clean: Wipe blood with cotton wool. You can clean with isopropyl alcohol (it stings) or sterile saline. Use alcohol sparingly.
- Antibiotic cream: Apply a thin layer.
- Ice: Hold an ice cube wrapped in cloth against the area for 5 minutes to reduce swelling.
- First 24 hours: Keep dry. Do not rub. Apply antibiotic cream 2–3 times.
- Days 1–3: Scab forms. Do not pick it. Keep clean. Ice if swollen.
- Days 4–7: Scab falls off. Skin closes. The corner may look slightly more extended.
- Days 7–10: Skin is closed but fragile. Do not stretch or rub.
- Day 10–14: Ready for next recut if needed.
Recut Timeframe Analysis Summary
- Recut before Day 7: Too early. Infection risk, irregular scar, poor shape.
- Recut Day 10–14: Optimal. Interrupts early remodeling, reinforces new shape.
- Recut Day 15–21: Acceptable. Still effective, but scar is starting to mature.
- Recut after Day 28: Less effective. Scar has contracted. Recut acts as a new wound.
- Wait 8+ weeks: Full maturation. Scar is permanent. Start a new series if needed.
- The corner holds the new lowered position without reopening.
- You have completed 3–4 recuts.
- The scar is no longer soft when you touch it.
- Further cutting risks hypertrophic scarring or asymmetry.
Key Rules from the PDF
- Epidermis only. Cat scratches, not deep cuts.
- Stay within the inner corner box. Not on the nose, not on the eyeball.
- Avoid the angular vein. If you see blue, do not cut there.
- Repeat sessions. One cut will not be enough.
- Keep it clean. Alcohol, antibiotic cream, dry environment.
- Use a proper blade if possible. Eyebrow razor is a poor substitute.
This is the updated, most comprehensive guide I can put together. It's not a walk in the park. It takes patience, precision, and a tolerance for some pain. But if you follow the depth limit strictly, keep everything clean, and wait the proper time between cuts, you can see results.
Good luck, and stay safe.
@IncelJesterr
@Dravadre
@shark
@Dnrc
@ajdksisod
@kdam
@wowitsmeomg
@Vodxi
@Sxmon210
@NizzyNeesh
@jojomojo999
@mathuuu
@Furak
@d1kstop
@ProtectiveShield
@IncelJesterr
@Dravadre
@shark
@Dnrc
@ajdksisod
@kdam
@wowitsmeomg
@Vodxi
@Sxmon210
@NizzyNeesh
@jojomojo999
@mathuuu
@Furak
@d1kstop
@ProtectiveShield
@IncelJesterr
Last edited:





